Restrictions on the Mac provides a way for parents to control and monitor the applications, settings, and features their children can access on their Apple devices. While in many cases this feature is useful, some apps, like Google Hangout or Skype, allow you to place phone calls or video conferences with another person. For example, you might also wish to have limited abilities in FaceTime so that your child can still use this tool to video chat with friends and family. Thankfully, there is an easy way to allow access to the camera on a Mac computer.
In the MacBook, many applications aren’t allowed to access the camera for any reason. In this article, we will show how to overcome the problem.
Allowing the camera access
Sometimes the camera access is turned off for all the systems. For this, we will show how to Turn on access for all apps after that will show individually.
Turning on the for all of the application
- For activating the camera for the Mac first go to the desktop screen of the Mac.
- Now click the ‘Apple’ icon from the top left corner of the screen.
- After that Click the option ‘System Preferences. . .’

- Now Click the option search box.
- Then type ‘Parental Control’ on the search box and press enter to see the search result.
- Click the option ‘Parental Control’ icon to open the Parental Control window.
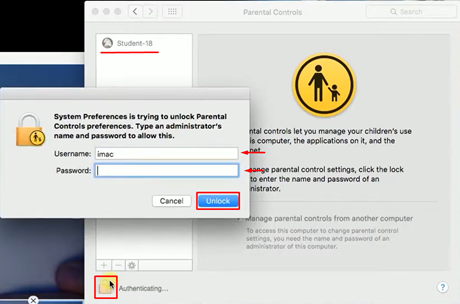
- Then you will find your user account in the list. Here my user account name is Student-18. First, you have to unlock the user account by giving your admin user id and password to make changes to activate the camera. For this Click, the ‘Lock’ icon from the bottom left corner of the ‘Parental Control’ window.
- Now give the Username and Password of your admin account in the new pop-up window.
- Click the option ‘Unlock’ option to access the user account.
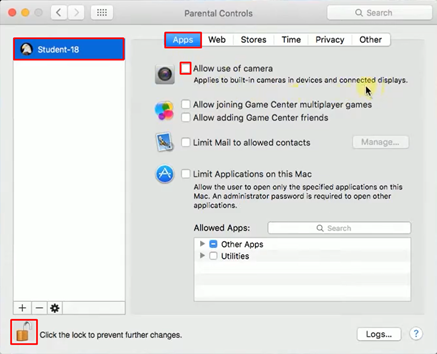
- After unlocking click on that user account name which settings you want to change.
- Now click the option ‘Apps’ from the top of the window.
- Here you will find some controlling options along with the camera. If the ‘Allow use of camera’ option is unchecked then no app of your Mac is allowed to use the camera, If the ‘Allow use of camera’ option is checked then your camera is allowed to use. Now put the tick mark if it is not checked yet.
- Finally, Click the option unlock button to protect the changes. After these settings go through the next step to give access individually.
Giving Camera access to an application: - At first, go to your desktop of your Mac.
- After that click, the icon ‘Apple’ from the top left corner of the screen.
- Then click the option ‘System Preferences. . .’ from the drop-down menu to open it.
- From the ‘System Preferences. . .’ window Click the option search box from the top right corner.
- Noe type ‘Security & Privacy’ in the search box.
- After typing press Enter to see the search result.
- Now click the icon of ‘Security & Privacy’ from the search result to open it.
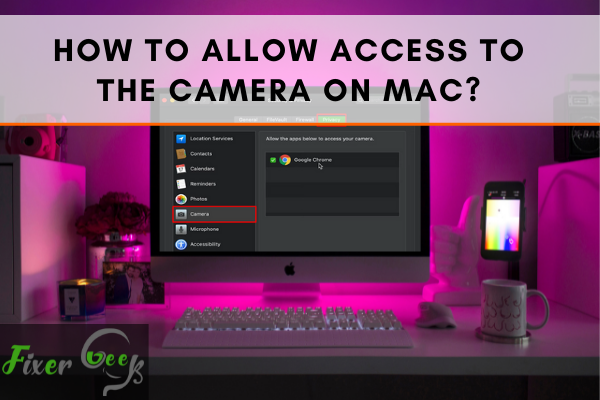
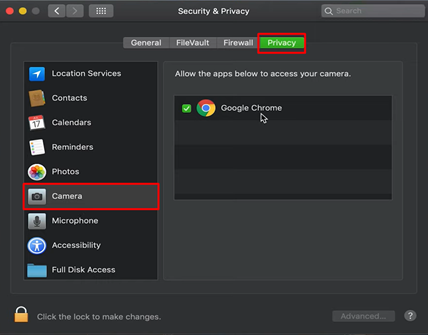
- In the ‘Security & Privacy’ control window, you will see four options at the top of the window, those are General, FileVault, Firewall, and Privacy. Click the option ‘Privacy’ option to see the list of the category of the information which can be used by an application.
- Now select the ‘Camera’ option from the list.
- Now you will see the list of apps that can use the camera from your Mac. If the check box before the app name is blank then it has no access to use the Camera but if the check box is checked then your app has the access to the camera. Put the checkmark on the check box of the application to give access to your Mac camera.
- Your application is now able to access the camera now. Close the current window and start using the camera with your desired application.
Summary: Access to the camera on Mac
- Go to System Preferences.
- Click the Security & Privacy icon.
- Select the Privacy tab.
- Click the lock icon in the lower-left corner and enter your administrator password.
- Select Camera in the left menu.
- Check the box next to an app to allow it to access your Mac’s camera.
