For most computer users, the word "Java" is synonymous with "security risk." Java has been plagued by one security flaw after another and often gets singled out as a target for hackers. Despite its reputation as a security threat, Java continues to be installed on a majority of web browsers and is rarely uninstalled. This post will show you how to allow Java applets through your firewall so you don't have to worry about installing a browser without this feature.
Java is an object-oriented programming language centered on classes that are designed to have fewer implementation requirements. It is a platform for developing applications, and it is secure, reliable, and fast. It is used to construct Java applications on the computer, mobiles, data center, etc.

The Firewall program on your Windows sometimes blocks using Java as this is in charge of determining which programs and services are permitted to connect to a network. You’ll need to allow Java through Windows Firewall to use it, and I’ll describe to you how.
Allowing Java Through Firewall
You can allow Java or add any exceptions on the Firewall following simple steps, and those are –
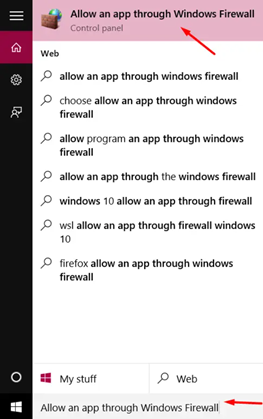
- Click on the Windows start menu search bar, type “Allow an app through,” and select the top option.
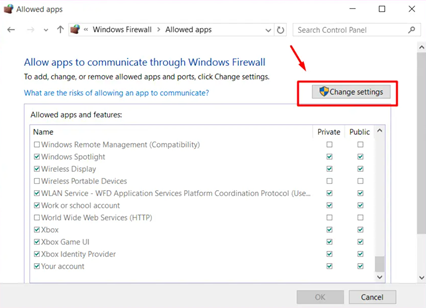
- Click on the “Change settings” option.
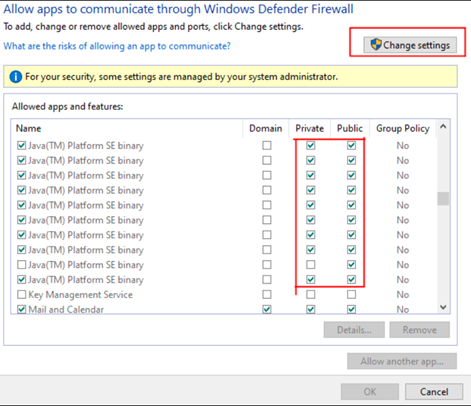
- Find the Java featured applications and tick the checkboxes for each type of network. The private network option gives access to work or home networks, where the public network option allows public access. It would be best if you ticked both network options to run it smoothly.
- Click on the “OK” option to save the changes.
How do I Enable Java Access from Control Panel?
Sometimes Java content is disabled in the browser, and as a result, applets do not run. To use the Java content, you need to configure the browser settings in the Java control panel. To do so –
- Go to the “Java Control Panel.” Select the “Security” option.
- Tick the checkbox for “Enable Java content.”
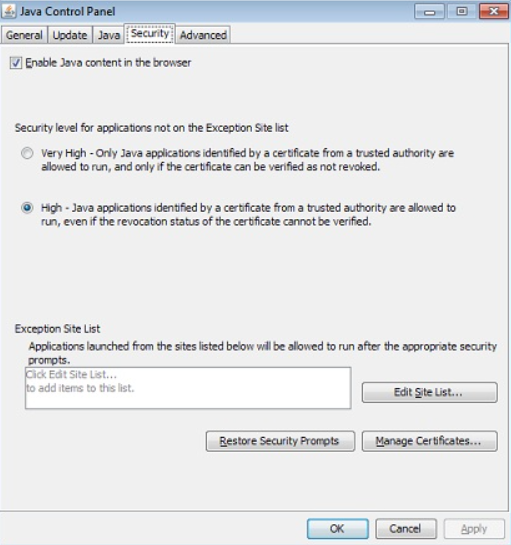
- Click the “OK” option and restart your browser. The applets problem should be solved.
How do I Know if My Firewall is Blocking Any Port?
Regardless of the threat level, the Firewall may deny any suspicious or destructive connection. In Windows 10 and perhaps other editions, users can customize the Windows Firewall rules to block or enable ports as needed. If you are facing such problems, knowing the blocked ports will help to mitigate the issue.
To know the blocked ports in Firewall
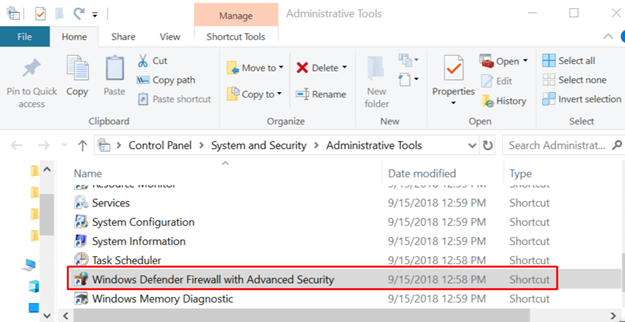
- Click the Windows button and R together to launch the “Run” program.
- Type “Control,” then click on “OK” to launch the “Control Panel” folder.
- Open “System and Security.”
- Click on the “Administrative Tools.”
- Select the Windows Firewall option.
- Open “Action” and navigate to “Properties.”
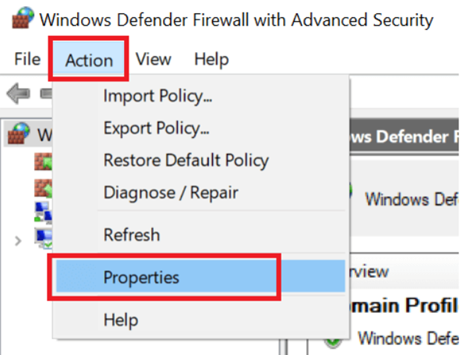
- Choose the preferred profile (Private, Public, or Domain).
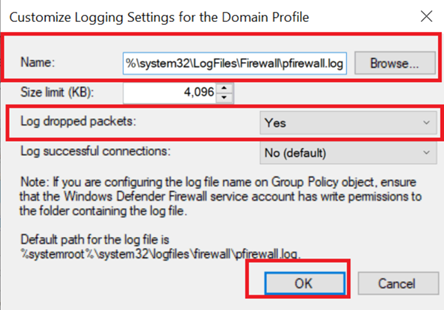
- Click the “Customize” option under “Logging.”
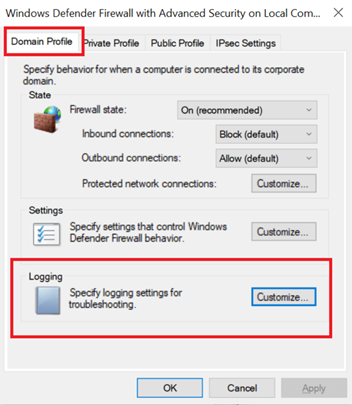
- Select “Yes” from the drop-down option for Log dropped packets.
- Save the path for pfirewall.log in the “Name” bar. Click on the “OK” option and save the changes.
- Go to the “File Explorer” and navigate to your saved pfirewall.log path.
- Open the pfirewall.log files and check the ports that have been blocked.
How to Check the Blocked Ports with the Command Prompt?
- Go to the windows search bar and type “cmd.”
- Right-click the “Command Prompt” option and select “Run as Administrator.”
- Type “netsh firewall show state” in the cmd.
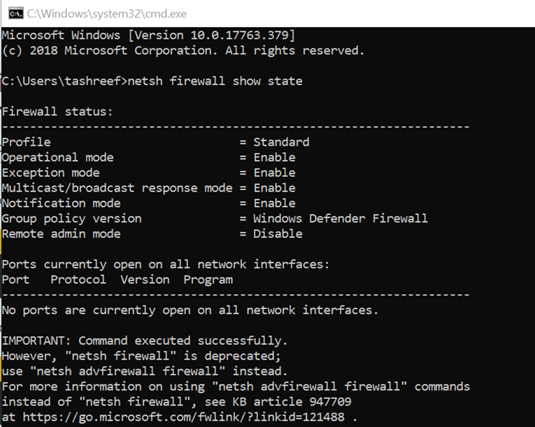
- If any port is blocked in the Firewall, it will show the list.
Summary: Allow Java Through Firewall
- Go to Control Panel.
- Click on System and Security.
- Find Windows Firewall and click on it.
- You will see Allow an app through Windows Firewall at the top of the screen.
- Click Change Settings and then check Java Platform SE binary to allow it through the firewall.
- Click OK to save changes.
- Now you have allowed Java through your firewall.
