Technical issues with your Amazon account can be a real pain. It’s hard to use the services you’re paying for if you can’t get past their email verification! Fortunately, there is an easy way to change Amazon email settings and get back to shopping. If you can’t remember your password or simply didn’t set up an account with a password, you have to change Amazon email settings before you can move forward. If this is your problem, just keep reading for the tips and tricks to updating Amazon emails.
One of the main reasons many people don’t like changing their e-mail account is to avoid the inconvenience that comes with it. There are some instances, however, when doing so is completely inevitable, be it due to a personal choice or a completely work-related matter.
The tricky part is that your e-mail address is associated with different accounts and platforms. Fortunately, changing your e-mail settings in your Amazon account does not require such a tedious work.
In today’s post, you can learn how to easily get away with changing your Amazon e-mail settings and other e-mail management tips without breaking a sweat.
Adding a New E-mail Address To Your Account
The first thing you need to do is go to the Amazon websitze. Look for the “Accounts & Lists,” which you can find on the right side of the screen. Click “Login & Security.”
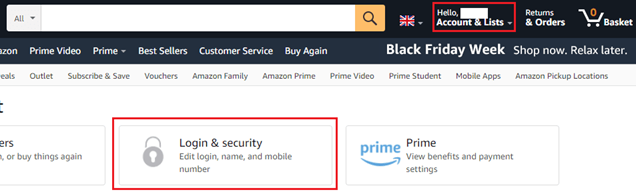
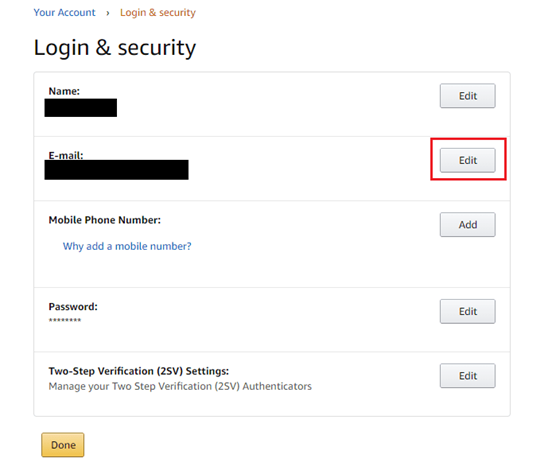
For security purposes, you’ll be asked to verify your account. After doing so, you’ll then be allowed to modify your name, phone number, password, and e-mail address.
Change your e-mail account by hitting the “Edit” button on the right side of the panel.
Thereafter, a prompt will tell you to type in the e-mail address that you want to connect to your Amazon account. A one-time password (OTP) will then be sent for verification. Log in to your new e-mail account to see the code.
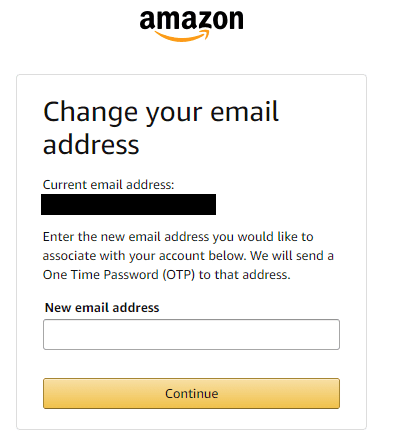
To confirm the changes you have made, enter your Amazon password then hit the “Save Changes” icon.
![]()
Archiving Amazon’s E-mails
Amazon does a good job of notifying its users about their shipments, purchases, or delivery updates by sending a brief text message, e-mail, or push notifications. It’s even possible to receive all three types by enabling this feature on your application.
If you’re one of those people, however, that do not want to be bombarded with multiple notifications, you can also easily disable them.
E-mail Notifications
The messages that Amazon sends you are often too similar. Of course, you may always filter which e-mails you want to receive and which ones are not important.
Fortunately, e-mail services, such as Gmail, give you an option to prevent Amazon e-mails from reaching your inbox.
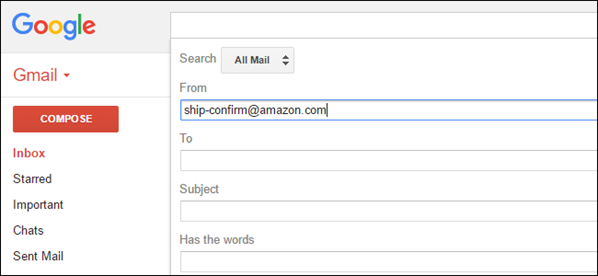
Look for the arrow that points downwards at the right corner of the search field. In the “From” box, enter “ship-confirmation@amazon.com.” You may then tap “create a filter with this search.”
Choose the “Skip the Inbox (Archive It)” box. Proceed by clicking the “Create filter” button.
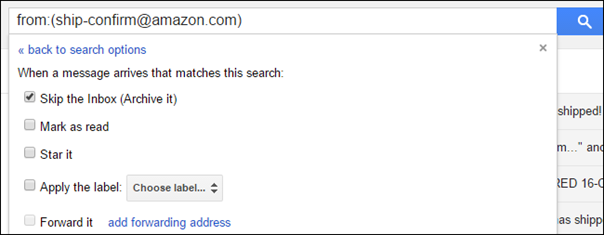
What happens here is that Gmail will put these Amazon e-mails in the “Archive” folder instead of your primary e-mail.
Other E-mail Settings
Using your Amazon e-mail settings, you can easily modify default configurations, depending on your preference.
For instance, you may alter the text size of your outgoing or incoming messages or show images in upcoming e-mails. You may also choose to automatically save attachments from your emails, every time your smartphone is connected to the Wi-Fi.
Moreover, after removing an e-mail, you may choose where to be redirected, either on the “Message list,” “Older message,” or “Newer message.”
Other features include adding the previous messages in your replies; notification banners, sound, and vibration; and grouping your emails.
After learning how to change your Amazon e-mail address and filter e-mail notifications (along with other extra tips), you may find it easier to manage your account, minus the hassles. Plus, adjusting a few things on your e-mail settings certainly won’t hurt, especially if you want to keep your account as organized as possible.
Summary: Change Amazon Email Settings
- Open the Amazon App.
- Tap on the button with three horizontal lines to expand your account options.
- Tap Settings.
- Tap Notification Settings.
- To customize a notification, tap the toggle next to the type of notification you'd like to receive. If it appears green, you are receiving notifications from that category; if it appears grey, you are not receiving notifications from that category.
- Each notification type is further customizable by tapping Manage under your chosen category. From this view, you can edit individual categories by tapping the toggle next to each. If it appears green, you will receive notifications in that subcategory; if it appears grey, you will not receive notifications in that subcategory.
