It can be difficult to solve the problem of how to connect Mac to Brother printer, especially for users who are not very skilled at computer. Many Mac computer users know little about the connection between Mac and printers, especially when they have a Mac but no access to network printer. Maybe you have a Mac computer but don’t know how to connect it to your Brother printer?
Brother Printers are becoming increasingly popular over the years. Compared to other traditional printers, these are full of features, uniquely designed, and smarter. Depending on the model, you’ll see different unique settings, features like smart scanning, ink efficient printing, cross-device connectivity, cloud printing, etc.
Connecting your Mac to your new Brother printer can be a bit tricky. Brother printers usually have good integrity and stable connectivity. However, they may start to have minor issues and stop working. So let’s learn how to set up a connection between your Mac computer and Brother printer.
Setting up the Hardware connection
Now, you may be a USB user, network cable user, or wireless user. So set up the printer according to your preferred connection method. Here’s how to set up each of these connections.
USB Connection
- Plugin your Brother printer to a power source.
- Switch it on.
- Connect it with your Mac via USB cable.
- Do not connect with any non-powered device/hardware slots.
Wired Network Connection
- Do not plug-in or power up the printer yet.
- Connect your printer with a network cable and include it in the network hub.
- Now power up the Brother printer.
Wireless Network Connection
- Plugin and power up the printer first.
- Check the Manuals for the latest Network User’s Guide or the Quick Setup Guide.
- Set up the wireless connection as per instructions.
Driver Setup and other steps
Once you set up a connection between your Mac and Brother printer, It’s time to complete the setup by installing/updating the drivers. Here’s how to do it.
- Boot up your Mac (If you haven’t already).
- Insert the disk that came with the printer. Or go to the website from the QR code on the manual.
- Download and install the driver file(s).
- The installation follows on-screen instructions and pretty much self-explanatory. So just follow along.
- You may have to restart your printer for the drivers to work properly.
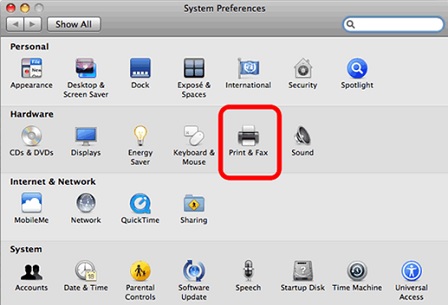
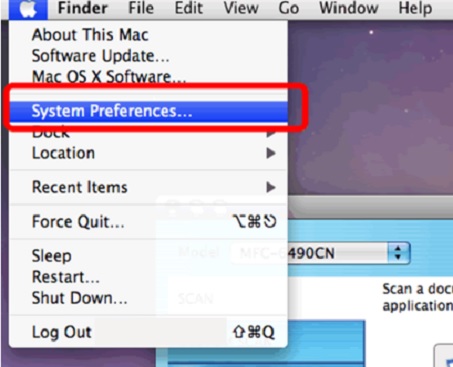
- Select the System Preferences option from the Apple Dropdown Menu.

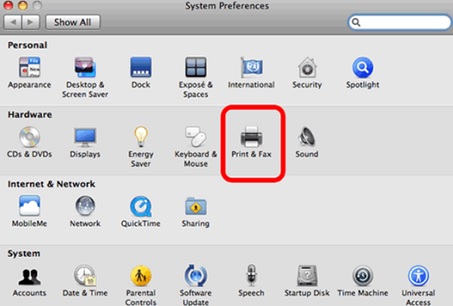
- Under the Hardware section, you may find Printers & Scanners, Print & Scan, or Print & Fax icon. Whatever it may state, just click on the printer logo.
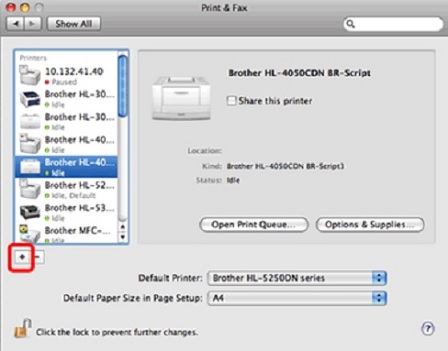
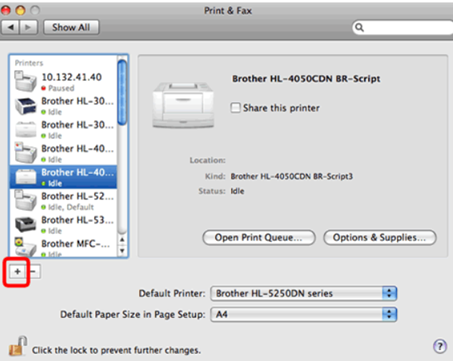
- It’ll bring up a list of connected/previously connected devices. We have to add our printer to this list. So click on the “+” icon just below the list, as shown in the picture.
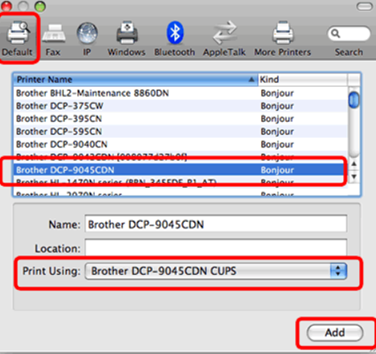
- Once on the next menu, click on “Default”. Now browse through the list and choose your Brother printer. Make sure that you select the exact printer model.
- Now you need to select the driver. If you’re running a CUPS driver, make sure that the corresponding version is available. From the “Print Using” field, select “Printer Model Name + CUPS” as shown in the picture below. Note that CUPS is available for maximum models.
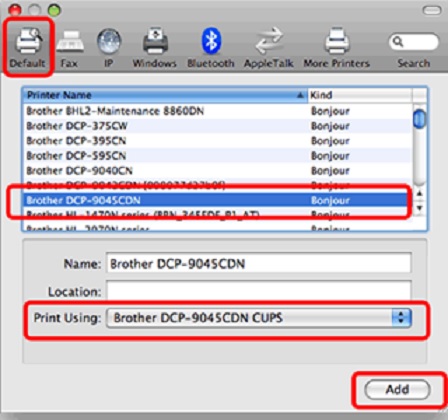
- Another option is the PostScript driver. You won’t be able to use it for all models. Look for “Printer Name + BR-Script” or “Printer Name + PS” from the menu. Select whatever is available.
- Click on the “Add” button.
And you’re all set. Your Brother printer should be print-ready now.
Summary: Connect Mac to Brother printer
- Turn on the printer.
- Check for any error messages.
- Open Print & Fax in System Preferences and select the + icon.
- Select Brother from the Use or Print Using menu.
- Select the Printer Model Name.
- If a Software Update window appears, ensure that the Install button is selected and click Continue.
- Click Add to install the driver and add your printer to the Printer List.
Brother’s Printers are renowned for their effective and longer service to the user. Connecting the Brother Printer to your device is slightly distinct from the common printers. However, it is not that complicated. In this article, we will give you a general idea about how to connect Brother Printer to Mac.
Before You Get Started
Sometimes during the connection of Brother Printer to the Mac operating system, it shows some problems and doesn’t connect. For that, you may apply these steps given below before connecting:
- Open the “Setting and Preferences” option from the “Apple” option.
- Select “Printer & Scanners”. Press down the “Ctrl” key and choose “Reset printing system”.
- Now the printer title list will be blank. Then, attach your Brother Printer from the start.
Here, we will tell you about connecting the Brother Printer with and without wires. So follow us along.
Connecting Brother Printer to Mac with Wire and USB Cable
- First, shut off the printer’s function. Then, take the plug from the socket. If any other cable is joined, then switch off them also.
- Then, decide the kind of connection you wish to give. If you wish to use the USB cable, join the Brother Printer in the socket. Switch on the printer power. After that, attach the printer to the Mac operating system with a USB wire.
- If you wish to join with wire, then link the network wire to the printer and the hub. Join the printer to the power socket and switch on the power.
- Then, select the “Apple” icon beside the “Finder” menu. Pick “System Preferences” from the emerged drop-down list.
- Locate the “Print & Fax” option beneath the “Hardware” section in the “System Preferences” window. This option may be differently named “Print & Scan” in the different operating systems. Select it.
- Select the Brother Printer you are using, and pick the “+” icon given at the lower left side of the screen.
- Access the “Default” option and pick out your Brother Printer title in the “Printer Name” option. See that the appropriate printer is added for the “Print Using” section. Then, finally, select the “Add” option.
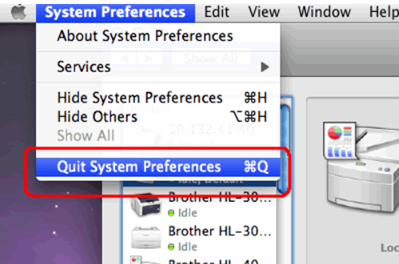
- And, it is attached to the “Print & Fax” option. Then, exit the system preferences by selecting the “Quit System Preferences” option.
Connecting Brother Printer to Mac without Wire
- Collect the PIN code and SSID of your network.
- Select the “Menu” button on the screen of the printer, You may also locate the “Settings” button and click on it.
- Choose the “Wireless network” preference. It will look for the networks that are close to the printer. A list containing the accessible network will come out on the screen.
- Choose the one you wish to join. Put the Pin code. Then, select “OK”. The printer will link without wire and attach to your Mac operating system.
- Now, for setting up the driver, go with the given instruction. You may also select the downloaded data.
- Reopen the printer. Then, again pick out the “System Preferences” option from the “Apple” option on your Mac screen.
- Go for the “Print & Fax” option. Then, select “Add”. A new window called “Default” will come out. Locate and select your printer title. Choose the “Add” option.
- The printer will be joined to your Mac. Select the “Quit System Preferences” to close the installation.
So, following these instructions, you can connect Brother Printer to Mac.
Summary: Connect Brother Printer to Mac
- Place the Brother Printer on a safe and stable surface.
- Download the latest version of Brother Printer drivers from the official site connectionbrother.com
- Remove all the packing materials from the Printer.
- Attach the power cord to the back of your Brother Printer and plug it into an electrical outlet.
- The device will display a message saying Ready when it turns on.
- The printer will connect to your Mac system automatically once it is turned on.
