How To Create Partition In Windows 7 During Installation?
Creating partitions in a hard disk that is underneath a Windows operating system can generally be done in the initial installation stages. While this action is possible during a Windows 7 installation, it is not easily accomplished. In fact, it requires many steps and commands to access the disk partitioning menu. Moreover, these actions must be done while the installation is happening. If certain actions are taken too late, you may be stuck with some unintended consequences like being able to install the wrong version of Windows or an error message stating you do not have enough space on the system partition.
For beginners, people tend to have only one drive on their computer – the default drive C. It serves as storage and Windows also will run on that same drive. However, for the computer-savvy individuals, that practice is not recommended.
It is encouraged to have at least 2 drives without needing to purchase another hard drive – one where the operating system is installed and one dedicated for storage. This is done for better sorting and organization of files. Having one drive can make a single problem bigger than it’s supposed to be.
To create another virtual drive, you must be familiarized with the process called ‘partitioning’. This is usually done during the first steps in the installation of Windows.
How To Create Partition In Windows 7 During Installation?
- Turn on the computer while inserting the removable device (either a CD or USB flash drive). Make sure the computer boots up first on the removable device.
- Proceed with the Windows 7 installation. A window will appear letting you choose what type of installation do you prefer.
- To choose the option of installing brand new Windows and partitioning the hard disk, click on the option ‘Custom (advanced)’.
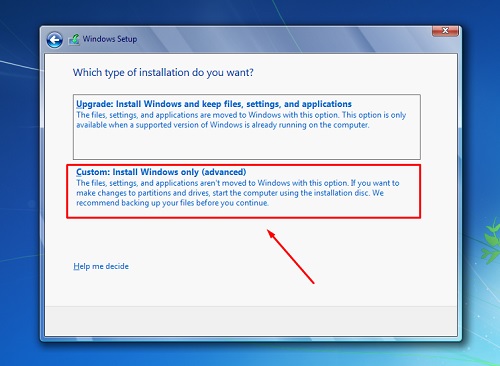
- On the next screen, you will be asked where the system will be installed. From here, you can create partitions before resuming the installation process.
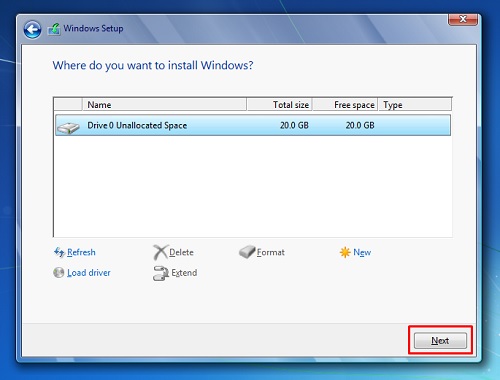
- You need to decide which option you want to choose:
• Install Windows directly.
• Create a partition and have the option in which partition Windows will be installed. - If you choose to install Windows directly, simply click on ‘Next’.
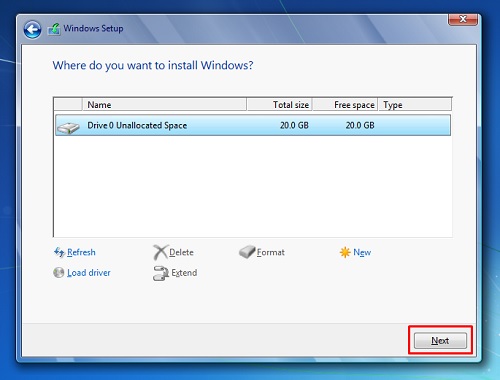
- However, if you choose to create a partition first, then click on ‘Drive options (advanced)’. The screen now will have gained more buttons for options. Here are their descriptions:
• New – Lets you create new partitions.
• Delete – Lets you delete a specific partition. Note that all data existing on that partition will be erased.
• Format – Lets you format a specific partition and prepare for the installation of the operating system. Note that all data existing on that partition will be erased.
• Extend – Lets another hard drive become a part of the partition of the current hard drive. This is used when you need more space for the partition of the current hard drive. When a new hard drive is introduced, it will automatically act as a separate drive but through this feature, you can configure it as an extension.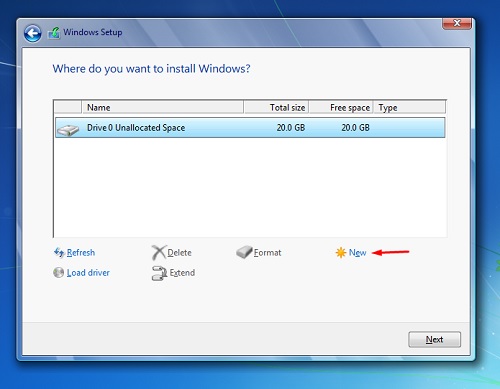
- To make a partition, click on ‘New’. In the ‘Size’ box, enter the desired size for the partition. After deciding, click on ‘Apply’.
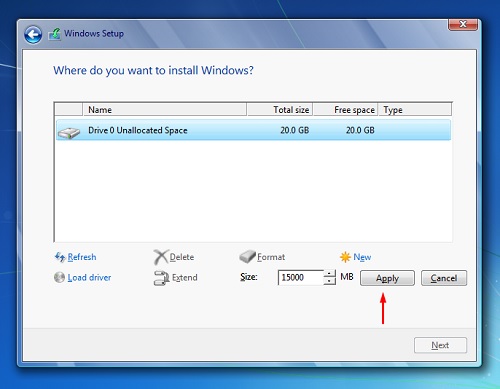
- The setup program will notify you that an additional partition will be created on that drive. By default, that particular partition will be hidden and will contain the files needed to boot the computer. This will consume 100 Megabytes of disk space.
- After the partition is created (the secondary virtual drive), select it and click on ‘Format’.
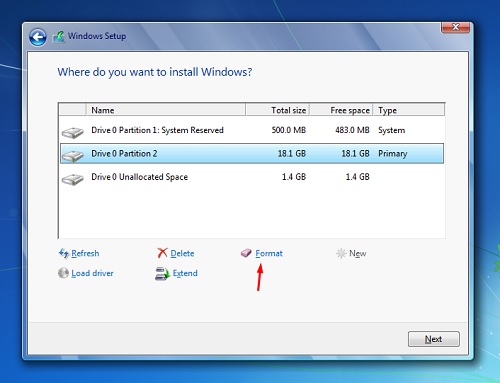
- Formatting the partition will make it usable either as a host of the operating system or for storage purposes. After formatting, you have now at least 2 drives to choose where Windows will be installed.
- After deciding which drive to install, select it, and click on ‘Next’ to proceed.
- Another way to create and manipulate partitions is by using the ‘DISKPART’ command. Since it is done on a command prompt, a mouse pointer is not needed. To access this part, press ‘Shift’ and ‘F10’ on the keyboard.
- The window of command prompt will open. Type ‘diskpart’.
- Follow the instructions being displayed.
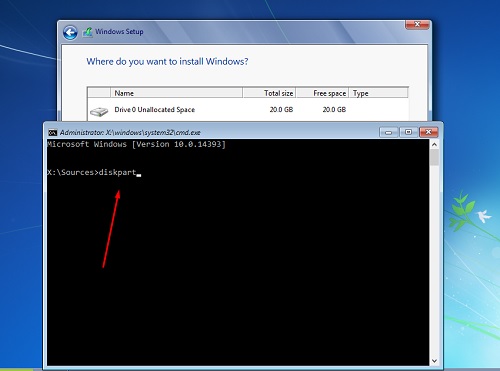
- For more help, you can type in ‘/?’.
Summary: Create partition in Windows 7 during installation
- Click on Drive options(advanced).
- Select the partition you wish to delete.
- Click on delete.
- Click on new.
- Enter the size of the partition in MB.
- Select primary or logical according to your need.
Conclusion
Creating partitions can be trivial at first but will get easy later on. Make sure all necessary data are being backed up. If you happen to decide to create a partition after Windows is installed and have no plans for starting from scratch again, you can do so but not using another method.