In this post we will know how to enable virtualization in bios dell and hp. Virtualization is one the latest kind of security. It is the ability to use one physical resource (computing power and storage) by various virtual appliances. With virtual technology, a server can utilize the processing power of other servers as opposed to just its own. This leads to better efficiency, simplified management, and reduced costs. Let us look at some ways to install virtualization software on Dell or HP computer.

If you are thinking of activating the Bios Virtualization, we are here to help you out. Read the entire content to know the most straightforward process to enable the Bios Virtualization technology on your computer in just 5 minutes.
Enabling Virtualization in Bios Dell
If you are a Dell computer user, here is the process of how you can activate the virtualization in your PC. Check it out below.
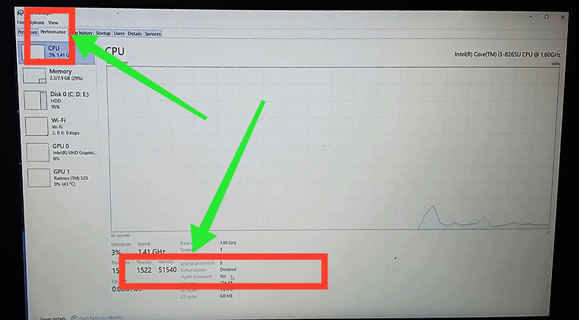
- Firstly, you have to check if the virtualization is disabled or not. To do that, press the “Ctrl+Shift+Esc” buttons at once from your keyboard. The “Task Manager” will open.
- You can also open the “Task Manager” by clicking the “Right button” on the “Taskbar” from the bottom of the desktop. Select and open the “Task Manager” interface.
- From “Task Manager,” select the second tab named “Performance.”
- Now, go down and find the “Virtualization” option. If it is “Disabled,” close the “Task Manager” and follow the steps below.
- Go to the “Start” menu and click on the “Power” option from the bottom left corner. Now, choose “Restart” from there.
- During the “Restart” process, the “Dell” logo will appear on your screen for 3-4 seconds. Quick press the “F2” button 3-4 times when the “Dell” logo appears on your computer screen.
- The “Bios” tab will appear on your screen. Find the “Virtualization support” option from there and click on the “Add (+)” button.
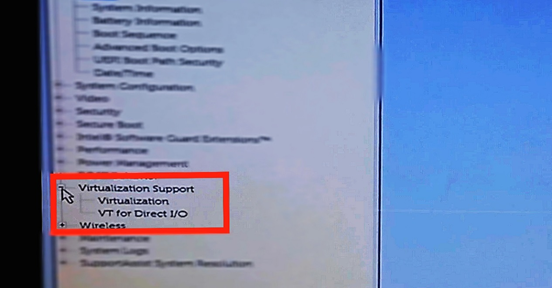
- You will get two options. Click on the “Virtualization” option and check the “Enable” box from the right.
- Again, click on the second “VT direct input/output” option and enable it by checking the box on the top right side.
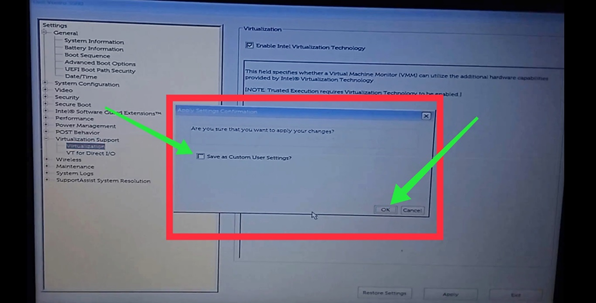
- Now, click on the “Apply” button from down and check the “Save” option box. Click on “Ok” and save it.
- Choose the “Exit” button from down and wait until your computer too starts.
- Now, go to the “Task Manager” again and check if the virtualization is activated.
Activating Virtualization in Bios HP
Well, the activation process is almost similar for every device. Still, there are some changes; here is the complete virtualization activation process for HP computers below. Have a look.
- Turn on your computer and go to the “Start” menu from the bottom left corner.
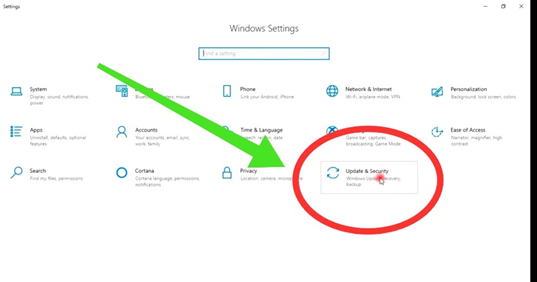
- Find “Settings” from the “Start” menu. If you can’t find it there, type “Settings” on the search bar. Click and open the “Settings.”
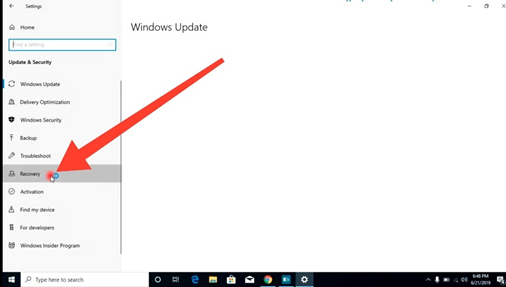
- From the “Settings” tab, select the last tab named “Update and Security” and open it.
- From the left-hand side, find the “Recovery” option. Click on it, and you will get two new options on the right-hand side.
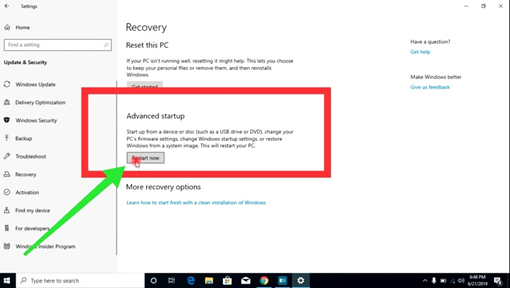
- Go with the “Advanced Startup” option and click on the “Restart” button right under it.
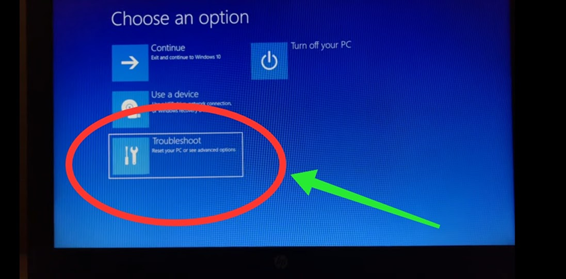
- A new tab will appear on your screen with four new options. Select “Troubleshoot” from there.
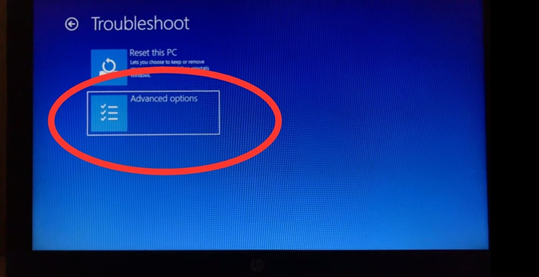
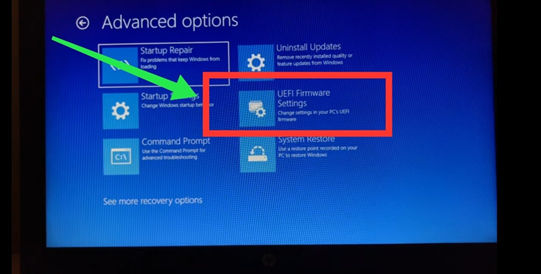
- From the “Troubleshoot” tab, click on the third option named “Advanced option” and open it.
- Another new interface will come, including 6 new options. Select “Settings for UEFI Firmware” from there.
- Now, tap on the “Restart” button to change the settings. Your Pc will start the “Restart” process.
- Here, you have to press the “F10” button. A new window will come up. Select the “System configuration” tab using your keyboard or screen option.
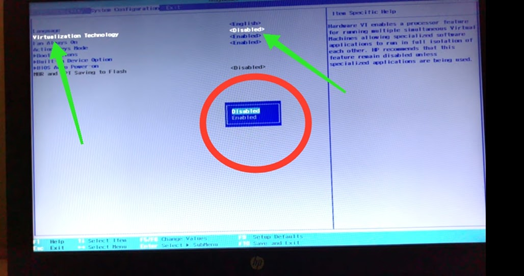
- Click on the “Virtualization Technology” and highlight the “Enable” option using the “Arrow” buttons.
- Press the “Enter” button to enable the virtualization option.
- Now, press the “F10” key on your keyboard and click on the “Yes” option appearing on your screen.
- The virtualization technology will be activated.
Summary: Enable Virtualization in Bios Dell and Hp
- Restart your PC or Laptop.
- Press F2 when you see the Dell logo at boot.
- Go to Advanced -> Virtualization -> System Settings.
- Change VT-d setting from Disabled to Enabled and Save & Exit.
