Recent leaks and rumors have excited a lot of memory enthusiasts, from possible specifications of the 3200 MHz G.Skill DDR4 kit to an additional leak for the Radeon VII. Both seem like interesting products. n this article, we will look at another memory feature that might be interesting for many users: XMP in Gigabyte and Asus Bioses. If you are unfamiliar with XMP, read our introduction to the topic in this post first.

If you want to boost your computer memory, you need to enable the XMP (Extreme Memory Profile) option. We have reviewed how you can do it on Bios Asus and Gigabyte below. Have a look.
Enabling XMP in Bios Asus
Here is the most straightforward process of activating the XMP (Extreme Memory Profile) for your Bios Asus Motherboard. Follow every instruction given below to get the preferred result. Let’s get started.
- Before enabling the XMP, you must check the speed of your RAM. To do that, turn on your computer and right-click on the “Taskbar” of your desktop. You can also open “Task Manager” by pressing the “Ctrl+Shift+Esc” keys altogether.

- Now, select the “Task Manager” option from there. From there, move to the “Performance” tab and go to “Memory” from down.
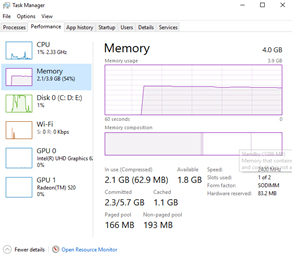
- Scroll down and check the “Memory Speed” from there and close the “Task Manager” tab.
- Now, navigate to your desktop screen’s “Start menu” and “Restart” the computer.
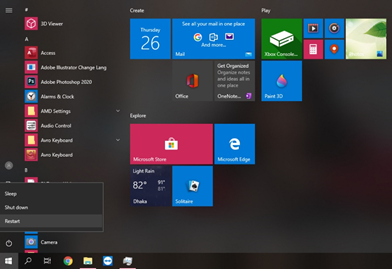
- While restarting your computer, the “PC Logo” will appear on your screen for a moment. Press the “F2” or “Del” key several times when you see it.
- The “Bios” interface will open up on your computer screen.
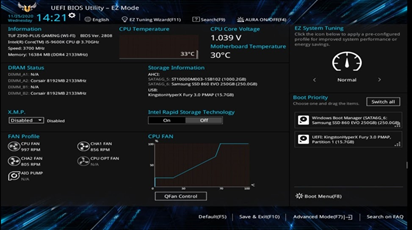
- Now, find the “XMP” header on the left side of the Bios interface. The option must be showing “Disabled” on the right.
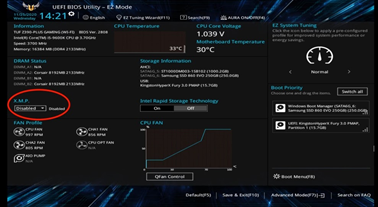
- Click on it and select “Enable.” A notification will pop up seeking your confirmation to save the change. Tap “Yes” from there.
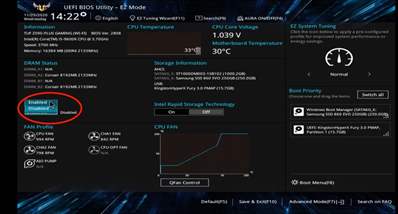
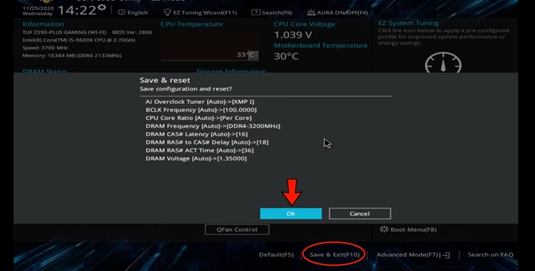
- Now, navigate to the “Save and Exit” button from down. Else, you can press the “F10” key on your keyboard to save it.
- Select “Ok” to save the changes you made. Your computer will restart now. Wait until the process ends.
Enabling XMP in Gigabyte
Here is another easy process to activate the XMP in gigabytes for your computer. To get it done successfully, follow the steps accordingly that we have added below. Here goes the step-by-step procedure.
- Turn on your computer and open the “Task Manager.” You can open it from the desktop “Task Bar.” Or, press “Ctrl+Shift+Esc” at once to move to “Task Manager.”
- From “Task Manager,” select the “Performance” tab right under the first header. Select “Memory” from the “Performance” tab.
- Now, navigate to the “Memory Speed” below and check the speed. Now, close the tab.
- Go to your computer’s “Start” menu and select “Restart” from there.
- When it’s restarting, press the “Del” button 3-4 times. The “Gigabyte Bios” interface will appear on your screen.
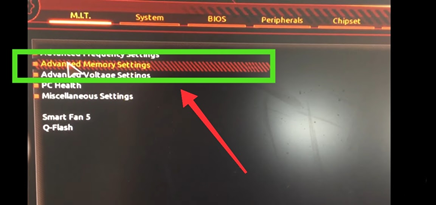
- From the “MIT” tab, select the second option named “Advanced settings for Memory.” It will take you to the next page.
- Click on the very first option that says “XMP (Extreme Memories Profile)” and select the “Profile 1” option instead of “Disable.”
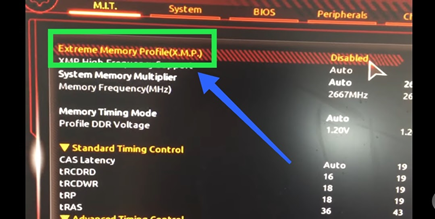
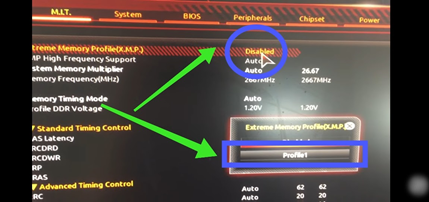
- Check all other information visible there to finish the process.
- Now, navigate to the last tab named “Save and exit” and select “Save and exit the Setup.” Click on “Yes” to finish.

- Your computer will get started now. It might take a bit longer to create than it usually does. Wait patiently to start the PC.
- Now, go to the “Task Manager” again and check the “Memory” option to confirm if the XMP setting is working.
Summary: Enable XMP in Bios Asus and Gigabyte
- You need to enter your motherboard's BIOS setup.
- Once there, look for the "Extreme Memory Profile (X.M.P.)" or something similar, and change its value to "Enabled".
- Save the settings and reboot your system and you're done!
- Enabling XMP in a Bios Asus.
- Go to the Advanced Mode of your BIOS and search for AI Tweaker.
- Enable ASUS MultiCore Enhancement feature by clicking on it and pressing Enter, then selecting on "Enabled".
- Exit the BIOS with F10 and boot into Windows 10.