Error 651 is a very common error and the main reason for it is due to the failure of connection between your system and the internet. And this error will be resolved by you either by using the troubleshooter which is given in windows or changing some setting of your system through commands. The below-mentioned paragraphs contains information on how to fix error 651 on windows 10 and how to fix error 651 in any version of Windows.
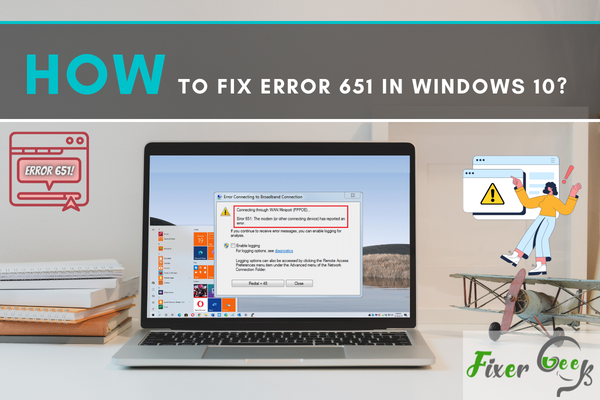
If you are a frequent internet user, you have most probably experienced error 651 when you are trying to connect your windows 10 PC to the internet. This error usually occurs when one is surfing the internet using a modem that is in bridge mode. Hence, you can’t use your internet connection through your desktop.
If you have been encountering this error when trying to connect your PC/laptop to the internet, here are some steps that you can follow to fix the issue.
Method 1: Restart your Computer and Modem
Error 651 can occur because of an issue with your computer and modem. In this case, you need to restart your PC/laptop and the modem. Follow these steps:
- Shut down your computer and modem and unplug from the socket.
- Also, unplug all cables that are connected to your computer or modem.
- Wait for about 30 minutes before reconnecting the cables to your computer or modem again.
- Plug your modem to the power source and turn it on.
- Do the same for your PC/laptop and try connecting again.
- This should solve the issue. If not, proceed to the other methods.
Method 2: Troubleshoot Network and Sharing Center Settings
This is a common method for fixing the connection failed error 651 in Windows 10. This method involves two steps which are as follows:
Step 1: Disable IPv6 Connection for your Modem
Here is how:
- At the bottom right corner of your PC or laptop, locate the internet icon and right-click on it.
- Click the Open Network and Sharing Center option.
- Once open, go to Change adapter settings.
- Then locate your network connection. Right click on it and click Properties.
- You will see a lit of items. Go to Internet Protocol Version 6 (TCP/IPv6) and uncheck the box next to it.
- Then click OK to apply the changes.
- Reconnect to the network to see if the connection problem is solved.
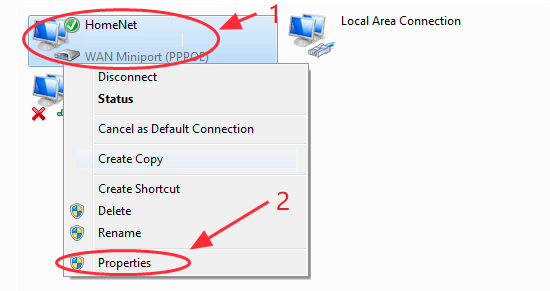
Step 2: Create a New Dial Up Connection
If the previous method does not work, you can try creating a new dial up connection for your network. This helps to determine if the modem is set as required.
- Click Open Network and Sharing Center option from the internet icon.
- Find and click on Change Adapter Settings.
- Find and right click on the dial up connection and click on Create Copy.
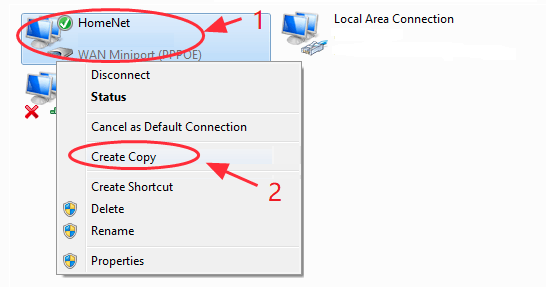
- Right click the original dial up connection and click Delete from the drop-down menu.
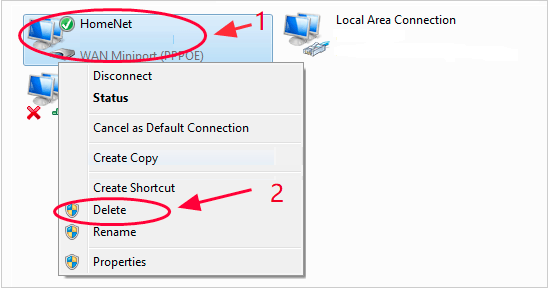
- Once done, reconnect to the internet and see if the problem is resolved.
Method 3: Create a New PPPoE Connection
You are likely to experience the error 651 in your Windows 10 if the PPP0E is not properly configured. To solve the error, you need to delete the old PPPoE connection and create a new one.
- Press the Windows key and type Control Panel in the search box.
- Go to Network and Internet option and select View Status and Task.
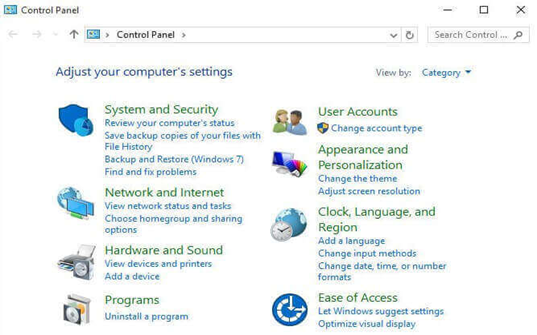
- Click on the option that lets you create a new connection or network.
- Select Connect to the Internet option.
- Click Next to finalize the process of creating a new PPPoE connection.
- Select the Broadband (PPPoE).
- Input your username and password.
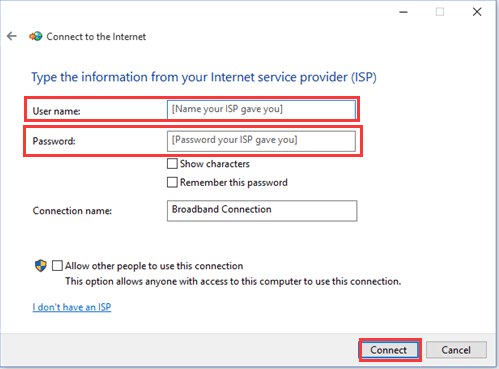
- Then, click the Connect button.
Summary: Fix error 651 in windows 10
- Go to Device Manager.
- Expand Network adapters.
- Right-click on the problem network adapter and select Uninstall from the list.
- Check Delete the driver software for this device and then click OK.
- Restart your computer now. If a new driver is installed during restarting, you need to update it manually by following the steps above.
- Open Network Connections by going through the control panel
- Right-click on your connection, then choose Properties from the menu.
- Select Internet Protocol Version 4 (TCP/IPv4). Click on Properties then choose General tab.
- You see " Obtain DNS server address automatically" option is selected here. If not selected then select it and click on OK button.
Conclusion
With these simple fixes, you should be able to able to use the internet without getting the error 651 message. Be sure to try one fix after the other until you find one that troubleshoots the error.
