Most people don't really know much about homegroups and how it can benefit them. The whole point of the homegroup is sharing files, pictures, videos or anything else that comes up. In this tutorial I will show you how to join a homegroup in Windows 10.

Homegroup is a network sharing feature that makes it possible for users of Windows devices to share files, music, photos, videos, and household printer with other PCs. This network works with Windows 10, 7, 8, and 8.1. In this article, we will look at the steps that will help you create and join a homegroup in Windows 10.
Before you start, it is important to shut down all other computers in your network. Follow the steps below in order to shut down other computers in the network and leave the computer that you will use to create your homegroup.
- Click on the Windows key + X in order to open the power user menu.
- Then, click on Network Connections.
- Right-click on your network adapter of choice and choose Properties.
- Find the Internet Protocol Version 6 (TCP/IPv6), and then click OK. Allowing your computer to run on this version will enable you to join whichever computers to a homegroup.
Creating a Homegroup
After doing that, you are now ready to create a Homegroup, so you can easily join one.
Here are a few steps for creating the Homegroup in Windows 10.
Step 1: Create a Homegroup
If you don’t have a Homegroup, create your first by following these steps:
- Right-click on the start button and choose Control Panel from the options available.
- When the Control Panel opens, look for the Network and Internet icon and click on it.
- Then, click on the Homegroup control panel to open it. If you can’t locate it, then use the Search Control Panel that is located at the top right to search for it.
- When the Homegroup window appears, click on the Change Network Location link.
- The network panel will appear on the right side, and you need to click the Yes button. Doing this will make your wireless network private and enable sharing.
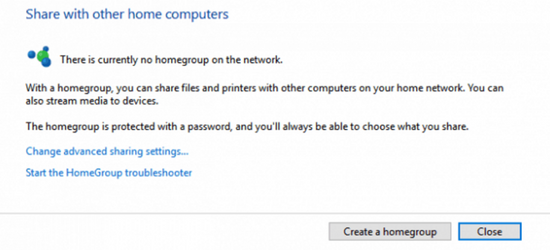
Step 2: Click ‘Create a Homepage’ to begin
Once you have done that, click on Create a homegroup button.
Step 3: Then, click Next on the wizard.
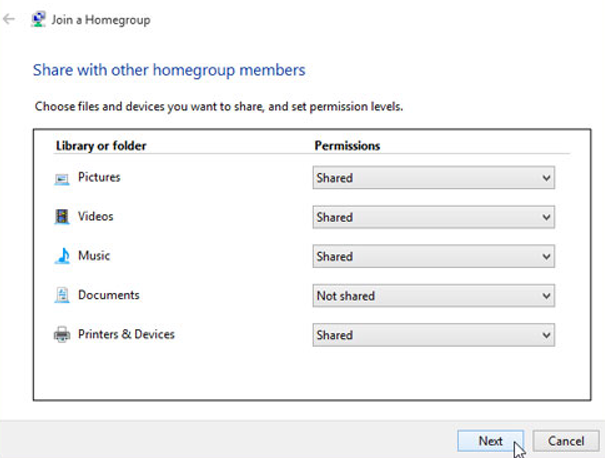
Step 4: Choose What to Share
Several items will appear on the Permissions panel, and Windows allows you to choose the folders and items that you would want to share with other homegroup members. The commonly shared folders include pictures, music, and video folders as well as print & devices. However, documents are generally Not Shared since they contain more private material.
Once you identify a folder that you would want to share, select Share from the drop-down menu. Sharing these folders allows other people in the homegroup network to access them without altering them.
Step 5: Click Next
Once done, click Next and wait as Windows configures your selections.
Step 6: Enter Password
If you are creating a Homegroup, take note of the password that is generated at the closing screen. Use the password for the computers that you want to add to your homegroup.
Joining a Homegroup
Now that we have created a Homegroup, let us now look at ways to join the Homegroup.
- Open the File Explorer, and click on Homegroup in the navigation panel.
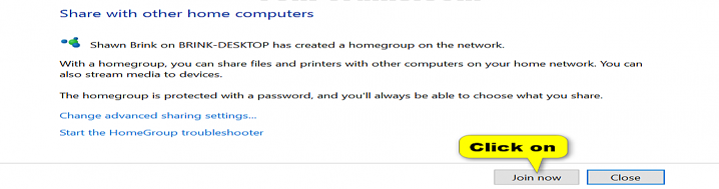
- Tap or click on the Join now button that is located on the bottom left side of the page. Alternatively, you can click on the Join Homegroup ribbon.If you can’t locate Homegroup, click on ‘Start the Homegroup troubleshooter’ section below.
- Click the Join now button. This button will only be available if a homegroup has been made already. Otherwise, you will need one yourself first.
- Choose the files and printers that you want to share with other computers, and set permission to either ‘Shared’ or ‘Not Shared’. Then, click Next.

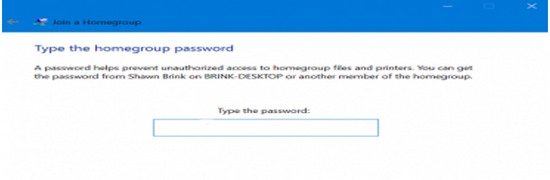
- Enter the homegroup password generated prior and tap or click Next. This allows Windows to configure your homegroup permission, and it may take a while. You will not be prompted to enter the password if you had previously joined the homegroup and then left.
- You will now have joined the homegroup and now access the printers and files shared by other members of the homegroup.
- Click the Finish button.
We hope that this guide has made it easier for you to join a homegroup in Windows 10.
Summary: Join a homegroup in Windows 10
- Sign in with the same user account on each PC that you want to use to share.
- Turn on network discovery and file and printer sharing.
- Turn on media streaming.
- Choose what you’d like to share with other PCs.
- Give your homegroup a name and password.
- Join every PC running Windows 10 to the same homegroup.
