Tired of your internet slowing down? Your ISP provides you with too little bandwidth, but their support tells you this is the maximum they can offer. Another option is to buy more bandwidth, and that's where the question arises: how to limit bandwidth?

When your internet connection is being distributed through the router, sometimes the division of bandwidth becomes unequal. There are times that certain devices hog more of the amount and leave other devices suffering from slowed connections. And even if you ask the other to lower their data usage, sometimes background apps are the real culprits. To help you, we listed a few ways you can do to speed up your internet connection.
Using Windows 10
Windows 10 has a built-in feature where you can limit data usage. However, it will only affect your own device and its apps. It cannot limit other people who are using their own devices to utilize your internet connection.
Option 1: Enabling A Metered Connection
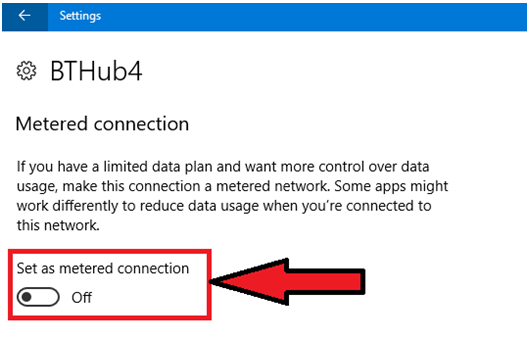
A metered connection is where the apps are being monitored for their data usage. Enabling it can prevent some Windows updates from automatically installing. It can also render certain apps that are not functioning properly. Here's how to do it:
- Press the ‘Windows key’ and ‘I’ in order to open ‘Settings’.
- Click on ‘Network & Internet.
- Choose between ‘Ethernet’ or ‘Wi-Fi’, depending on the medium of your current internet connection.
- If you chose ‘Wi-Fi’, then click on ‘Manage known networks.
- Choose your network and click ‘Properties.
- Toggle ON the ‘Set as metered connection’.
- If you chose ‘Ethernet’, click your 'connection'.
- Next, toggle ON from the ‘Set as metered connection’.
Option 2: Setting A Limit In Data Usage
You can select a specific app to be limited in using data from your internet connection while the rest are unaffected. Here's how you can set the limit:
- Press the ‘Windows key’ ‘I’ to open the ‘Settings’.
- Proceed to ‘Network & Internet' and then to ‘Data usage’.
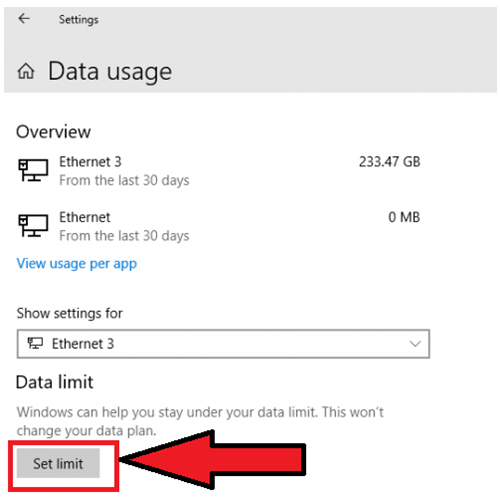
- In the section ‘Overview’, you'll see that there are various internet connections. It indicates the amount of data used in the past 30 days. Click any of them to see the breakdown.
- Click the dropdown of ‘Show settings’. Choose ‘Set limit’.
- Here, you can set the period of limiting the data. You can also set the maximum data. After setting up, click on ‘Save’.
- There will be a bar graph showing the amount of data used. If you wish to change it, click on ‘Edit limit’. You can also remove the setting by clicking on ‘Remove limit’.
- The section ‘Background data’ is below it. You can set limitations for apps and features that are running in the background.
Using Your Router
Sometimes it is better to change the appropriate setting from the router. You can access the router settings through any device already connected. It will be much preferable to use the PC when doing this.
Option 1: Changing The Router’s ‘Quality of Service’ or ‘QoS’
Each router has a different user interface but all of them have a setting for limiting the bandwidth. The term they commonly use is ‘QoS’. Here’s how to reconfigure:
- Log in to the dashboard of your router.
- Find the section where there is ‘QoS’ labeled. As a tip, look for the tab or window where most of the items are related to internet traffic.
- If you wish to prioritize your computer, set the traffic priority of your PC’s MAC address or IP address to high.
- If you wish to lower the traffic priority of other devices connected, repeat the previous step and identify those particular devices.
- If there is a ‘Save’ button somewhere, click on it.
Option 2: Changing The Parental Controls
This option might be useful if you have kids that are too dependent on the internet, especially if they're using it for entertainment.
- Log in to the control panel or dashboard of your router.
- Check for the section ‘Parental Controls’.
- Once you are in there, you can adjust accordingly. The settings are likely to be intuitive yet each router might have a different interface on this portion.
Summary: Limit Bandwidth
- Open the Network and Sharing Center.
- Click on Change adapter settings.
- Right-click the active connection and select Properties.
- Select the Networking tab, right-click Internet Protocol Version 4 (TCP/IPv4) and select Properties.
- Select Specify IP addresses and enter the range as 192.168.100.100 through 192.168.100.110 with a subnet mask of 255.255.255.0
- Select Use the following DNS server addresses, then enter the Preferred DNS server IP address as 8.8.8.8 and Alternate DNS server IP address as 8.8.4.4
- Click OK then disable and re-enable the connection in Windows.
Conclusion
The options we provided above should help you improve your network speed. Even if you don't have a background in IT, you should be able to easily do these steps. If you're not satisfied, you can always invest in third-party programs.
