One of the biggest deterrents to moving into a new home is usually the wiring. But there is an easy way to keep your sanity while still getting all that sweet, sweet high-speed internet access into your home: running an Ethernet cable through your walls. Here's how to do it.
Running your ether cables through walls is one of the best ways to keep them looking neat and tidy. Unfortunately, not many homes, especially those built before the internet technology, have provision for this. The question now is, how to run ethernet cable through existing walls?
If you are having the same problem right now, then you have come to the right page. In this article, you will learn the steps on how to run ethernet cables through existing walls.
Steps on How to Run Ethernet Cables Through Existing Walls
Here are the general steps on how to run Ethernet Cables through existing walls:
1). Plan Your Route
The first and most important step when running an ethernet cable in existing walls is to plan out the route of the wires. For this, you will need the master plan of the building layout to ensure that you will be running it away from dangerous places.
2). Begin Cutting
Once you have the plan mapped out, start cutting box openings in the drywall. You can begin by marking the designated location. Be sure to turn off the power when doing this step.
3). Drill Holes
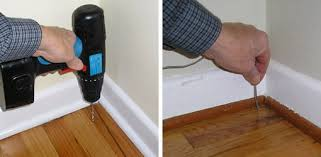
After that, you will need access to the holes. To get that, you can use a drill. These holes are what you will use to run the cables through the walls.
4). Thread the Cables
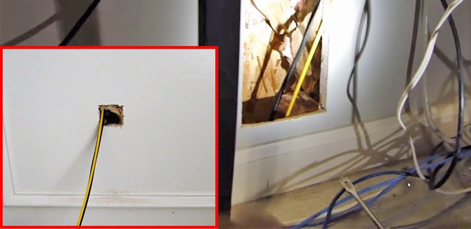 Now all you need to do is to let the cables pass through the walls. This can be a little challenging because you are working with a few holes and boxes. But, to make things easier, you can use an electrician’s fish tape. This will allow the cable to pass through the wall and go to its intended location easily.
Note: If you will be needing an additional outlet in the same room where the ethernet cable will end, it's best to consider getting help from a professional electrician. Although doing this can be slightly expensive, it will ensure that the job is done correctly and safely. It will also prevent you from encountering costly mistakes.
Do’s and Don’t When Installing Ethernet Cable
To ensure that you correctly and safely install your ethernet cable, take note of the following do’s and don’ts:
Avoid Unsafe Locations
Make sure that your ethernet cable is positioned far from the ceiling tiles, water pipes, electrical conduits, and other pipes. Doing this might cause your property to fail safety inspections. It also increases the risk of fire and electrocution.
Keep Them Organized
Don’t just jam the cables on the wall and be done with it. As much as possible, make sure to arrange them neatly so that they are easier to manage later on. You can also take advantage of different wire management systems to make this easier for you to do.
Don’t Bundle Cables Tightly
Bundling your cables tightly can result in kinks, which can negatively affect the network and reduce its efficiency. Plus, it also makes it difficult to troubleshoot in case you realize some issues moving forward.
Don’t Leave Wires Exposed
Exposed ethernet cables by termination have a higher risk of incurring damage and breaking the plug inside. As much as possible, avoid committing this mistake because it can be a huge hassle and costly to fix.
Final Words
There are many benefits in running the ethernet cable through existing walls, especially when it comes to aesthetic purposes. However, it's easier said than done, especially if you are doing it in an old house with a decades-old layout and wiring system. But, the steps mentioned above can help make it more manageable.
Summary: Run Ethernet Cable Through Existing Walls
- Find the path.
- Add a cable to the drill bit.
- Drill through from above.
- Identify where you're going to make cutouts for the Ethernet sockets on your wall plates.
- Cut out the holes for the sockets.
- Install the wall plate with sockets and end connections.
- Run the cable between the two access points.
