- Method 1: Check Your Virtualization
- Method 2: Allocate more CPU and RAM cores in BlueStacks's Settings
- Method 3: Change the power plan in your Control Panel to High Performance
- Method 4: Update your GPU drivers
- Method 5: You should close all other programs that are possibly consuming a significant amount of RAM
- Summary: Speed Up Blue Stacks
- Conclusion
Are you looking for a way to speed up Blue Stacks? Blue Stack is an Android emulation software which allows you to run Android apps on Windows or Mac. It can be installed using two methods, virtualization and containerization. Blue stack simply acts as an emulator which means applications installed on the computer will have the same interface design as a mobile device which runs on an Android operating system.
If you feel like your blue stacks have been running slow for the past days, you visited the right page. Blue Stacks have been continuously improving their performance for enhanced user experience.
They have also posted an announcement to advise all users who are still using their previous versions to consider upgrading to their latest release. This is to give them the benefits of their substantial enhancements in application performance, bug fixes, and new features.
By upgrading to their latest version, users can experience smoother and more immersive gaming. However, suppose you think upgrading to their latest version is not possible in the meantime. In that case, you can freely follow this guide.
Method 1: Check Your Virtualization
Make sure you have turned on Virtualization.
To ensure smoother gaming, you have to enable Virtualization.
- Open your Task Manager (Ctrl + Shift + Esc).
- Then, access the Performance tab.

- In the Performance tab, you will be able to see the Virtualization information on your personal computer. If it is enabled, then it means your Virtualization is on. On the other hand, if it is disabled, your Virtualization is off.
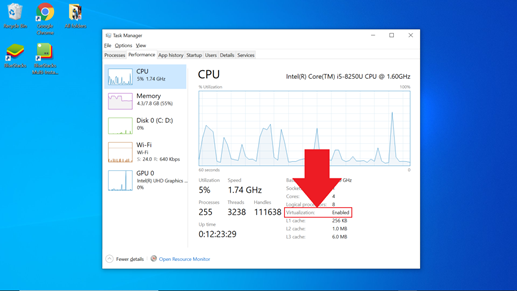
- If it is disabled, then you must enable it.
Check if your CPU supports Virtualization
If your personal computer's CPU has Hardware-Assisted Virtualization, it means that your personal computer can support Virtualization.
To know whether your personal computer supports Virtualization or not, you have to choose one of the following links (base your choice on your CPU type).
AMD CPU
Intel CPU
To check Virtualization support on your Intel CPU, you need to follow these steps:
- Install Intel Identification utility. This can be downloaded from their official site.
- Once you're done installing it, launch it.
- Then, select CPU Technologies.
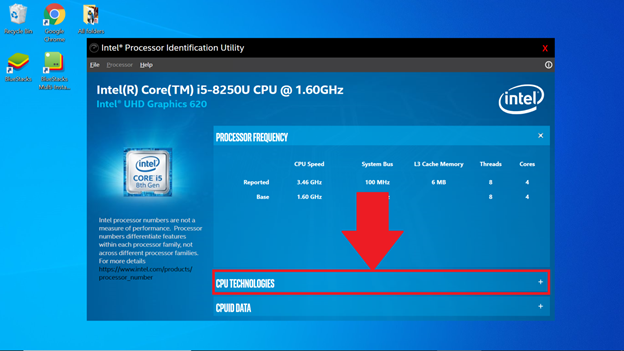
- After that, a menu will display. If you see a mark before Virtualization Technology, it means your personal computer supports Virtualization.
To check Virtualization support on your AMD CPU, you need to follow these steps:
- Download the AMD-V Utility
- Then, you need to right-click on its ZIP file.
- Click Extract All.
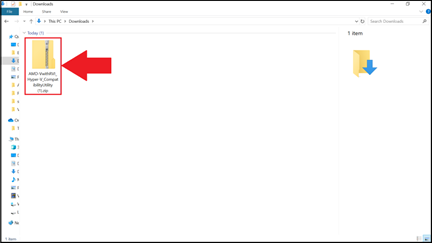
- Once it is already extracted, you should right-click on the .exe file.
- Click Run as Admin.
- You should now be informed about the Virtualization's status on your personal computer.
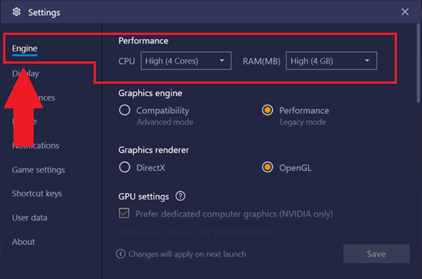
Method 2: Allocate more CPU and RAM cores in BlueStacks's Settings
To achieve this, you have to do the following:
Go to its Settings menu. You can access settings by clicking the gear icon located on the toolbar. Then, in the tab "Engine," you should allocate more significant amounts of CPU and RAM cores. This increases performance.
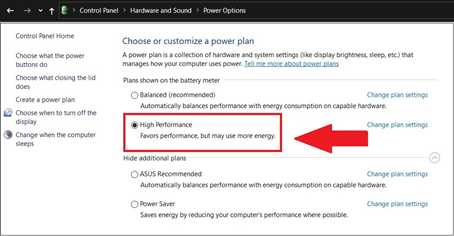
Method 3: Change the power plan in your Control Panel to High Performance
This will be done inside the Control Panel. Kindly refer to the picture below.
Method 4: Update your GPU drivers
- AMD - You will be able to ensure that your drivers are updated through the AMD software.
- NVIDIA - You may utilize GeForce Experience to update your drivers constantly.
Method 5: You should close all other programs that are possibly consuming a significant amount of RAM
If you are running multiple applications at once, this will indeed result in performance issues. So, it would be best if you closed these unwanted or unnecessary programs by accessing Task Manager. In your Task Manager, you should choose the application you want to close. Then, click End task.
Summary: Speed Up Blue Stacks
- Disable the Bluestacks network connection.
- Install CPU-Z to monitor your computer's resources during game play.
- Disable BlueStacks and non-essential programs at Windows startup.
- Check your CPU and RAM usage while you're playing a game in Bluestacks.
- Install new drivers for your graphics card (you probably need a laptop to do this).
- Update DirectX for Windows XP users (this is probably not possible for you, I don't know why it's in the article).
- Turn off hardware acceleration in Flash settings.
Conclusion
These are the five methods that can improve your gaming experience. Although the best way to enhance your experience is to update your Blue Stacks version, there will always be hindrances when it comes to that. So, these temporary solutions are provided for you to enjoy smooth gaming in the meantime.
