Many of you have no idea how to SSH into EC2. The problem is, you are missing out on a lot of useful information! This guide will help you setup your Amazon EC2 instances so that you can access them using SSH.
Amazon Elastic Compute Cloud (Amazon EC2) is a web maintenance application that supplies protected, flexible compute space in the cloud. People generally make an instance using Amazon EC2. But, after making the instance, you have to join the instance with SSH to connect it to your operating system and manage it. SSH or Secure Shell is an encoded network contract for running network services safely above an unsafe network. So, here we will give you a basic idea about how to SSH into Amazon EC2.
Before You Get Started
Generally, all network services can be protected with SSH. Now, you can join SSH into Amazon EC2 in various ways. Here, you will know about how to do it in two ways:
- SSH into Amazon EC2 instance using Terminal
- SSH into Amazon EC2 instance using PuTTY
Before starting the process, you have to set up your Amazon AWS. Sign in to your account and create an instance with a key pair. Download the key pair file. After launching your instance, let us advance with the operation of SSH into Amazon EC2.
SSH into Amazon EC2 using Terminal
- First, Locate the option “Playground”. Select it. Then, choose the “Instant Terminals” tab.
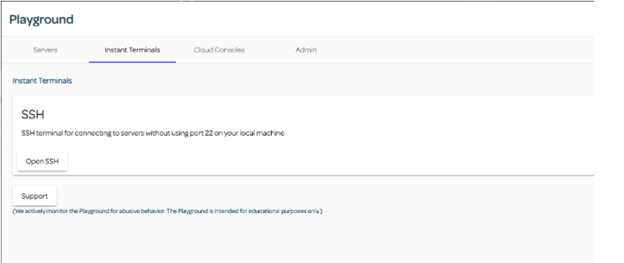
- Click on “Open SSH”. Click on it. Operate the “add key” command.
- Find the key pair you downloaded before from the key pair section. Access it with the AWS instantly within a text editor.
- Copy the whole text of the key pair file. Then, put it over the line in the instant terminal.
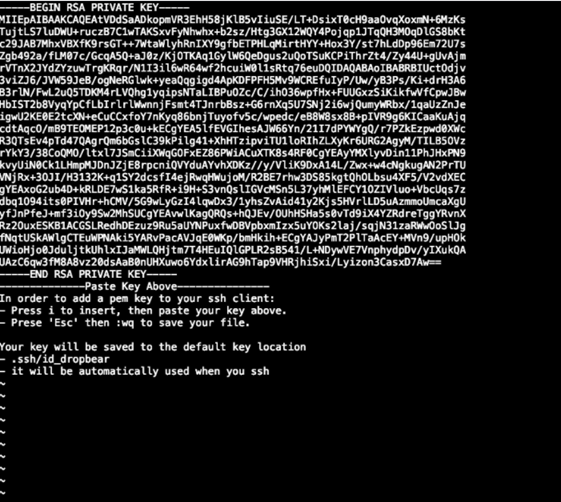
- Write down “:wq” after hitting the “ESC” key from your keyboard.
- Select the “EC2 Instances” options from the “AWS Management Console”. Click on “Connect”. And, you will get your appropriate SSH command.
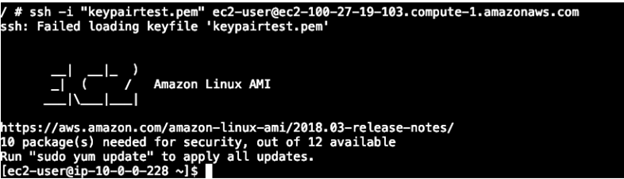
- Then, SSH to your Amazon EC2 instance applying that command. And, your SSH is joined with the Amazon EC2 using Terminal.
SSH into Amazon EC2 using PuTTY
- Open the PuTTYGen application. If you do not have it on your computer, download it from here – Download PuTTY. After installing, advance with the operation.
- After opening the application, the PuTTYGen consol window will emerge. Find and access the PuTTY key generator console.
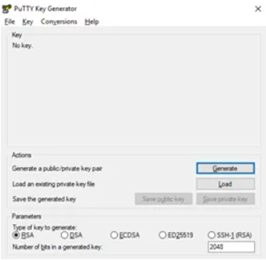
- Select the “Load” option and it will ask you to put your downloaded key pair file. Navigate to the location of your key pair file and load it.
- After loading it, find the “Save private key” option and click on it. Put a title to the key pair file. After saving, now move on to SSH into the AWS EC2 instance.
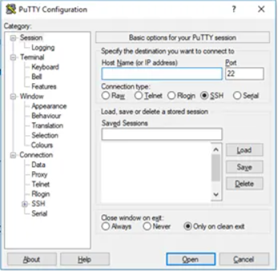
- First, you have to arrange the PuTTY client. Apply the key file you made. It will enable you to connect with the instance. Initiate the PuTTY application.
- The configuration window will appear. Write down “bitnami@” as the hostname. Then, give your public IP address. Put “22” in the “Port” option. Choose “SSH” in the “Connection type”.
- Extend the “SSH” option from the “Category” toolbar. Choose the “Auth” option. Click on “Browse”. Then, find your produced key file using PuTTYGen.
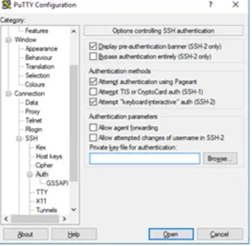
- Select the “Session” option and put a title. You may load it on any occasion you wish to SSH into the AWS EC2 instance.
- Now, launch the PuTTY client. Choose the session you stored earlier. Click on “Load”.
- Then, select “Open” and your console session will begin.
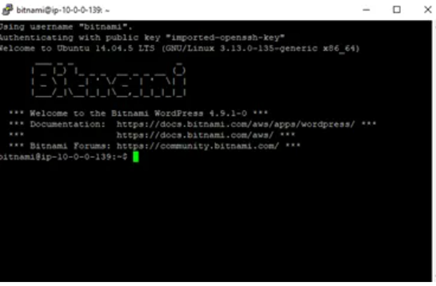
So, that’s how you can SSH into Amazon EC2 following the above procedure.
Summary: SSH into Amazon EC2
- Before you start, make sure that you have already created a Key Pair.
- If you don't already have a key pair, create a new key pair for your instance with Amazon EC2.
- Now go to your dashboard and check the Instances page. Here you will find a list of all the instances currently running on your Amazon. Find the name of the instance that you want to SSH into.
- Now in order to connect to this instance, we need the public DNS of this instance, so copy it and paste it somewhere safe (or simply take note of it).
- If the public DNS is not available, click on Actions > Manage DNS records on top right corner of the Instances page, to assign one.
- Open your terminal and navigate to the directory where you have saved your key pair file (the .pem file). Now type in the following command (replace my-key-pair with you key pair name): chmod 400 my-key-pair.pem .
- This command is used to change permissions of your private key so that only you can read it. Note that this step is very important, otherwise you will encounter an error later
