How To Start Virtualization Through BIOS Configuration?
358 Views
Are you new to virtualization and not clear about how it is done using BIOS configuration? The following steps are for creating virtual machines using the same.
CPU Virtualization is a process of transforming the capability of CPUs into more detailed and refined layers for more efficient and effective usage. This is built-in, and there are steps needed to be enabled so that it can be performed.
Virtual machines require this process to be activated, and the only way is through the BIOS configuration. Before we dive into the procedures, you need to check first if your motherboard and CPU need an upgrade or are capable of virtualization through the following steps.
Checking of Virtualization Capability
These steps will save your time whether virtualization is enabled or disabled or not possible at all.
- Open the ‘Task Manager’ either through the shortcut keys or the taskbar.
- A window will open. Select the ‘Performance’ tab.
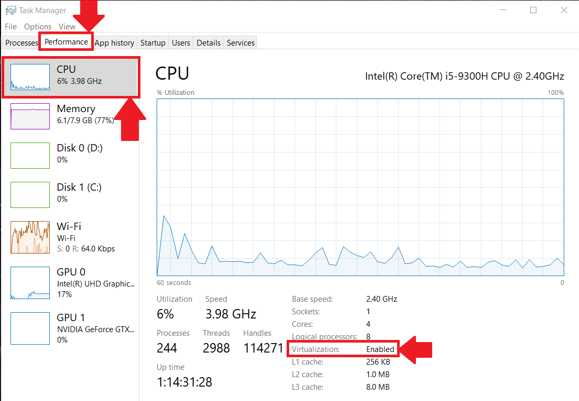
- Search at the bottom-right for ‘Virtualization.’ See if it is enabled or disabled.If disabled, you will proceed to the next step, which is to check if your PC setup supports virtualization.
- If disabled, you will proceed to the next step, which is to check if your PC setup supports virtualization.
Checking of PC Requirements
We will be tackling both Intel and AMD. Both can have different ways of checking if the PC met the requirements.
For Intel
- Download the appropriate virtualization detection tool.
- Run the file and choose your language.
- After installation, open the program. Select for ‘CPU Technologies’.
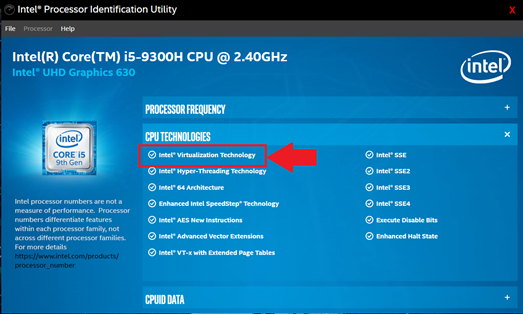
- A menu will drop down, and all the information related to the virtualization will be shown. If there is a ‘tick’ on the ‘Intel Virtualization Technology,’ virtualization is possible on your PC Setup.
For AMD
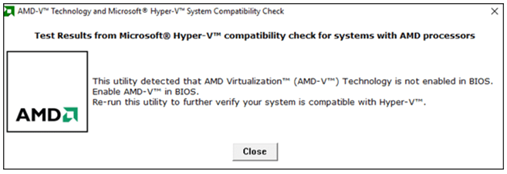
- Download the appropriate virtualization detection tool.
- Run the file as administrator and have it installed.
- After installation, it will automatically show if virtualization is possible or not. It will also display the current state of the PC’s virtualization, similar to the procedure for ‘Checking of Virtualization Capability.’
How to Enable Virtualization?
You can enable it by having visited the BIOS settings. There are different ways of accessing BIOS. The easiest way is to refer to the manual of your PC or laptop. Once you have entered the BIOS settings, then you are good to go.
For Intel
- You need to enter ‘Advanced Mode’ or press the F7 on your keyboard.
- Under the Advanced Mode, go to the ‘Advanced’ tab.
- Under the ‘Advanced’ tab, there are various options presented. Select the ‘CPU Configuration.’
- Under the CPU Configuration, locate the ‘Intel Virtualization Technology.’ If ‘Disabled,’ you can enable it by clicking its status to change into ‘Enabled.’
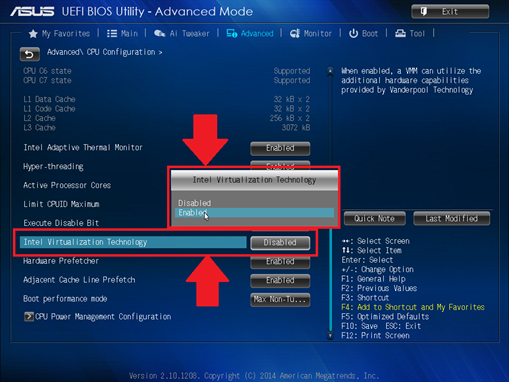
- If it is enable, you can now exit BIOS settings. Make sure it to click on ‘Save changes and exit’. Then allow your computer to restart, and you’re ready for virtualization.
For AMD
- You need to enter ‘Advanced Mode’ or press the F7 on your keyboard.
- Under the Advanced Mode, go to the ‘Advanced’ tab.
- Under the ‘Advanced’ tab, there are various options presented. Select the ‘CPU Configuration.’
- Under the CPU Configuration, locate the ‘SVM Mode. If ‘Disabled,’ you can enable it by clicking its status to change into ‘Enabled.’
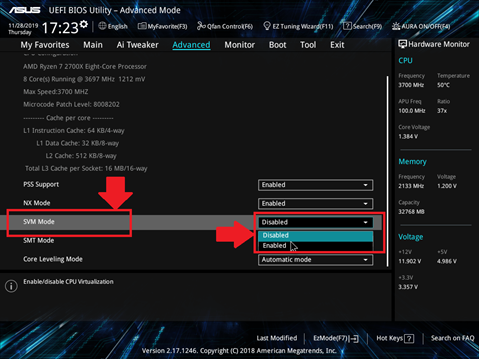
- Once it is enable, click on the ‘Save changes and exit’ then restart your computer.
Generally, the two chipsets have the same procedures except on the label for the virtualization feature.
Summary: Start Virtualization Through BIOS Configuration
- To start virtualization through BIOS configuration, do the following:
- From the Start screen, type msinfo32 and press Enter. The System Information window appears.
- Click File > Save and save the file to a folder on your desktop.
- Gather information about your system.
- Determine if you are running a 32-bit or 64-bit Windows operating system.
- Refer to your system user guide for detailed information on accessing BIOS and modifying BIOS settings such as virtualization technology settings.
- Close all open applications before starting BIOS setup.
Conclusion
Virtualization technically poses no relevant risks in computer performance, if caution is exercised. It is just a feature so that you can run virtual machines. Virtual machines technically have two programs that are supposed to run on different computers but are being performed on one desktop.
One example of which is running another operating system under a currently working operating system. The steps are straightforward, and you don’t need to be that techy to figure things out.
