Are you looking to learn how to transfer email from one account to another? Have you ever experienced a change in your life and want to transfer the mail of your Yahoo!, Hotmail or other account to Gmail?
Data migration is an essential technological feature that has allowed us to consolidate files and information into a more efficient network.
This does not only give you better access to all your data, but it also gives you a more practical overview of large-scale projects.
Transferring your data also means that you can always change your service provider, especially if the current one hasn’t been exactly helpful.
Steps to follow
In this guide, you will find everything you need to know to transfer all emails to your Gmail account so you can start organizing your files right at this moment. Follow these steps for a more manageable data transfer.
Step 1: Open your Gmail account
You can do this by heading over to your preferred browser and typing in Google.com or Gmail.com.
Both of these will allow you to log in to your Gmail account. Enter your username and password, and voila! You’re now using your account. Let’s continue to the data migration process.
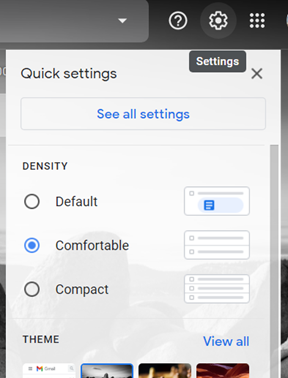
Step 2: Access the settings
You can find your Gmail settings at the top right of your computer screen where the gear icon should be. Click on this icon to open Quick Settings. Then, click on See all Settings.
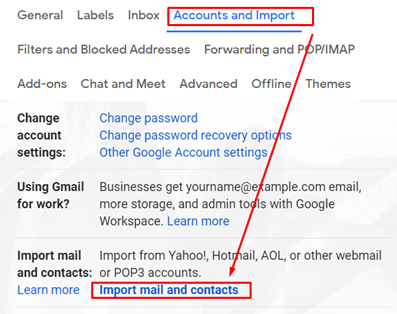
Step 3: Go to the Accounts and Import Tab
Once you can view the settings of your account, go to the Accounts and Import tab. From there, you will be shown many options concerning data transfer. Under this category, select the Import Mail and Contacts option.
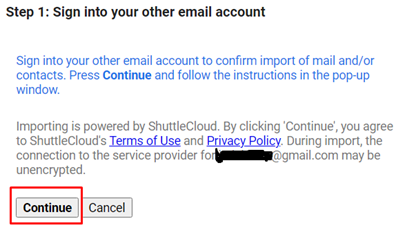
Step 4: Sign in to the source account
A pop-up page will then appear to show you more steps for you to follow. The first of these steps will be to put the email from which you will migrate the data.
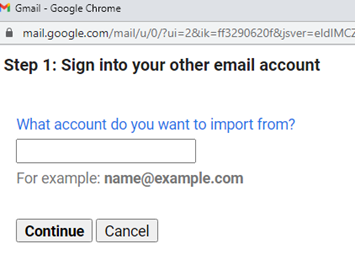
Once you have done so, Gmail will start to check if such an email account exists. You will then be required to sign into this account with your username or email address and password.
Then, press Continue. You will have more steps to follow at this point, but the process flows intuitively at this point.
Step 5: Start the Import
Once you’re done with the process and the steps to follow, press Start Import. This process may take quite a while, depending on the content of the source email. You are given 30 days for the forwarding of messages to your new account.
This way, you can let your family and friends about your new contact. Your new Gmail address is also displayed on your profile for up to 60 days.
Bonus Step: How to Stop the Import?
The time may come when you won’t need the continuous transfer of data. This can bulk up your memory, and you might lose precious storage for emails that you no longer need. Luckily, you can stop this process by heading over to the Settings icon and clicking on See all settings.
Then, head over to the Accounts and Import tab. This is where you can go and Check Mail from Other Accounts. There, you can delete the account linked to yours to stop the data migration.
Summary: How to Transfer Email to Gmail?
- Moving your email from one provider to another is easier than you think!
- For some email providers, the task is as simple as logging in on the new service and entering the information for your previous account.
- Gmail can automatically import messages from any email provider that supports POP (Post Office Protocol).
- If your previous email service doesn’t support POP, access your email from a desktop client such as Thunderbird or Outlook and then export your messages to a .pst file.
- The next step is to configure Gmail to work with your old account.
- This is done by creating a filter that tells Gmail to deliver all messages from your old account into the “All Mail” label.
- When email addresses change, the transfer process should be straightforward.
Conclusion
That being said, transferring all your data from another email to your Gmail account is easier than you think.
Gmail also proves to be quite useful and resourceful in this regard, since it can allow you to inform your other contacts of this change. This can be incredibly helpful, mostly when this data migration process is done for business or corporate purposes.
We hope this guide helps you in this task and that things flow smoothly during the process. May this help you in organizing your files and making work more efficient.
