- Managing Tasks & To-Do with MS Project
- Microsoft Project To-Do List Management
- To-Do List Implementation with MS Project 2010
- • Adding Simple Task
- • Adding Task to Network Diagram
- • Insertion of Task in List
- • Creation of Repetitive Tasks
- • Initiation of Multiple Tasks
- Summary: How to use Microsoft Project as todo list manager?
Microsoft Project is one of the most popular task management tools, but few people realize that they can use it the same way they would use a to-do list manager. It all comes down to being organized. This article will go through different categories, such as how to organize tasks, and how to create subtasks in Microsoft Project.

Are you troubled with the constant tracking of specific tasks with progress? There are many to-do list management tools available to save you the hassle. But you can’t skip the usefulness of Microsoft Project over other options.
Managing Tasks & To-Do with MS Project
Unfortunately, Microsoft Corporation already initiated its MS To-Do for handling the task. Therefore, updated versions of the software (Project 2013/2016/2019) drops the feature. You can manage the to-do list using MS Project 2010.
Microsoft Project To-Do List Management
Its application gets limited to project management. Still, you can create your customized to-do list management with improved versions. However, proper task management gets somewhat exotic for any ordinary user.
To-Do List Implementation with MS Project 2010
Creating your to-do list or task remains somewhat simple. There are several segments to continue with the software.
• Adding Simple Task
- Click on the ‘View’ tab to access its ‘Task Views Group’.
- Simply press the ‘Gantt Chart’ button.
- Locate the ‘Task Name Field’.
- Select any empty cell to type the task’s name.
- Click the ‘Enter’ button to integrate the name.

• Adding Task to Network Diagram
- Click on ‘Network Diagram’, accessing ‘Task Views Group’ under the ‘View’ tab.
- Find the ‘Insert Group’ to press on its integrated ‘Task’ button.
- A new task box should appear, requiring to fill up the empty box.
- Simply click on the ‘Enter’ button after filling the blank row with a name.
• Insertion of Task in List
- Check the row right below the targeted task insertion.
- Press the‘ View’ tab to open the ‘Insert Group’ to click on the ‘Task’ button.
- One dialog box with a blank cell will appear.
- Fill the row with a particular term to name the file.
• Creation of Repetitive Tasks
- Click on the ‘View’ tab to access ‘Task Views Group’.
- Find ‘Gantt Chart’ to initiate the repetitive process.
- Select an empty row right where you want the list.
- Get to the ‘Task’ tab to check its ‘Insert Group’ section.
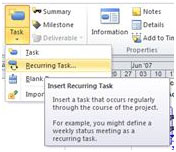
- Press on the ‘Task’ button to click ‘Recurring Task’.
- Type one suitable name in the ‘Task Name’ box.
- Check the ‘Duration’ box to insert the session length.
- Hit the ‘Recurrence Patten’ to find the selections.
- Choose from Yearly, Monthly, Weekly, or Daily.
- Specify the time limit by checking the specific boxes.
- Enter the approximate start & end project date.
- If you want, select a calendar to track the progress.

• Initiation of Multiple Tasks
- Open the ‘View’ tab to click on the ‘Task Views Group’.
- Press on the ‘Gantt Chart’ button to initiate the next steps.
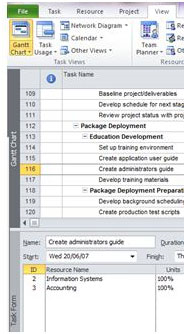
- Access the ‘Split Views Group’; press on the ‘Details’.
- Hold onto the ‘Gantt Chart View’ right on your screen.
- Press on the empty row at the very end of your task list.
- Type in task information inside the ‘Name’ & ‘Duration’.
- Specifically, check the ‘Effort Driven’ box to fix the duration.
- Press ‘Ok’ for saving the task; click ‘Next’ to continue.

Look into Microsoft Support for learning additional details on the management.
Summary: How to use Microsoft Project as todo list manager?
- Create a new project, preferably a blank one.
- Make sure you have the right view set up.
- Click on the View tab and click on Gantt Chart. You’ll notice that the left side of your screen now looks like a to-do list.
- Add tasks to your Gantt chart.
- To create a task, simply start typing in the first empty row of your Gantt chart (in the Task Name column) with your first task. By default, pressing Enter will add another row for another new task below it.
- Assign resources to tasks.
- Whenever you do assign a resource to a task, be sure to put in their name under Resource Name and try not to change it after it’s been entered (you’ll see how this can cause problems later).
- Track progress on tasks by entering % complete.
- Assign worktime through work assignments.
- Microsoft Project offers an easy way to manage tasks as long as you are familiar with the sorts of settings and options that are available..