Have you ever noticed how Windows 10 has no Recycle Bin icon in This PC? This is really confusing, but luckily if you were using Windows 7 or earlier versions, then you know where your Recycle Bin is and this post is not for you. For those who use Windows 10 and want to add Recycle Bin back in their This PC the below instructions are easy to follow.

The Recycle Bin is one of your computer’s most important and most convenient features as it serves as your deleted items’ temporary storage until you decide to delete them permanently. As such, any deleted items have a chance of being recovered as long as they’re in the Recycle Bin.
However, getting to it can sometimes be inconvenient, especially if you’re in the middle of a task and want to recover something you accidentally deleted. As such, adding the Recycle Bin to the File Explorer’s This PC section can make it more easily accessible.
With that said, how do you add the Recycle Bin to the This PC section of your File Explorer?
First Method: By Manually Editing the System Registry
The first way of adding your Recycle Bin to the This PC section is by manually editing the system registry of your computer. However, this is only recommended if you’re knowledgeable about using this feature of your computer.
After all, misusing the registry can make your computer unstable and sometimes render it inoperable. So, before you proceed, consider backing up your Registry first as well as your computer files.
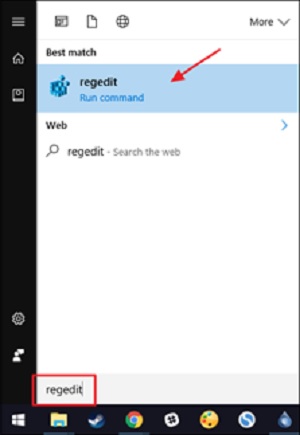
1). Search for the Registry Editor.
Access your computer’s Registry Editor by typing the command regedit in your computer’s search bar.
2). Navigate to the NameSpace key.
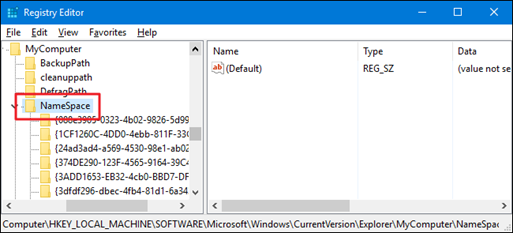
Here, you will be creating a new key. To do this, right-click on the NameSpace key and select New > Key. Name the new key as {645FF040-5081-101B-9F08-00AA002F954E}.
3). Close the Registry Editor.
Once you’re done, you can now close it. You can test if the change was successful by opening your File Explorer and going to its “This PC” section. Your Recycle Bin should already be there.
For easier accessibility, you can always pin it to your Quick Access option. That way, you can easily go to your Recycle Bin whenever you need to.
Second Method: “Show All Folders”
The great news is that this method is a lot easier than the previous one. This method doesn’t require you to edit anything that may cause problems to your computer. However, editing the registry is still the most recommended method as it allows you to add and remove the Recycle Bin whenever you need to.
Regardless, if you’re wary about tinkering with your System Registry, you can try this simpler method.
1). Open your File Explorer.
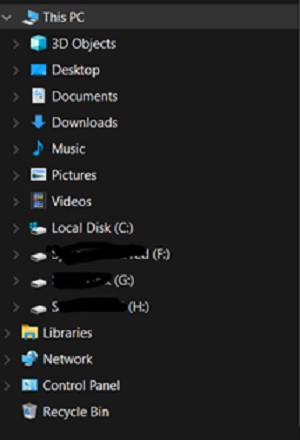
Once it’s open, you can find on the left-hand side, in the This PC section of your window, everything you usually access such as your Desktop, Documents, Music, Downloads, and more. However, you’ll notice that it doesn’t have the Recycle Bin as part of the options.
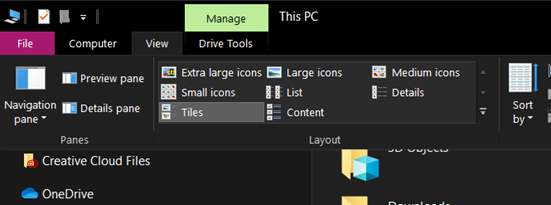
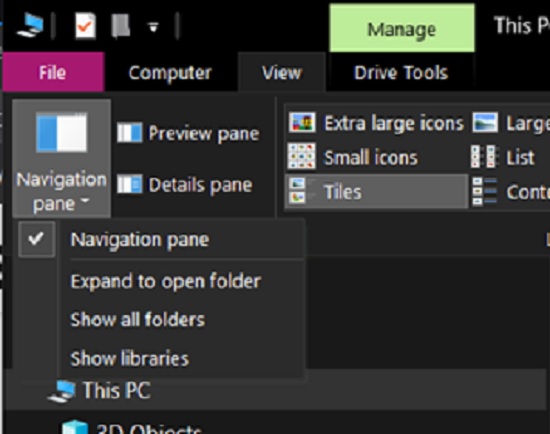
2). Click on “View” then on the “Navigation Pane.”
3). Under the Navigation Pane, select Show All Folders.
This will show your Recycle Bin as part of the This PC section of your computer.
Once it’s there, you can also add it to your Quick Access menu so that you can always easily access it whenever you need to. You can also revert it to how it was before by unchecking the Show All Folders option.
However, if you have already added it to your Quick Access menu, you can still access your Recycle Bin from there.
Final Thoughts
The Recycle Bin is a handy feature that allows you to keep deleted files until you decide to delete them permanently. If you’re the type of person who needs to keep their Recycle Bin close at all times, then adding it to your File Explorer’s This PC section can make it more accessible.
This is especially handy if you accidentally delete a file and want to recover it immediately without the need to go to your PC’s desktop.
Summary: Add Recycle Bin in This PC
- Click on the Start menu and select File Explorer.
- Select the View tab at the top of File Explorer and check the Hidden items box in the Show/hide section.
- Open the Recycle Bin from This PC and open Properties.
- In Properties, navigate to the Location tab and then select Move...
- In Move folder select This PC from the top of the left pane.
- Scroll down in This PC until you see 3D objects and double click on it.
- Click OK to return to File Explorer’s main screen. You should now see Recycle Bin in This PC under 3D Objects. That’s it!
