VNC stands for virtual network computing and it is used to remotely control a computer. This guide will teach you how to connect to a Linux computer with VNC so that you can view the screen and use the computer as if you were sitting right in front of it. By the end of this guide, you will know how to connect your Android phone or tablet, iPhone or iPad, Mac or Windows PC/laptop to a Linux server through VNC.

Virtual Network Computing (VNC) is a particular program that can perform the complicated task of connecting to a Linux system. However, for doing this, you have to build a VNC server on a Linux system. Here, we will do it on a CentOS system. So, follow this article to have a proper idea about how to connect to Linux with VNC.
Connecting to Linux with VNC
- First, you have to set up the Tiger VNC application on the CentOS system. Put this command for installing:

- After completing the installation, you have to make a service file in “/etc/system d/system/”. As it doesn’t have an idea of how the user wishes to use it. Here, we will adjust it for an individual user – root. The installation process has made a file named this:

- Copy the file. Place it in the “/etc/system d/system/” folder. Put an attachment such as this:

- You have altered the title from “VNC server @ service” to this title “VNCserver@:1.service”. Whenever you wish to permit sign in from another individual, you can make another file with “2” and onward.
- Now, the next step is to alter the service file using the user name. You had transferred some unfinished files into the “/etc/systemd/system/” folder. So, you have to complete it. You must change the “” section with the title of the individual you wish to permit access using the Tiger VNC. It will have to be altered twice. First, access the service file for rewriting:

- After that, apply the “Search” option. Change the “” with the individual user name. At these two places:
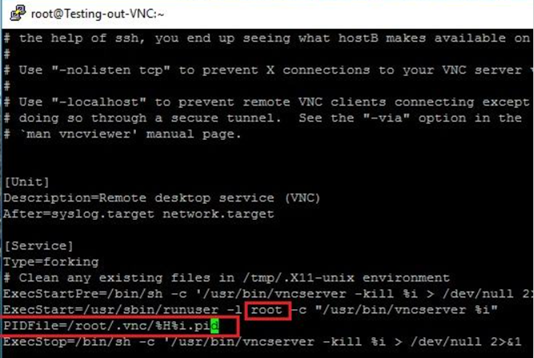
- Also, see if the directory for “PID File” prevails. An error will come out if it is not there. You may alter the path for solving this error. For the primary file, the path was something like this:

- The error will be gone after you change the path to this:

- Now, you have to authorize the VNC service. Then, launch it. After the alteration and saving of that alteration are complete, authorize the VNC service applying this command:

- You have to rerun this command for every service file that you made and modified. At the “/etc/system d/system/”, it will situate links to the proper “wants” catalog. Then, refresh the service adjustments with this command:

- Launch the VNC services with this:

- Now, put a password to the VNC server. And, also set the port numbers. Sign in with the user that wants to join. Then, apply this command:
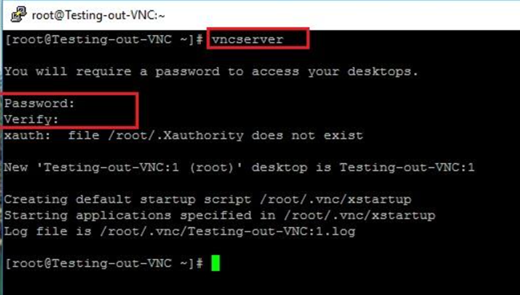
- This command will ask you to put a password for joining the VNC server. It is different from your sign in password. It also shows you the port number “1”:

- So, add the number to the given port. And it will be 5901 for this individual user. You may check it by going through the log file. Now, you can connect with the Linux system using this password and port number.
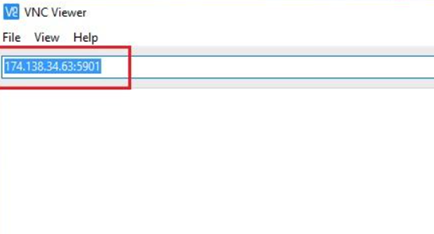
- Download the VNC Viewer. Install it. Launch the application. Put the IP address and port number on the top given box.
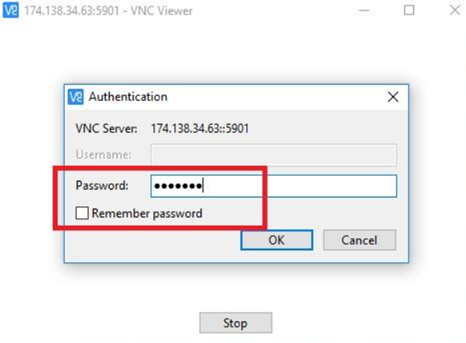
- Then, it will ask for the password you have set before. Then, it will permit you to connect.
So, that’s how you can connect to Linux with VNC.
Summary: Connect to Linux with VNC
- Connect to Linux with VNC.
- Establish a connection.
- Install VNC Viewer on the client device.
- Verify that Virtual Network Computing (VNC) is enabled on the server device.
- Get the IP address or hostname of the server device.
- Connect to the server device.
