A signature is a short message that you can add to the end of all the mails you send. You may have seen people including their name, contact information or just small smiley icons at the end of their mails. It's a nice way to add some extra stuff along with the email that you want to send. Today I am going to show you how to create signatures in Microsoft Outlook/ Windows Mail/ Outlook Express and how to avoid sending mail without any signature.

In Outlook, it is possible to create your signature for professional and business use. A signature is an essential part of your email. It establishes your identity and provides contact information for the receiver.
Today, we will guide you in creating your signature on both Outlook’s software and website. We will also talk about the things that you should include in a signature below.
Things to include in a signature
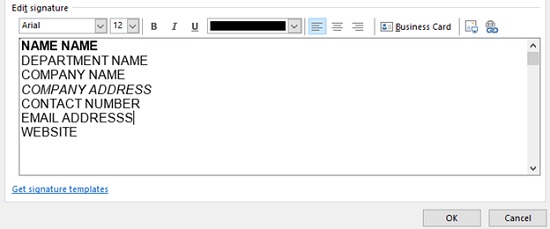
Your signature should include the following information in order:
- Name
- Department
- Company
- Company’s address
- Contact number
- Website
You can also follow the following tips to make your signature look more professional:
- Make the text of your name bold.
- Put your country code in the contact number area.
- You can also put your company’s logo or your personalized signature. Place the image either above your name or below the website area.
How to create signatures in the Outlook software?
For this tutorial, we will demonstrate the process by using the recent version of Outlook software 2020. However, you don’t need to worry about that because the steps are mostly the same as the older Outlook software versions.
Let’s get started!
- Open the software by searching for Outlook in the search bar. You can also double-click the icon if the software is on your Desktop.
- Sign in to Outlook with your email. After a successful login, Outlook will bring you to the homepage.
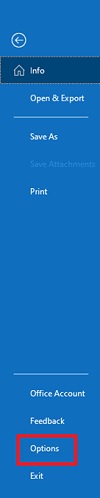
- Click the File option that is located at the upper-left of your screen and beside the Home tab.

- Find the Options button at the lower-left of your screen and click it.
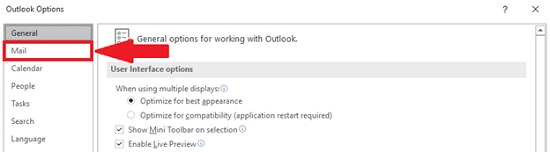
- After pressing options, the Outlook options will appear. Click Mail from the list of choices on the left.
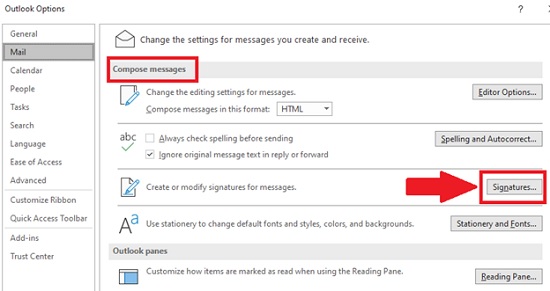
- Under Compose messages, click the Signatures button beside the Create or modify signatures for messages option.
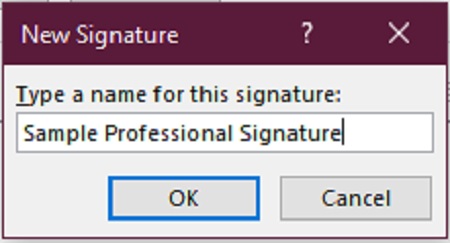
- Select New.
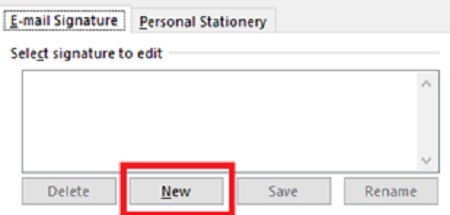
- Label the signature as you like. For this tutorial, we will name the signature as “Sample Professional Signature.” Click OK.
- Under the edit signature, fill up the textbox with your signature. You can also change the font, text color, and the like. After that, click OK.
- Press OK on the Outlook options as well.
- To see whether your signature has been saved successfully, you may create a new email by going to the homepage and then click New Email in the upper-left of your screen.

As you can see, the signature is visible in the email above. Therefore, creating signatures in the Outlook software is a success.
How to create signatures in the Outlook website?
Here’s how to create signatures if you prefer to access Outlook through the website
Steps:
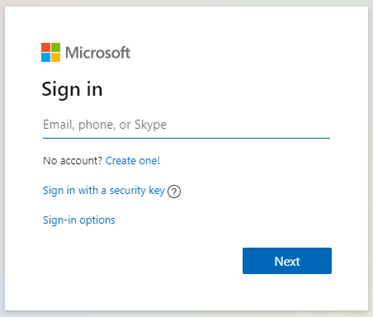
- Go to outlook.com and click sign in at the upper-right of your screen.

- Sign in to Outlook with your email, phone, or Skype account. After a successful login, Outlook will bring you to the homepage.
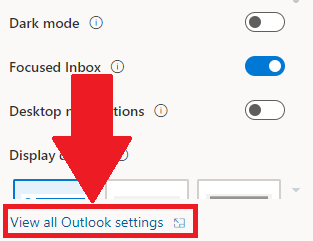
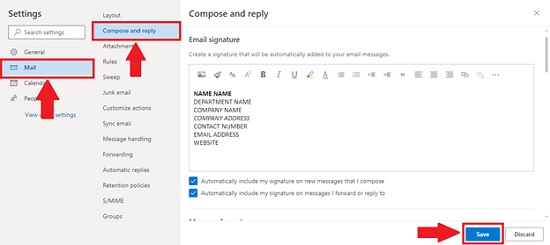
- Select the settings button located at the upper-right of your screen.

- Under Settings, scroll down until you can find the View all Outlook settings option.
- In Outlook settings, go to Mail and select the Compose and Reply option. Put your signature on the text box and click Save.
- To see whether your signature has been saved successfully, you may create a new email by going to the homepage and clicking New Email in the upper-left of your screen.
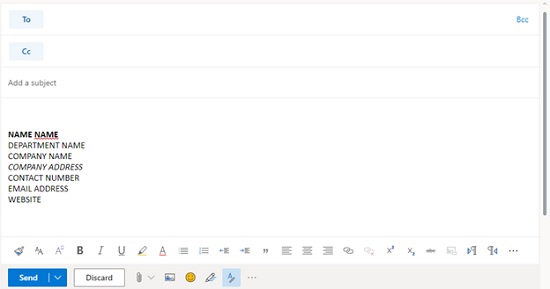
As you can see, the signature is visible in the email above. Therefore, creating signatures on the Outlook website is a success.
Final Words
Congratulations! You have successfully learned how to create signatures in Outlook. Now you can use it for your business-related emails and the like.
Summary: Create Signatures in Outlook
- On the File menu, click Options.
- In the Outlook Options dialog box, under Mail, click Signatures.
- If you want to create a new signature, select the E-mail account you want to associate with this signature from the Choose default signature drop-down lists under E-mail Signature.
- Do any of the following in the Edit signature box:
- To start a new line, press SHIFT+ENTER.
- If you want to add an image to your signature, click Picture, and then browse to find an image you want to include.
- To change font formatting for all of your signatures, click Font below the Edit signature box. Note that this will change font formatting only for text that hasn't been changed within the individual signatures.
- Click OK twice.
