So you've installed Ubuntu on your computer, and it's sitting on the bottom of your boot-up process, making you wait before Windows starts – it's time to remove Ubuntu from BIOS. Here are a few ways to do this.
Adding another booting system such as Ubuntu alongside Windows can be helpful if you want to try a new system without the risk of losing the one you have. Every time you boot, you have the choice to choose either operating system.

If you’re planning to go back to Windows, removing Ubuntu would be the best option to avoid confusing your boot manager.
In this article, we included three methods to help you.
1. Use BCDEdit to remove EFI Boot Manager
Windows has a built-in command-line managing tool for Boot Configuration Data or BCD. BCD files store the description for boot application settings and boot applications. Apart from modifying stores, it can also add boot menu options or create new stores. In addition, it is usually located in the folder %WINDIR%System32.
It’s one of the best ways you can remove Ubuntu from your disk. Here’s the step-by-step guide.
Steps:
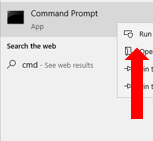
- On the search box, type cmd. Then right-click on it. Choose Run as administrator.
- As soon as it opens, insert bcdedit /enum firmware.
- Then Enter. The command will list everything it can find on the BCD store.
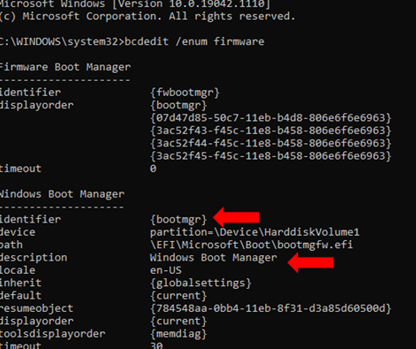
- It should include details such as the device, identifier, and even the description. Copy the identifier that you would like to delete from the BIOS. For reference, identifiers are alphanumeric strings. Make sure that you look for the identifier of the path ofEFIUBUNTUGRUBX64.EFI or something similar.
- To delete it, type bcdedit /delete [identifier]. The identifier here is the one from before.
- Press Enter and wait for it to complete.
2. Visual BCD Editor
Command prompts are one of the most common ways to remove Ubuntu from the BIOS. However, it can be frustrating. Deleting the wrong entry can make things more complicated. If you're not used to using it, it might be better to stay away from using it, unless you have no other options.
The Visual BCD Editor is one of the best dual-boot repairing tools for Windows. It's Windows' GUI version of their bcdedit utility. It can help you completely edit the boot menu without having to put in commands.
Here's how you can remove Ubuntu
Steps:
- Open Visual BCD Editor after downloading and installing it.
- It will scan your system. This can take a few seconds but it can reach for a few minutes.
- After scanning, click on BCD Store. It should be located on the left side of the screen.
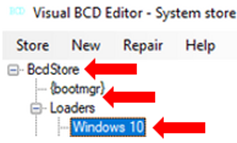
- Afterwards, select Loaders.
- There should be another option after. Click on the bootloader options. For this example, it’s Windows 10.
- On the right side, there will be a list of bootloaders available. Delete what you want to be removed by clicking on that bootloader then pressing Delete, which is located at the bottom of the screen.
3. Removing Boot Manager Options through BCDEdit
You can also remove Ubuntu by removing the boot manager. However, this can be tricky. You can end up deleting the wrong boot manager and make everything more complicated. Only use this as your last resort. That’s why we put it at the bottom of our list.
Steps:
- Open the Command Prompt and select Run as an administrator.
- Insert bcdedit /export c:bcdbackup then click Enter. This will allows you to create a backup of your CBD settings in case you delete the wrong boot manager.
- To get a list of boot loaders, insert bdcedit /v then press Enter.
- The next steps will be almost the same as with the first method. Copy the alphanumeric identifier of Ubuntu. Be careful since choosing the wrong one can make it more difficult for you. Check the description on the left side and make sure the alphanumeric characters you copied are not from Windows 10.
- Next put bcdedit/delete [identifier]. Double-check first before pressing Enter.
Final Words
Removing Ubuntu can be easy as long as you follow these steps. If it stills shows up, then it might be best to seek professional help.
Summary: Remove Ubuntu from BIOS
- Steps to remove Ubuntu from BIOS
- Restart the computer.
- Choose your language settings, and then click "Next."
- Click "Repair your computer."
- Click "Load Drivers"
- Select the operating system you wish to repair.
- Click "Next."
- Click on "Command Prompt."
- Type in "bootrec /fixmbr" and then press Enter. This will remove GRUB from being loaded in BIOS and allow Windows to boot normally. Once the process is complete, restart the computer.
