How To Block A Wi-Fi Network On Windows, Android, And Mac?
How to block a Wi-Fi network from Android, Windows, or Mac? There are several reasons of why you'd want to block a Wi-Fi network. Sometimes a complete block might be necessary, but in most cases you’d just like to black out the network itself. This tutorial is going to show you how to block or unblock Wi-Fi network on your smartphones and computers.
It isn’t comforting to see so many Wi-Fi networks in Windows, Android, or Mac devices, when you are about to connect to your Wi-Fi. Also, there is a risk of data privacy if you accidentally connect to other open Wi-Fi networks. So, the best option is to block the Wi-Fi networks on all these devices. This article will help you learn how to secure a Wi-Fi network on Windows, Android, and Mac.
Blocking on Windows
There are two ways to block unknown or unwanted Wi-Fi networks in Windows. One is to secure networks one by one. The other is stopping altogether.
Blocking Networks One by One
To block Wi-Fi networks one by one:
- Launch command prompt. It would help if you run it as an administrator.
a). You can search for the command prompt using the search tool on the Task Bar, or
b). You can use “Windows Button + R” to open “run” and then type “cmd” and then hit “CTRL + SHIFT + Enter” to open the command prompt as admin.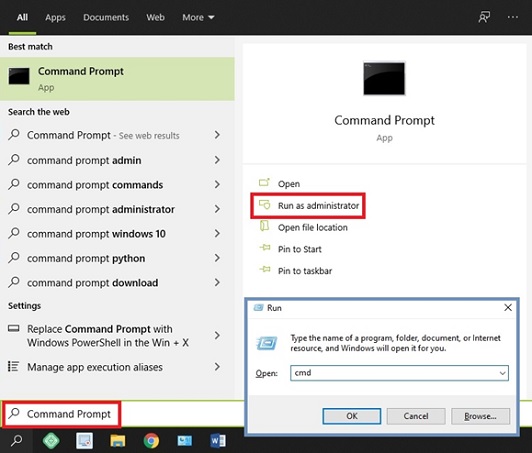
- In the command window, type this and enter:
netsh wlan add filter permission=block ssid=“Example Name” networktype=infrastructure - Use the actual name of the Wi-Fi network that needs to be blocked instead of “Example Name.”
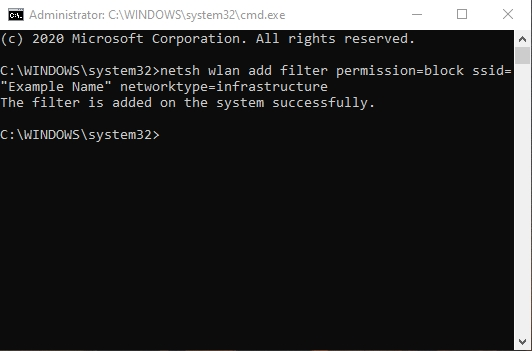
This process in Windows will block each name you enter. Note that the name is case-sensitive. Also, if the owner changes the word, you will need to reenter it again to block the network.
If you need to unblock and blocked a network for some reason, enter:
netsh WLAN delete filter permission=block ssid=“Example Name” networktype=infrastructure
Make sure to type the name correctly.
Blocking Networks Altogether
The above process can be time-consuming if there are too many networks to be blocked. Follow these steps in this case:
- Open the command prompt and enter the given command:
netsh WLAN add filter permission=allow ssid=“Example Name” networktype=infrastructure - Type the Wi-Fi network name that needs to be shown on the list instead of “Example Name.”
- Now enter this:
netsh WLAN add filter permission=denyall networktype=infrastructure - It will block all other Wi-Fi networks except for the ones you entered in step 1.
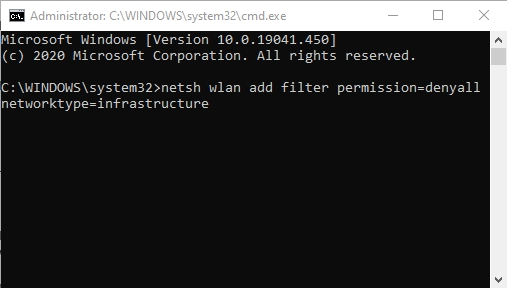
- To unblock all these networks again, enter the following:
netsh WLAN delete filter permission=denyall networktype=infrastructure - Enter “netsh WLAN show filters” in the command prompt to view all the blocked and unblocked Wi-Fi networks.
Blocking on Android
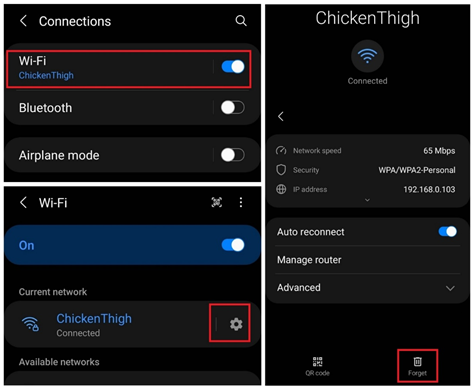
In android, you cannot block a network that won’t show in the “Available Wi-Fi Networks” list like in windows. But you forget a network so that you don’t automatically connect with it. To ignore a network:
- Go to Settings > Connections > Wi-Fi.
- From the list, tap on the Settings button beside the network you want to forget.
- Below you will find the forget button. Tap on it and confirm.
- Your device will no longer automatically connect to that network.
Blocking on Mac
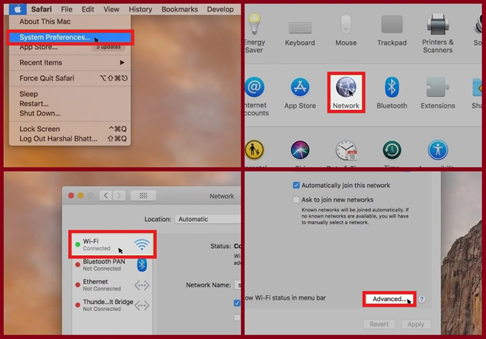
You can use the settings in system preferences to block a network from automatically connecting to your Mac.
- Go to network after opening System Preferences.
- Click on “Wi-Fi” from the sidebar to open Wi-Fi settings and hit the “Advanced…” button.
- Click on “Wi-Fi” to open the list of preferred networks. (Note: This is the list of networks that have been connected to your Mac already).
- Select a network and click the “minus (-)” button to block it from connecting to your Mac.
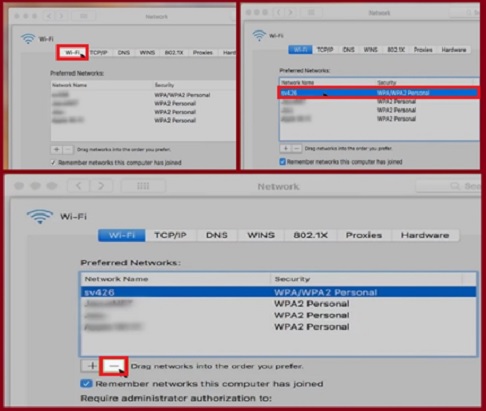
After finishing these steps, any networks that you have deleted will never reconnect automatically to your Mac.
Summary: Block a Wi-Fi Network on Windows, Android, and Mac
- Windows - Start by opening the Settings app.
- Windows - Scroll down to Network & Internet and click it.
- Windows - Click Wi-Fi on the left.
- Windows - Select Manage Known Networks.
- Windows - Click the network you want to block.
- Windows - Click the Forget button.
- Android - Open Settings and select Wi-Fi.
- Android - Long-press a network, then select Forget network from the pop-up menu.
- Mac - Launch System Preferences, go to Network, and select Wi-Fi in the list on the left-hand side of the window.
- Mac - Click Advanced at the bottom right of the window.
- Mac - Select a Wi-Fi network under Preferred Networks in the list on the left side of this window, then click the minus (-) button below it to remove it.