Have you ever tried to find how to change DHCP lease time in Windows 10? Maybe someone told you that the latest version of Windows operating system, has a number of new features and improvements, and especially the interface is very convenient and user-friendly. There are a lot of positive responses about this OS from all over the world. But some users are still concerned about whether there are bugs or issues. This article will share some common ways and tips to help you repair or resolve problems with your computer, including how to change DHCP lease time in Windows 10.

The DHCP is defined as a network management protocol that’s crucial in the communication process between your device and other IP networks.
This is because the DHCP server is the one responsible for assigning your device an IP address that allows it to connect to the network. Without it, you will need to manually assign an IP address to your device every time.
However, these IP addresses are only assigned to the device for only a specific period which is called the DHCP lease time.
What is the DHCP lease time?
The DHCP lease time is an important component of your DHCP as it determines just how long your network device can use that particular IP address in a network. An IP address is required of every device connecting to a network as this is what allows them to communicate on that network.
Think of it as your home address and no house is allowed to have the same address as the others. This is because it will cause confusion when it comes to information delivery.
However, this address is only reserved for your device for a fixed amount of time, after which it will need to ask the server for a new one.
The good news is, you can change your DHCP lease time. This tutorial will deal with how to change it on Windows 10 devices.
Checking your DHCP lease time
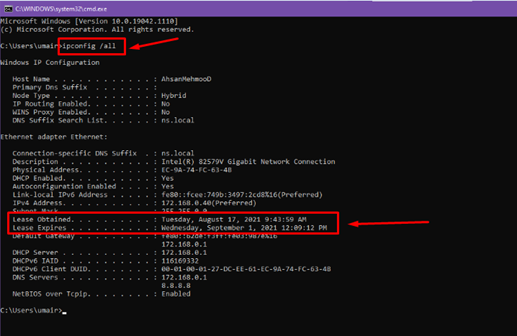
First, you will need to check your DHCP lease time. To do this, you will need to open the Command Prompt. You can do this by searching “Command Prompt” in your search bar.
Once the Command Prompt is open, type in the command ipconfig /all and press Enter. This will load the data about your DHCP lease time such as the Lease Obtained and Lease Expired.
Changing your DHCP lease time
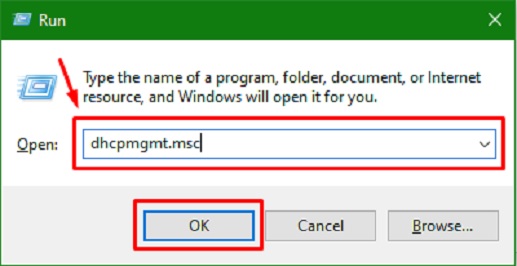
To change the DHCP lease time of your computer, you can do it by first running the DHCP management console.
Once you’re at the DHCP management console menu, open the “General” tab. You can find this in the section of “Lease duration for DHCP clients.”
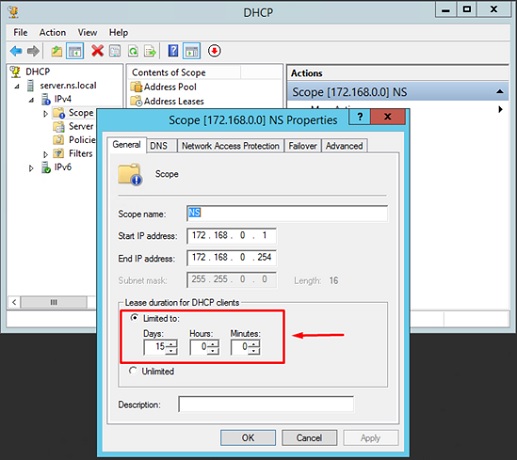
In the “Limited to” field, you can change the lease time to what you want by changing the value.
After doing so, click on “OK” to save the changes. The new settings will apply to the new requests from the new clients of the server as well as during the renewal of your old IP address.
Final Thoughts
Changing the lease time of your DHCP will depend on the type of connection your device is using. If you’re using a wired connection, setting a lease time of 8 days is the standard as it won’t leave the network as often compared to wireless devices.
Setting it to a shorter lease time will just increase the network traffic related to DHCP activities.
For wireless devices, it’s best to set it to a shorter lease time like 24 hours. This will allow regular devices to keep the same IP address for most of the time.
On the other hand, if it’s a guest network or a hotspot, it’s best to use a maximum of an hour for the lease time while office guest networks can be set to a maximum of 8 hours.
Summary: Change DHCP lease time in Windows 10
- Press Win + R to invoke Run dialog.
- In Run dialog, input dhcpmgmt.msc and hit Enter to open the DHCP console.
- In the left pane, click IPv4, then right click and choose Properties from context menu.
- In the opened window, switch to General tab and under Lease duration for DHCP clients section, select a larger DHCP lease time duration.
- Finally click OK button to save changes.
