Recently Microsoft released Windows 10 and it is packed with many new features. While most of the old shortcuts still work, the look & feel of the operating system has changed a lot. A lot of us are still getting used to the changes. Such as you want to change the location where you store your files, but you can’t since there is no option to change folder icon in Windows 10. In this brief tutorial, I’ll share with you how to do it.
![]()
There are plenty of reasons why you’d want to change the icons for some of your folders. It might be because you want to use a clever way to classify and label folders. Alternatively, it could be just a fun way of personalizing your PC to make things a bit more exciting.
If you’ve got a Windows 10 device and are looking to spice up your desktop with unique icons, you’ve come to the right place.
Here are the steps you want to follow:
Find or create the folder icon you want to use
Before you set your sights on changing the icon of any folder, you want to first start looking for a folder icon that you’ll be using.
Windows has a load of different default icons pre-installed on your computer. You might want to check these out first just in case you happen to fancy any of them.
![]()
If none of Windows’ default icons suit your style, then you can try checking out the icons available on Iconfinder which is a website that offers both paid and free icons.
![]()
![]()
If you have an icon in mind, but it’s in a format such as JPEG, PNG, and so on, you’re going to have to convert it first to either EXE, DLL, or ICO. In case you’re wondering, this is the file type that desktops use for icon files.
Fortunately, you can easily convert any image of your choice to the appropriate file type through conversion websites such as ICOConvert.
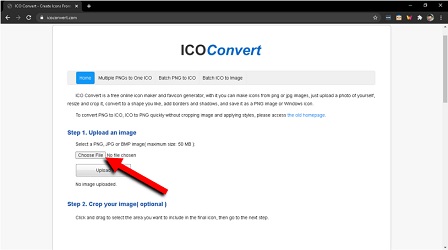
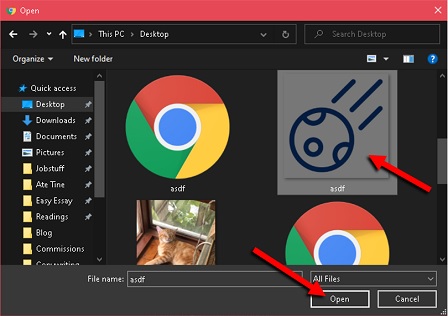
Simply click on the “Choose File” button and open the file you want to turn into an ICO file.
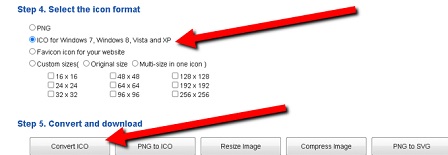
After that, you can skip immediately to Step 4 to make sure you have the “ICO for Windows 7, Windows 8, Vista and XP” option selected. Then, click on “Convert ICO” to begin downloading your icon file.
Whether you’ve downloaded an icon or made an icon yourself, make sure that you’ve saved the ICO file in a location you can easily find later on.
Right click and open Properties
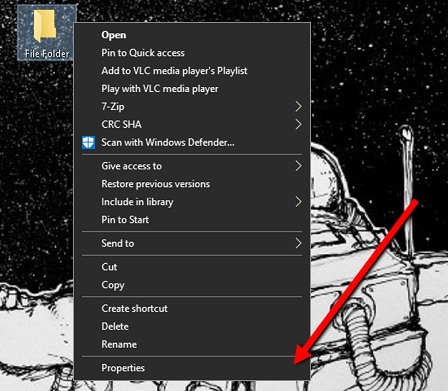
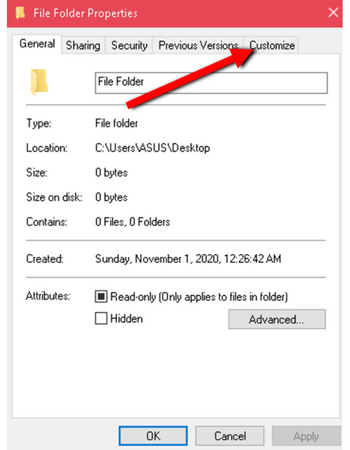
Go back to your desktop and right click on the folder that you want to change. In the menu that will pop up, click on the one at the bottom called “Properties.”
Under “Customize,” click “Change Icon”
Once you do that, a window will pop up that contains all the things you can change about that folder. On the upper right corner, click on “Customize.” Under Customize, click on “Change Icon.”
![]()
Click “Browse…”
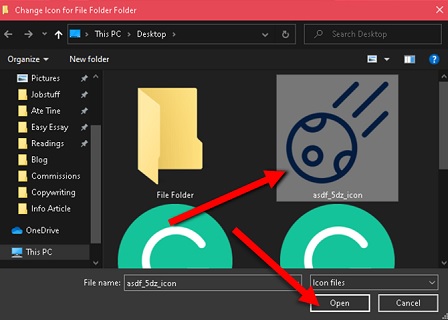
Once you do that, another window will pop up. In this “Change Icon” window, you can select any image in the EXE, DLL, or ICO file format. This is where you will look for the ICO file that you’ve saved before. Click on “Browse…” to look for it. Go to the destination of the ICO file that you want to use.
Open the ICO file you want to use
Once you’ve found the ICO file that you want to use, open it in the window that pops up. Keep in mind that your computer will remember the destination of your ICO file. This means that if you ever decide to move the ICO file elsewhere or happen to accidentally move it elsewhere, the icon for the folder will change.
If ever that happens, you can just re-do the entire process.
Click “OK” and “Apply”
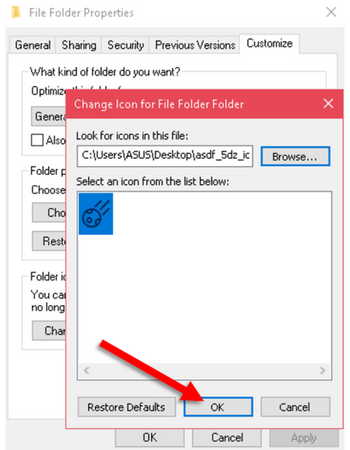
Back in the “Change Icon” window, click on “OK” to confirm that you’re selecting the correct ICO file, then click on “OK” and “Apply” to finalize it.
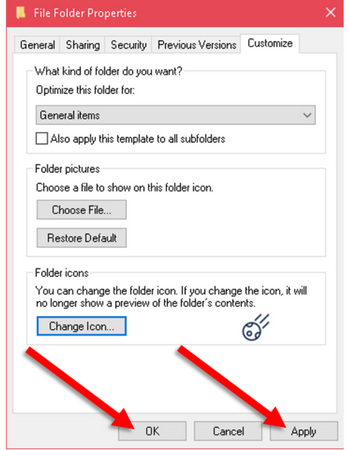
Once you’ve gone back to your desktop screen, your folder should be shown with its new icon.
![]()
Summary: Change folder icon in Windows 10
- Right-click on the folder you want to change icon.
- Select Properties from the menu.
- Click on the Customize tab.
- Click on Change Icon button at the bottom.
- It will open a windows that has all pre-defined icons, choose your favorite icon and click Ok.
- Now you can see your selected icon on the folder.
- You can also choose icon from an external file like .ico, .dll or .exe file. To do that click on Browse button instead of Change icon button and browse for the file that contains icon you want to use. Then select an icon from there and click Ok.
Conclusion
There you have it! Now that you’ve familiarized yourself with the steps needed to change icons on your Windows 10 PC, you can easily personalize your computer.