How to change android kernel? Changing android kernel is not as easy as it sounds. There are a lot of technical issues to take care of when you decide to flash a new kernel in your android mobile phone. What happens if you update to a new version of Android and the kernel doesn’t support it? Then your device goes into bootloop. This is why there are users who are not comfortable with changing the default android kernel.

Did you know, installing a custom kernel in the wrong way can wreck your phone?
Changing your android phone’s stock kernel can indeed boost your phone’s performance to a great extent. But if you make any mistake in the process, your phone will be stuck in the boot loop, and you can say goodbye to your device. So it’s essential to know the proper way of changing the android kernel.
That’s why we have come up with a proper guideline to change an android phone’s stock kernel. Follow carefully if you don’t want to make any mistakes.
What is a kernel?
Before you install a custom kernel for your android phone, you need to have a clear view of the kernel. Let’s have a deep look into it.
So the kernel is the default operating system of your android phone. It enables your phone’s software to communicate with the hardware. You can think of it as a bridge between android apps and your phone’s hardware. The picture below shall make it clear to you.

Now the stock kernel limits how much performance you can get from your phone. That means it isn’t letting your phone perform at the maximum level. This is the main reason people often turn to custom kernels.
Change your android’s kernel in 2 Easy steps
Now that you know everything about the kernel, it’s time to change your Android phone kernel. We have tried to explain the process into two steps to understand it quickly and make no mistake while installing.
Pre-conditions
- You must have a custom recovery installed on your phone. It’s a must for the process. You can use Fox recovery, TWRP, or any other custom recovery you want.
- Download the custom kernel that you prefer for your phone and store it in the internal storage. You can find lots of custom kernels on the internet. Remember that the custom kernel you want to install has to be in a zip file.
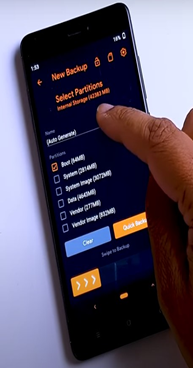
- Boot into your recovery and backup your stock kernel. The process is not very difficult. Follow the sequence to get it done. Go to recovery > Back up menu > New backup > select boot > Rename (if you want) > Swipe right.
- And lastly, make sure that your phone has at least 70-80 percent charge left on the battery.
Custom Kernel installation
- Firstly, reboot your smartphone and take it to recovery mode. Different phones have different requirements to open recovery mode. Search on the internet if you don’t know how to open recovery mode on your phone.
- Now that you have opened custom recovery, you have to wipe out Dalvik cache, Vendor cache, and System. You can leave the “System” untouched if you want to. But we recommend you clear it because it may cause a boot loop. And boot loop is something we don’t want here.
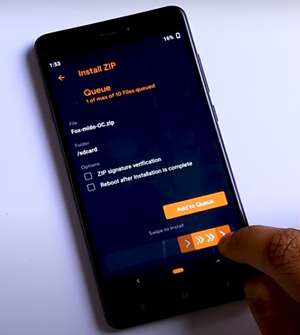
- After that, you have to go to the internal storage of your android phone and locate the custom kernel zip file. Once you find it, click on it. Afterward, the custom recovery will ask for your permission to install the custom kernel. Swipe right to give the consent.
- Once you swipe right, the recovery will start installing the custom kernel immediately. It may take some time, so keep patience. Do not turn off your phone.
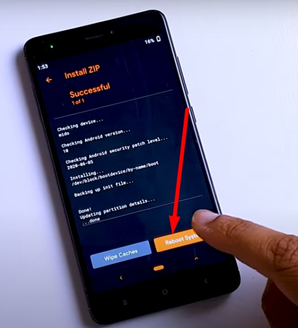
- After the completion of the installation process, all you have to do is reboot the System. That’s all. You have successfully installed a custom kernel on your android phone.
Summary: Change kernel android
- How to change the kernel on android.
- Download the most famous kernel change application, Kernelflux.
- Download your favorite kernel.
- Open app kernelflux and click on + sign in top left corner. Then select your downloaded kernel from the list.
- Click on "Start" button to begin flashing it on your device.
- Done! Kernel successfully flashed.
