Nowadays, Nintendo is not just video games. By integrating a wide range of entertainment content and by providing the means to communicate, Nintendo creates bonds and establishes new ways of playing in several different fields of life. In order to use the full potential of your Wii U or 3DS, you'll need to set up an account with them first, which will give you a Nintendo Network ID. Exactly like on Nintendo 's website, this is important for setting up eShop downloads and playing against other gamers online. Here's how to change your Nintendo Network ID if you've got a Wii U or 3DS console.
Want to change your Nintendo network id easily? Then this article is all you need.
Suppose you have created your Nintendo network id with your personal information in it. But you want to sell your Wii U or Nintendo 3DS family system for personal reasons. Now, if your data remains in your ID, it would be very harmful to your privacy as the following user gets all your information. So what should you do?
In these types of situations, you can change your id and its information, and then you can sell your console. In this article, we have tried to put it to make no mistake while performing it.
Can I change everything on my id?
So before you learn how to change your id, you better know the limitations because there are some options that you can’t touch on your Nintendo id.
You can change your gender, region, time zone, birthdate, and country on your Nintendo ID. You can even change your Mii settings and email preferences.
But there are some limitations on Nintendo id. You can’t change your birth date, country, and your name. To change your name, birth date, and country, you must contact the authority and show your valid reasons.
Change your Nintendo Network ID in few steps
To change your network id, you have to go sequentially. So carefully follow the steps below and try not to make any mistakes.
Using Nintendo device
- Firstly you have to go to the settings of your Nintendo 3DS. You will find it on the home screen of your Nintendo 3DS.
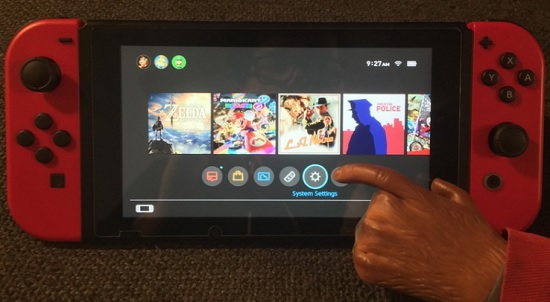
- From the settings option, go to the Nintendo network id settings. After that, click on “User settings” because you will get all your user data there. And you can change them as you wish.
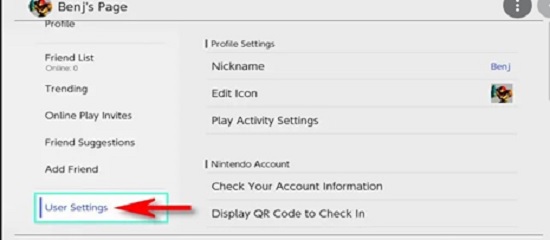
- After that, you will get access to the profile settings. Here you can change your gender information, mailing address, region, or time zone. But unfortunately, you can’t touch the name, birth date, and country option as we have already stated above.

- Now, if you are done with the profile settings, you can change the password too. For this, you have to go to the “Password settings.” Once you get into the password settings, you will see three options: Change password, Save password, Forgot password. If you want to change the passcode, click on the first option, and if you completely forgot the password, you have to use the “Forgot Password” option.
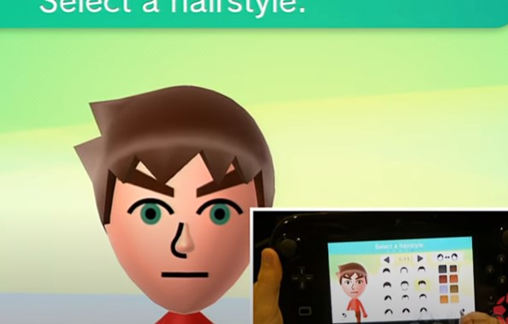
- If you want to bring some change to your Mii, you can also do that. All you have to do is launch the Nintendo Mii maker, and then you can personalize your Mii as you want.
- Suppose you are willing to deactivate your Nintendo network id forever. You can also do that by selecting the “Delete Nintendo Network ID” option. Remember that you will lose all your eShop funds, game license, etc., if you deactivate it.
Using Non-Nintendo device
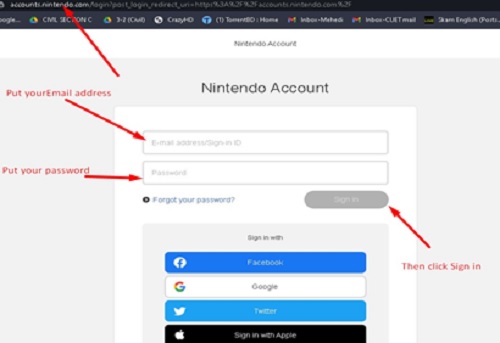
You can also change your Nintendo network id by using a non-Nintendo device. To do that, you have to go to the Nintendo website and use your Nintendo account ID and password. Afterward, you will get access to all your information, and you can do it as you prefer.
Summary: Change Nintendo network id
- Select Nintendo eShop on the HOME Menu to launch Nintendo eShop.
- Select your Profile Page from the top of the screen.
- Scroll left and select Linked Nintendo Network ID, then Next.
- Enter the Nintendo Network ID you want to link to this user, then select Link. If prompted, enter your password for the Nintendo Network ID and select OK.
- Select Unlink for the Nintendo Network ID that you want to unlink from this user, then select Unlink again on the next screen to confirm your decision. If prompted, enter your password for the Nintendo Network ID and select OK. You can now relink your Nintendo Network ID by following the steps above.
- Select Done or A to return to the Profile Selection screen, then confirm that the linked account is displayed next to your desired user profile in brackets ([]).
