Agile CRM is a customer relationship management software (CRM) that works perfectly with closely-integrated partners. It has integrated features with popular ecommerce platforms such as PrestaShop and WooCommerce. You can also connect WordPress, your website CMS provider, with Agile CRM by integrating it with Agile Widget plugin. This allows you to create forms that can collect leads and automate lead generation. The collected leads will be automatically added to your Agile CRM account or any other CRM of your choice.
Agile CRM is a web-service based on the management of customer relationships in the online platform. WordPress is an open-sourced blogging tool that is now the dominator of the management system marketplace.
WordPress is based on the languages: PHP and MySQL. It can be integrated with any web hosting page of yours. It can also be integrated with your Agile CRM account very easily. There is no need for any coding experience.
Agile CRM WordPress integration
- Go to https://www.agilecrm.com/wordpress-crm from your browsing app. Click on the “Try the Agile CRM WordPress Plugin”. This will download the Plug-in.
- Login to your WordPress site. Go to the dashboard. Navigate to “Plug-ins” and select “Add New”.
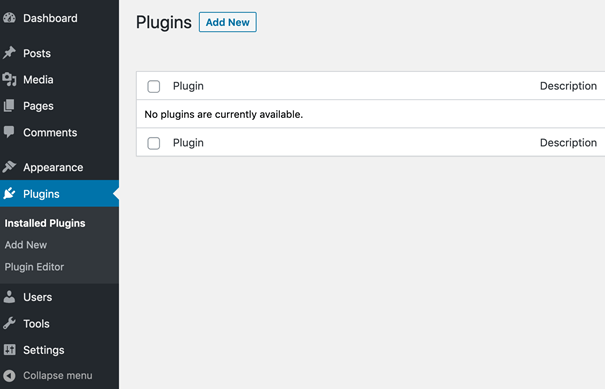 Click on the “Upload Plug-in” option and locate the file from your local directory. Click on the Plug-in file from your downloaded files. Click “Open” and “Install now”.
 - If the plug-in is installed successfully, click “Activate Plug-in”. If there is a new version of the plug-in, click “Update Now”.
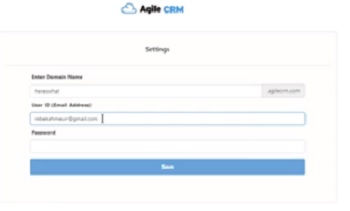
 Once you have updated, go back to the “Plug-ins” option ad click “Activate”. The Agile CRM plug-in will be activated and it will be visible in your menu section at the top.
 - Click on “Agile CRM” and select “Settings”. Enter your Domain name, Mail ID, and Password. Click “Save” to apply your changes.
- Now go to the “Landing Pages” option and test it on your test pages. To set it, click on the “Pages” option and select your test page to edit.
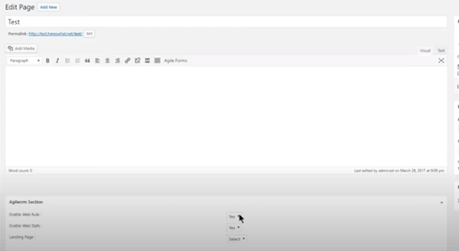 At the bottom of the edit page, you will see the Agile CRM section. Select the “Landing Page” options only and select your test page. Click on the “Update” icon which is at the right side of the webpage.
 - Click on the “View Page” option and it will show you the landing page that you have set up.
By using WP Fusion
WP Fusion is an app that works as a communication channel between Agile CRM and WordPress. It allows the synchronization of all user data and custom fields. You can set up a direct connection to your Agile CRM account.

To connect Agile CRM with WordPress by WP Fusion:
- Download the latest version of WP Fusion to your system.
- Navigate to “Plug-ins” and select “Add New”. Click on the “Upload Plug-in” option and locate the file from your local directory.
- Install the file and click “Activate Plug-in”
- Go to “Settings” and select “WP Fusion”
- From the “Select CRM” drop-down option, select “Agile CRM”. For Agile CRM configuration, you need to provide some information: Your sub-domain, your user mail, and your API key.
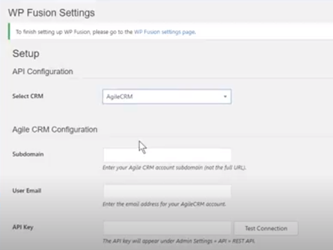 • Your Agile CRM sub-domain can be found by logging in to your account and looking at the URL in the address bar. Copy the first part of the address after HTTP and before .agilecrm.com. Now, paste it in the designated field in WP fusion.
• Your mail address is the mail you use to login into your Agile CRM account.
• For the API key, click on the “profile” icon in your Agile CRM account in the top right corner of the webpage and select “Admin Settings”. Scroll down to the “Developers and API” on the left-hand menu. Copy the “Rest API” code. Paste it in the field in WP Fusion. Click on the “Test Connection” icon to test your API key.
 - WP Fusion will make a connection with your Agile CRM account. It will import your tags and custom fields. Finalize the process by clicking “Save Changes”.
Summary: Connect WordPress with Agile CRM
- Install AgileCRM form and widget plugin.
- Set up an account with AgileCRM.
- Login to AgileCRM and create a new form.
- Go to Marketing->Forms.
- Click the "Create Form" button.
- Fill out the form name and description at the top of the page, then click Save and Next.
- Add any fields you want on your form by dragging them from the left column to the right. For each field, you can configure it by clicking on its gear icon.
- Once you're done with all your fields, click save at the bottom of the page and you'll be taken back to the form list.
- Copy your form embed code and paste it in a WordPress post or page using WordPress text editor.
- Use Shortcode in widgets & sidebar.
