Windows Defender Firewall keeps you away from all kind of risks. It is constantly monitoring your system and protecting it from hacker attacks, malicious software or other types of threats. However, in order to have the best protection it is important that you allow Windows Defender Firewall to monitor specific Windows applications you are using so no threats may get through that way. Read this article if you need help on how to create firewall rules for apps in Windows Defender.
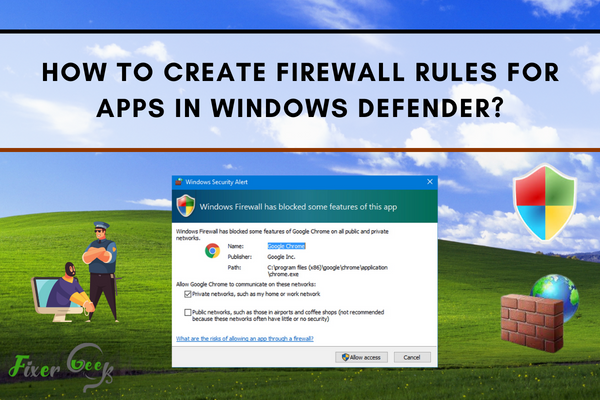
Apps that need internet connection must undergo through the firewall. Without the firewall, the computer can be vulnerable to malware attacks through the apps. For this reason, Windows 10 has a built-in security in the form of ‘Windows Defender’. You can set rules in the Windows Defender how to treat app request for internet connectivity. Follow these steps to create Firewall rules for apps in Windows Defender.
Step 1 Opening the Windows Defender
- Click on the Start menu.
- Select ‘Run’ and then type ‘WF.msc’. This will open the Windows Defender Firewall. Click ‘OK’.
Step 2 Selecting a Profile
The program is at default settings when first initialized. Hence, it will give you options on what type of profile you intend to choose. It can be ‘domain profile’ for specific purposes, ‘private profile’ for home use or ‘public profile’ for networks on public places.
Mostly, users select ‘private profile’. If you want to view more details on each profile setting, follow these steps:
- Locate the ‘Advanced Security’ node found at the top portion of Windows Defender Firewall.
- Right-click on it and select ‘Properties’.
Step 3 Customizing the Profile
You can customize a profile by setting up the rules. The purpose of these rules is to set up patterns on what to do with a particular request of the app, whether it requests info from the internet to the computer or vice versa.
You will be encountering 3 types of rules: ‘Inbound rules’ which refers to the incoming traffic from the internet to the computer. The second one is ‘Outbound rules’ which refers to the outgoing traffic originating from the computer to the Internet. Lastly, the ‘Connection security rules’ are less commonly used rules for the traffic, usually from one computer to the other while connected in a network.
By default, inbound connections are blocked and permissions are always asked by the app before proceeding. The rules can bypass that situation and perform what they are set to do. To access creation of new rules for either inbound or outbound connections, here are the steps to follow:
- On the left navigation pane of the Windows Defender, right-click on either ‘Inbound Rules’ or ‘Outbound Rules’.
- Select ‘New Rule’ and a window will appear.
While trying to create new rules, here are things to keep in mind:
- ‘Allow’ rules that are defined explicitly will be prioritized over the block settings that are default.
- ‘Block’ rules that are defined explicitly will be prioritized over any ‘Allow’ rules that are conflicting.
Step 4 Creating the Rules
Assuming you have opened the Windows Defender Firewall, chose either ‘Inbound Rules’ or ‘Outbound Rules’ and click on ‘New Rule’. It is now time to define which app’s inbound or outbound connection is to be allowed or blocked. To do this, follow the steps below:
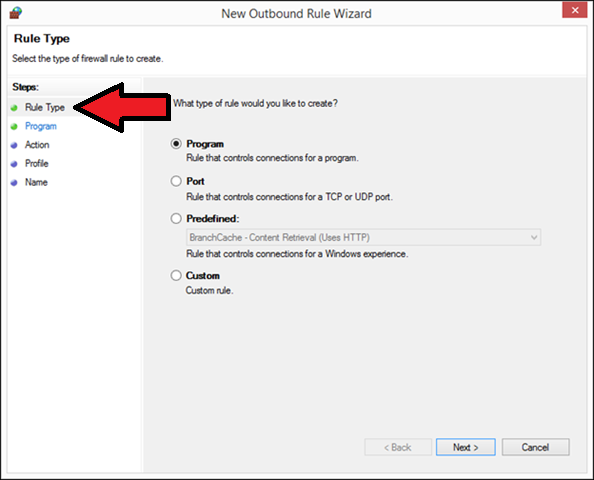
- The first step is to select which type you would like to create on the Rule Type option. You have 4 options: ‘Program’ which applies to a certain program; ‘Port’ which applies to network traffic through a certain port; ‘Predefined’ which controls certain Windows service connections; and ‘Custom’ which can be the combination of the previous options.
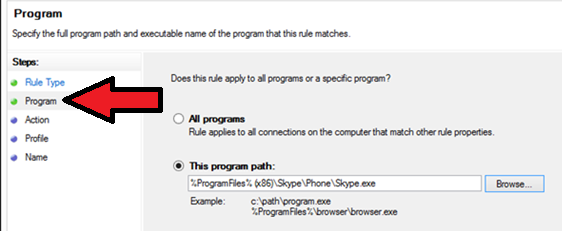
- If you want to create rules for a particular app or program, select ‘Program’ and then click on ‘Next’. Select ‘This program path’ and click on ‘Browse’. Make sure you select the launcher of the app (the one with the file extension ‘.exe’).
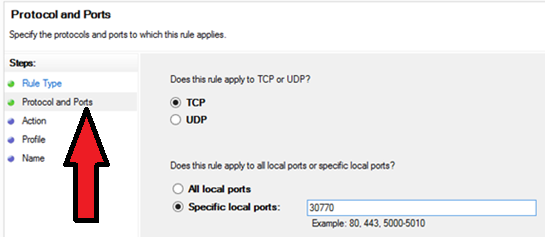
- If you want to create rules indirectly for the app via manipulating the inbound or outbound connections of a certain port, click on ‘Port’. If you are creating an inbound rule, you can only configure the local port number. If you are creating an outbound rule, you can only configure the remote port number.
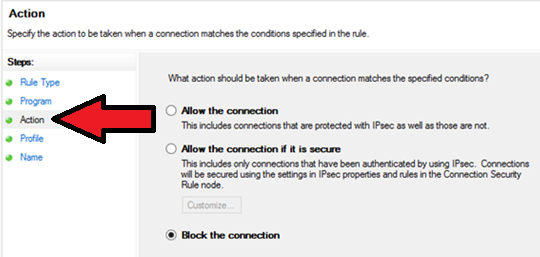
- After selecting the program or the port to be configured, click on ‘Next’. On the ‘Action’ step, you have 3 options: ‘Allow the connection’; ‘Allow the connection if it is secure’ which involves specific authentication procedures; and ‘Block the connection’.
- After making your choice, click on ‘Next’. On the ‘Profile’ step, you will be asked which type of network will the rule be applied; whether it will be in the network Domain, Private or Public. If you select your network type as ‘Private’ initially, then at this step, select ‘Private’.

- After marking the checkbox, click on ‘Next’. Lastly, on the ‘Name’ step, you can assign a name of the rule and its description for convenient enabling/disabling. Then, click on ‘Finish’.
Summary: Create Firewall rules for apps in Windows Defender
- Open Start.
- Search for Windows Security, and click the top result to open the experience.
- Click on Firewall & network protection.
- Select the option called Allow an app through firewall.
- Click the Change settings button at the top of the window.
- Click the Add button.
- Expand the drop-down menu labeled Allowed apps and features and turn on or off desired options.
- Select the application you just added, and use the drop-down menus next to Private and Public to configure whether it should be allowed or blocked in each connection type.
- Click OK to confirm your changes.
Conclusion
If ever you have difficulty in tracking the rules you’ve created or lost count of the apps you have either blocked or allowed, then you can restore the settings into default. It will be better to do this without internet connection first or any apps running in the background. For extra measure, restart the computer so that the settings will surely take place.
