Cutting a video is not difficult. It’s an opposed to many other editing tasks, cutting doesn’t involve much high-end editing skills. You have just to cross chop, cut or clip parts of your videos and then use another video editor or software to join clips, music and effects to create your final product. How to cut videos on Mac? Actually there are a lot of ways, in this post I will take you through some simple steps for cutting a video on Mac.
Got something unwanted on your favorite video? Or do you need to remove some extra segment from a long video clip? You can easily cut them down by simply using different software available for macOS.
Before you proceed to edit a video, you need to determine first what you need to do. If you just want to cut a video and nothing more, then some easy in-built solutions for you can save your money and time both. You just need to play the video and give the appropriate command to the software, and then you are ready to go.
How to cut videos with MacOS built-in QuickTime Player?
QuickTime Player is an open and dedicated software available for your Mac. This is an in-built software for your Mac that can easily edit videos and trim them without giving a lot of effort or using any other additional software.
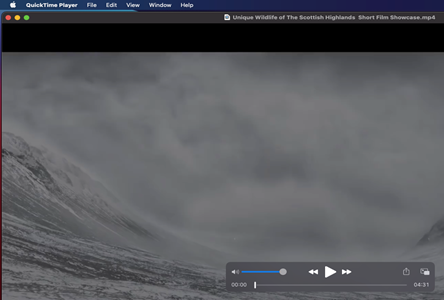
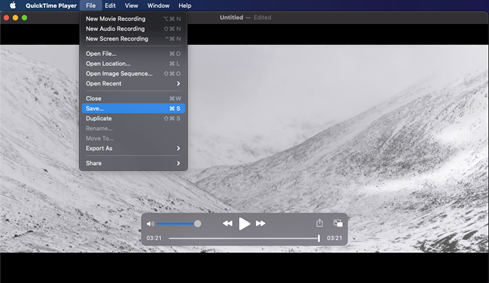
- Open your desired video that you want to edit from your Mac or a removable device through QuickTime player.
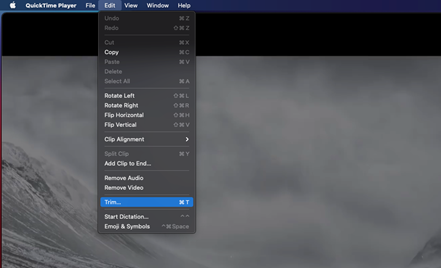
- Click on the “edit” option on top of your screen. Or you can also use the “shortcut+T” button to enter “Trim” mode.
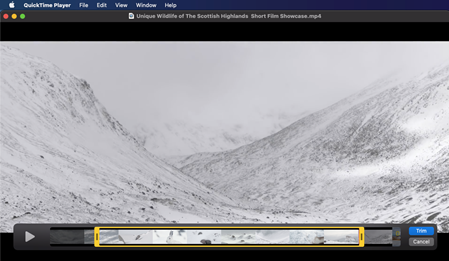
- Then you will find a yellow box on the bottom of your screen where you can move the box to select a specific portion of your video to remove a selected part.
- Once you are done selecting the segment you want to remove, select the “Trim” option on the bottom right corner of your mac screen.
- You are DONE! Your new edited video is ready to play.
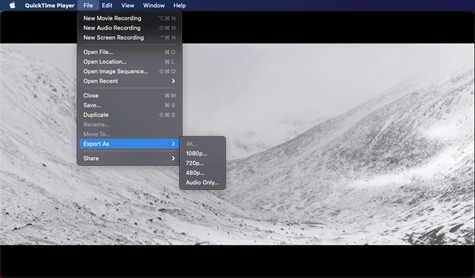
- Now you can save your edited video in different resolutions like 480p, 720p, or 1080p and all. You can also save your video in both .mov or .m4v format.
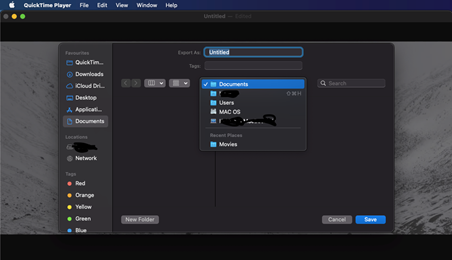
- Lastly, select the folder path where you want to store your new trimmed video. You can rename your video here if you need to.
Alternate apps to cut videos on Mac
Apart from the built-in video editor, there is some easy-to-use third-party software available for mac users. A few of them are given below,
Wondershare Filmora
Wondershare Filmora for Mac is a wonderful app like its name. It can support hundreds of video formats like mp4, avi, mkv, and all. It is a classic package for a user to customize a video with some cool AI effects like Face-off, Tilt Shift, Jump Cut, and many more. Mac users can easily merge and cut large action cam videos within a short amount of time.
Avidemux
Avidemux is another free video editor available for mac users for simple cutting, filtering, and other kinds of stuff like these. It has got a GNU GPL license and also supports various formats like mp4, mov, asf, aac, ac3, DVD compatible mpeg files, and all. Its interface is clean and easy to run. The most important part is a user can find it free on the internet.
OpenShot
OpenShot is another free video editing software similar to QuickTime Player, available for mac users. It has also got a minimalistic and user-friendly video editing option where mac users can easily cut their videos.
All in all, we can see that cutting a video on a Mac is quite easy by following the above-mentioned steps.
Summary: Cut videos on Mac
- Open the video in QuickTime Player.
- Set the time range you need to cut.
- Trim it!
