How To Find And Remove Temp, Cache, Dump, Restore And Other Junk Files In Windows 10?
540 Views
One of the reasons for junk files showing up on your computer is due to the several applications you install and uninstall on your PC. There are some applications that free up temporary files, cache, and restore files that may take a lot of space on your hard drive. So, it is recommended to clean them up when you have enough space to save these temporary and junk files. Temp files can slow down your computer by taking up disk space. In this article, I am going to show you how to find and remove temp, cache, dump, restore and other junk and temporary files in Windows 10.
Occasionally, you may notice that a percentage of your drive space decreases when copying or downloading a common file, installing a new program, or allowing a certain update. This happens because of the junk files created by Windows.
They exist just by using your internet browser or having the remnants of an uninstalled file or an abrupt deletion of a certain file. Sometimes, they exist after Windows fixed itself when it encountered a system error before.
In order to delete these unnecessary files, you can apply the following methods below.
Deleting Files On Recycle Bin
- Locate Recycle Bin on your desktop.
- Right-click on its icon and select the “Empty Recycle Bin” option.
- To confirm the permanent deletion, click on “Yes”.
Deleting Temp Files Automatically
- Click on “Start” and locate the “Settings” app.
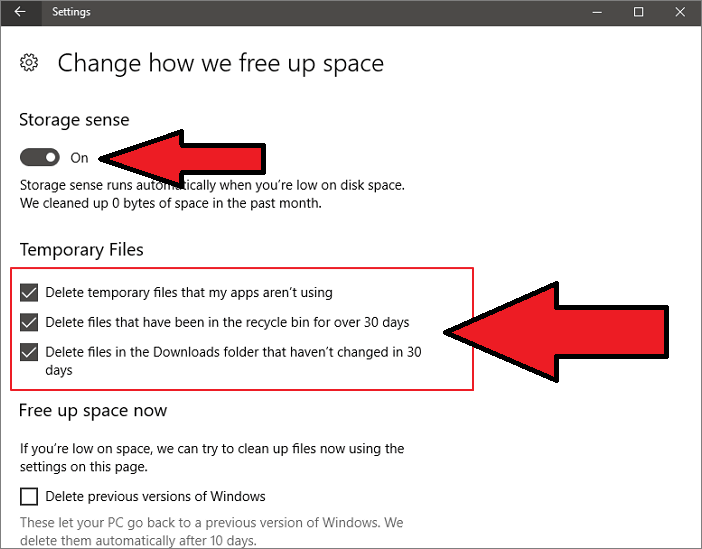
- Open “Settings” and go to “System”. Afterward, click on “Storage”.
- On the “Storage Sense” section, move the slider button in order to turn on the feature.
- Click on the “Change how we free up space” link.
- Turn on the “Delete temporary files that my apps aren't using” option and other options that involve automatic deletion.
Deleting a Variety of Junk Program Files
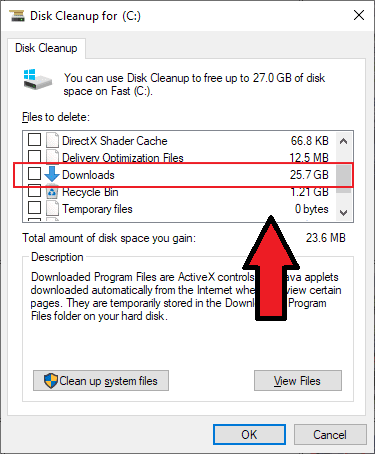
- Type the phrase “disk cleanup” on the search box.
- Among the search results, select the “Disk Cleanup” option.
- Choose the drive that needs to be cleaned up then click on “OK”.
- There are a lot of files listed that can be cleared of including unwanted program files, log files, and thumbnails. Some checkboxes are pre-selected like “Temporary Internet Files”, “Downloaded Program Files”, and “Thumbnails”. Mark the ones you wish to be deleted.
- Click on “OK” afterward.
Deleting Junk Browser Files
- Open the internet browser you frequently use.
- After the browser is opened, press Ctrl + Shift + Delete on your keyboard all at once. A menu will appear in order to delete caches and browsing history.
- To delete any remnants or unwanted files from using your browser, mark the checkboxes on “Cached data and files”, “Cookies and saved website data”, and the “Tabs I’ve set aside or recently closed” options. You may even include the “Browsing history” option.
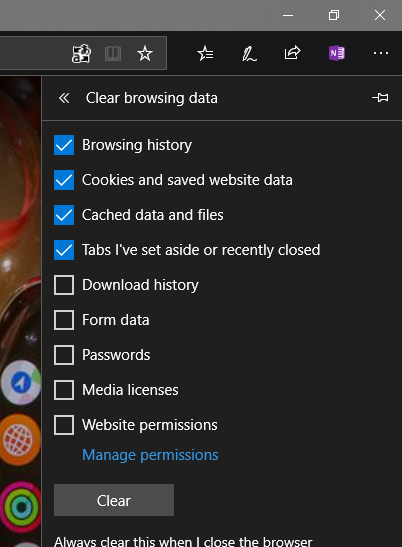
- Click on “Clear”. Note that deleting them is only good until your next usage.
- If you want this process to be automated, select the “Always clear this when I close the browser” option. However, having a browser history can be quite an advantage on certain occasions, so exercise caution when proceeding.
Deleting Restore Points
- Type “disk cleanup” on the search box.
- Among the search results, select “Disk Cleanup”.
- Choose the drive that needs to be cleaned up then click on “OK”.
- Click on the “Clean up system files” button below the window.
- Afterward, select the “More Options” tab.
- Go to “System Restore and Shadow Copies” and click on “Clean Up”.
- To confirm the deletion, click on the “Delete” button.
- To delete all of the restore points created, click on “Start” and locate “Computer”. Another alternative is to type “computer” on the search bar and select the exact match from the search results.
- Right-click on it then select “Properties”.
- On the left side, click on “System Protection”.
- Click the “Configure” button to access the settings for System Restore.
- You can choose to disable the System Restore or allot a percentage of your drive for the feature. After making configurations, click the “Delete” button to have all the current restore points deleted.
Summary: Find and remove temp, cache, dump, restore and other junk files in Windows 10
- Section: Clear your downloads folder.
- Clear your recycle bin.
- Delete temporary files.
- Delete the contents of the Temp folder.
- Empty the contents of the Downloads folder.
- Remove unnecessary system restore points.
Conclusion
It may be annoying to deal with temporary and junk files, but it is necessary to free up disk space in case your system is running low. You can also use third-party programs that can do most of the deletion process such as CCleaner and EaseUS Todo PCTrans.
Hopefully, the steps we’ve provided above can help you.
