There are many unknown facts about your Mac, and deleting files from SD Card on Mac is one of them. The question about how to delete files from SD Card on Mac might come up if you have upgraded your iPhone or iPad to iOS 11. This is because Apple chose to use the iCloud Drive for transferring data and it means that you can’t delete anything directly from the SD Card on your device after the upgrade. Instead, you will need to follow certain steps so that you can do this quickly.
SD cards or other portable storage facilities have brought about a revolutionary change in portable device usage. Now, gigabytes of data can be stored in a chip the size of a thumbnail. So they’ve become quite a convenient choice for smartphones, digital cameras, drone cameras, and other electronic devices.
However, SD cards are meant to store data temporarily. They have limited storage and likely to receive new data in the form of photos, music, video, etc regularly. So you’ll have to move or delete existing data to free up space. SD cards are also quite fragile and vulnerable. And not to mention, prone to “getting lost”.
So it’s wise to free up the SD card by backing up the files and deleting them with a factory reset. We’ll learn how to do so with a Mac.
Some common reasons for deleting SD card files
- To make it usable on a new device, with a new file system. The existing old data may not work properly on a new device. So it’s a good idea to format and start fresh.
- Corrupted files. These files are damaged and won’t run. They may further damage your system files if you allow access to your device. So better get rid of them asap.
- If your file system is corrupted and doesn’t show up on camera or cellphone.
- For any other issue that may prevent the SD card from working properly.
What do you need?
- Your Mac computer
- A card reading adapter or
- A device with a USB cable
- A third-party cleaner software (Optional)
Walking the traditional way
Deleting files with the Mac built-in file explorer is very simple.
- Connect the SD card to your Mac. You can use a card reading adapter or connect the device that the SD is associated with. Use a USB cable for that. You can also connect via the cloud. It’ll take longer than the previous methods though.
- The SD card will show up on your Mac as a drive with an associated name. Open the drive.
- Select the file(s) you want to get rid of. Hold the Apple button and click for multiple selections.
- After selection, drag and drop the files on the trash can. It’s on the bottom right corner of your screen.
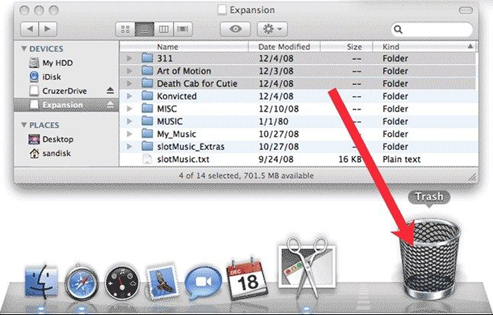
- Files inside the trash can are restorable. If you want, you can empty the trash can manually. Now press Shift + Command + Delete. It’ll permanently delete those files.

With the disk utility feature
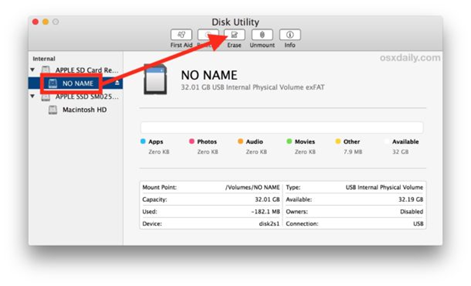
There’s a disk utility feature on Mac that lets you completely erase your SD card. To use this,
- Connect the SD card following any of the steps mentioned in the previous section.
- Launch your Mac disk utility.
- You’ll appear on the “First-aid” tab by default. Navigate to the erase tab.
- Please note that this action will permanently remove all the data from your SD card. If you want to delete a select set of data instead, avoid this procedure.
- After you hit the erase option, provide a name for the SD card and select the desired file format.
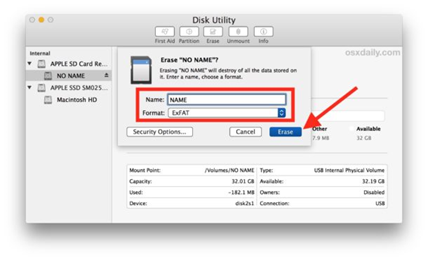
- Now hit the erase button and it’s done!
Using a third-party app
Aside from the system provided methods, you can also use third-party software like Super User to safely remove data from the SD card. There are also plenty other free/premium tools to take care of your problem.
Summary: Delete files from SD Card on Mac
- Open a Finder window and navigate to the SD card.
- Click on the "View" menu near the top of the screen, hold down the Option key and select Show Library.
- Open the folder named "Application Support".
- Open the folder named "CrashPlan".
- Locate and delete the file.
