If you are using a custom built PC, you might have noticed that the maximum screen resolution that you can set in Windows 10 is 1366x768 pixels. When we build a custom computer, we generally ensure that the GPU and monitor both support higher resolution so that when we upgrade our OS to Windows 10, the display resolution becomes a problem. The screen resolution reaches maximum value of 1366x768. So in this tutorial, I will tell you about the method to increase Windows 10 screen resolution beyond maximum.
Screen resolution is the clarity of images and text, as displayed on your screen. Items on the screen will always appear sharper and smaller at higher resolutions and larger at lower resolutions. At lower resolutions, few items can fit on the screen while at higher resolutions, more items can fit the screen. A higher resolution can be as high as1600*1200 pixels, while a lower resolution can be as low as 800*600 pixels. The resolution to use depends on the resolutions supported by your monitor.
CRT monitors usually display a high resolution of 800*600*1024*768 pixels and work effectively at different resolutions. Laptop screens and LCD monitors, which are also referred to as flat panel displays, work best at specific resolutions and supports higher resolutions.
Large monitors support high resolutions. The ability to increase the screen resolution totally depends on the capacity and size of yor monitor and the type of video card you use.
Windows allows you to select display resolution from multiple resolution settings. In windows 7, you only had one recommended setting and one low setting, but you were allowed to choose other settings from the resolution slider found on the control panel. Windows 10 gives you many resolutions options to choose from.
Here is how to choose the highest resolutions you want from windows:
- Click on the start button.
- Go to settings.
- Click on the system.
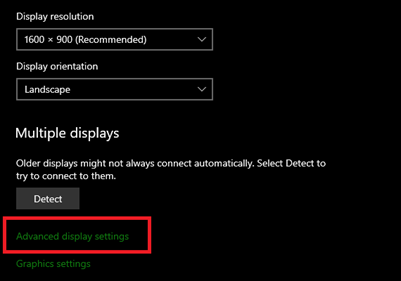
- Get on the display tab and press on advanced settings. Scroll down to the bottom of the advanced settings screen and click on Display adapter properties.
- This will take you to the properties of the display adapter. In the adapter tab, ''press the list all mode'' button. It will redirect you to a new window showing each resolution which your display can support.
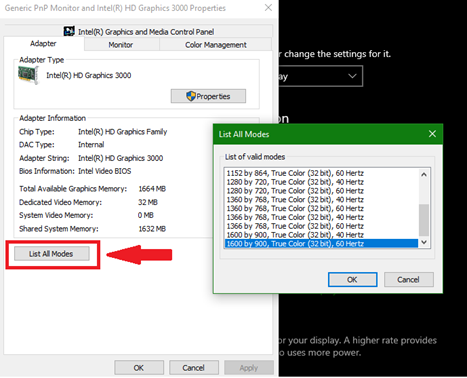
- Check on the highest resolution supported by your monitor and click 'OK,' which is followed by the word ''Apply'' on the properties window.
The resolution you select will be applied on your monitors' screen display, and you will be given an option to revert to the previous resolution if you don't like it. Note that you can't set a resolution that is not supported by the adapter. This is usually prevented by your hardware limitation and not the operating system.
But if windows do not provide you with the maximum resolution you want, here is how you can add it using custom resolution. You can use the custom resolution to virtually add any screen resolution and flexibility using the following method.
Setting a Custom Resolution on an Intel-based Graphics Card
You should first check whether your computer supports the graphics feature then follow these steps:
- Ensure you have the recent Intel Graphics Driver.
- Press Ctrl + Alt + F12 to open the Intel Graphic Driver properties. You can also right-click the window desktop and go to graphics. If you are asked to select application mode, go to advanced mode and press OK.
- below the display tab, check on the Custom modes/ Custom Resolution and select it. In case you get a warning, click yes and continue.
- Under settings, give the specifics of height and width as you also refresh rate provided in the boxes (e.g., 2400 x 1024).
- Click add and when prompted with a confirmation dialogue click yes.
- If satisfied with the current resolution, click, OK. To remove the custom resolution, click remove under remove custom resolution.
Summary: Increase screen resolution beyond maximum in Windows 10
- Right-click on the desktop and open the NVIDIA control panel.
- Click on Change resolution.
- Under Customize, select the Use NVIDIA scaling with fix aspect ratio check box.
- Change scaling and set it to Full screen. Click on Apply to make changes.
