How To Lock Files, Folders And Drives In Windows 10?
590 Views
Are you looking to lock files and folders in Windows 10? Maybe you want to ensure that a particular folder and its contents aren't accessed by anyone else. Maybe not. But you're definitely here because you want a simple guide on how to lock files, folders, and drives in Windows 10.

Locking files, folders, and drives in Windows 10 can be very useful when you have important and confidential documents on your computer. If you use Windows 10 as your operating system, then you can use two different ways to lock files, folders, and drives.
The first method is a little bit complicated but will require no third-party applications. On the other hand, the second one will be the easiest. Just by using an easy-to-use application, you can protect your files, folders, and drives from unwanted users.
Let’s have a look at each of them.
Using folder encryption
Using folder encryption is one of the most common ways of locking your files, folders, and drives. Here are the easy steps you can follow:
- Locate any drive, folder, or file you want to encrypt.
- Right-click on it and choose Properties.
- In the Properties window, choose General menu.
- Choose Advanced.
- Click on the checkbox right next to “Encrypt contents to secure data”.

- Click OK then Apply.
- A new pop up window will appear. It will ask you to confirm whether you want to apply the change to this drive only or also to the folder, subfolder, and files in it
- Choose one of the options that you think suits your needs better.
This method is wired to your Windows user account. It means that when you are logged in to your account, your chosen drives, folders, and files will be automatically decrypted. Yet, when you are logged out from your account, the files will be encrypted again and other users will not be able to open them.
Using Folder Lock
The application we will be using here is called Folder Lock. This application is specifically designed to lock files, folders, and drives in a Windows computer. You can download the application from its official website.
If you haven’t had the application on your computer, open your browser and go to https://www.newsoftwares.net/folderlock. Once you have the app installed, follow the steps below to lock your files, folders, and drives.
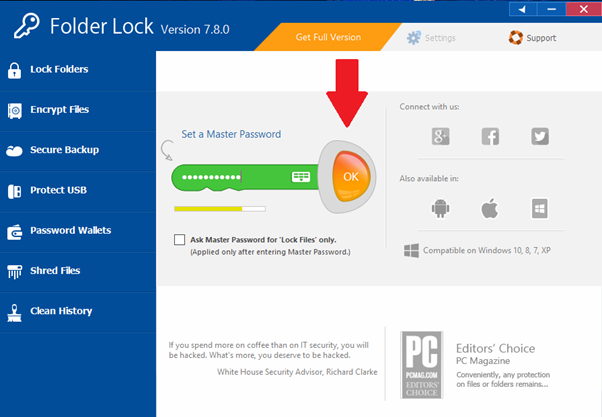
- Open Folder Lock. The app will then ask you to set a Master Password. The master password will be used to access Folder Lock.
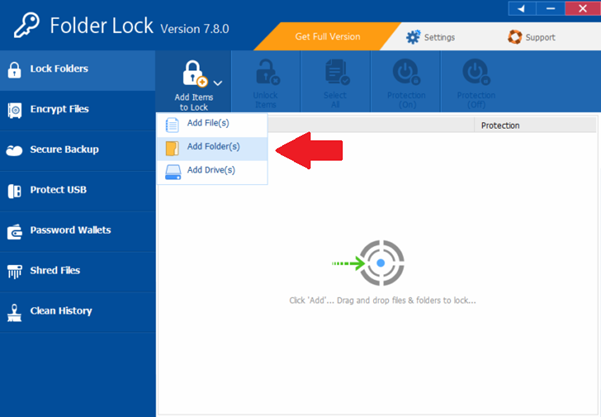
- Go to the Lock Folders menu and choose Add Items to Lock.
- Choose one between Add File(s), Folder(s), or Drive(s) according to your need. Here, you will see the process of locking a folder as an example. Don’t worry, the process for locking files and drives will be quite similar.
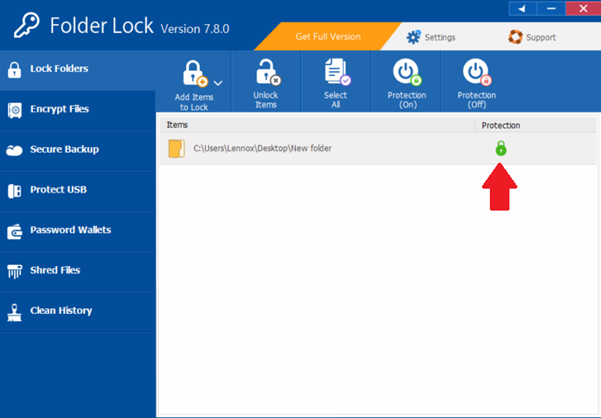
- Locate the folder you want to lock and click OK.
- After you click OK, you will see the selected folder on the Protection tab. If you see a green lock icon beside your folder name, it means you have successfully locked your folder.
In Folder Lock, you can also make a specifically encrypted drive. You will be able to put any important files and folders in it.
- Click Encrypt Files menu and choose to Create Locker.
- It will then ask you about the Locker Name and where you want to locate it.

- Click Next.
- Set the password for the locker.
- Set the maximum allowed size for the locker, the smallest size is 300MB.
- Click Finish and you have successfully made an encrypted locker.
In the encrypted locker, you will be able to put any files and folders that you don’t want other users to see. The locker will only be accessible from the Folder Lock application. This way, the you can ensure the safety and security of the files and folders in it.
Summary: Lock files, folders and drives in Windows 10
- Open the folder or drive that you want to lock
- Click the Security option in the toolbar
- Click Advanced to open the Advanced Security Settings window
- Select the user account that you want to lock and click Disable Account
- If prompted, select Yes on the pop-up dialog box
