How to map a network drive in Windows 7? It sounds a little technical but don't be put off by that. Simply follow the step-by-step instructions in this article and you will have no problem mapping a network drive in Windows 7.
You’ve probably thought of how to send your files from computer to computer. Sometimes, the files you need to send are just too huge to be done over the internet. If you think about it, sending files this way might even be safer.
Accessing your files from a different computer is easier if your PC or laptop is part of a LAN. You can easily transfer your files without having to use your USB. To make this happen, you’ll need to map a drive letter to that particular network folder in Windows 7.
If you're not familiar, when you map a drive, you assign your computer's drive letter to a server path. You can even set it up in a way where you can connect them without having to go through the same tedious process in the future.
Here’s how you can do it
- From your Start menu, choose Computer.
- Once you click Computer, you’ll find Map Network Drive on the toolbar. Select that button so that it opens the dialog box for the Map Network Drive. You should also keep in mind that you need the other computer’s network permission to access the folder you want to share to the local drive.
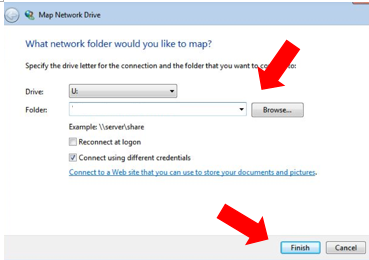
- From the drop-down list of the drive, choose the unused drive letter that will be used for the network folder.

- Type the path on the Folder box. You need to enter the network’s share pathname to the server. You can also click on the Browse button then find the shared network folder if you’re not sure about the pathname.
If you want to choose a mapped folder that was previously used, you can find it from the drop-down list within the previously entered pathnames. - Now choose Connect Using Different Credentials. After that select Finish.
- To continue, you’ll need to use your email login on the domain in the User name box.
- For the password, just type your email password before clicking OK.
If you’re not an administrator, you’ll need to do ask your network administrator to type their username and password when the Windows Security dialog box pops up. Click OK once finished.
How to reconnect to the same server?
You can do the following steps so that it’s easier to reconnect in the future.
- From the start menu, choose Computer.
- Then select the server.
- Another way to do this is to choose Reconnect from the Logon pop-up box. This will prompt Windows to map this same path or drive every time you turn the computer on.
- After all these steps, you won’t have trouble setting it up. As you hit Finish, Windows automatically creates a network drive. It will then open right away in Windows Explorer.
You will be able to access the other computer’s files, folders, and subfolders. All you will need to do in the future is open the network drive from Computer. You can even access it from the My Computer icon.
It won’t be disconnected until you choose to. It automatically connects every time you turn on your computer unless you stop it.
Summary: Map a network drive in Windows 7
- Right-click on Computer.
- Click on Map network drive.
- Choose a free letter (e.g. Y) to assign to the network share.
- Enter the path to the network share resource as \\server\shared_folder.
- Check "Reconnect at logon".
- Click on Finish.
Conclusion
Knowing how to map a network will help you save time whenever you need to transfer files. It’s also helpful if you need to access a folder from another person’s computer.
It’s an easy way to quickly locate files. Mapping a network drive is useful not just in school computer labs and offices. You can also set them up at home. Just always remember that you will need to ask permission from an administrator when you set up the network.
