How To Move Windows 10 Apps To Different Drive Or Partition?
366 Views
This is a common confusion for many people. How do you move windows 10 apps to different drive or partition? You can move the Windows 10 Apps using below steps:
In the past, Window users encountered situations where they had to uninstall or delete certain apps to free up more space for their device. This is agreeable an uncomfortable and almost annoying situation to be in especially if you are a tech person and need a lot of apps on your device.

If you have ever been in this situation or are in now, I bring you glad tidings. Before the introduction of Windows 10, it was quite difficult to move in-between storage, that is, switching apps across different storage.
But thankfully this feature is available with Windows 10. Now you do not have to worry about losing those apps as you can safely transfer them to a different partition or your hard drive.
This ‘life-saving’ feature on Windows 10 allows the transfer of files, apps, and photos to an SD card. This feature works for both desktop and mobile phone versions of Windows 10. Keep reading to find out more about this feature and how best you can use it to make your Windows 10 life easier.
The Steps for Moving Windows 10 Apps to a Different Drive
Now, how can you go about this transfer of the existing app from your Window 10 to your hard drive or partition? Here are some steps to help you.
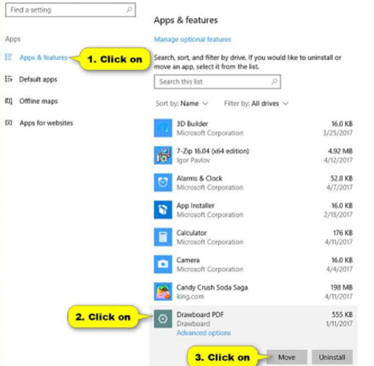
- Open your settings and tap/click on the Icon for Apps.
- On the left side, you will see Apps and Features, click on it. Now, click the store app you want to relocate e.g. Drawboard Pdf. Then next click Move.
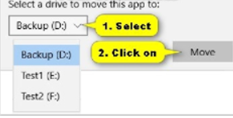
- Now select what drive you want to export to and click on move.
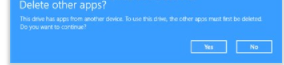
- If your selected drive or partition contains an app from other devices then a Yes or no icon will appear on your screen for you to continue because you have to delete those other apps to move this new app to the drive.
- You can now move this app into your drive.
- When you are done moving the apps, close your settings.
Warning
During this process of moving your apps to an external drive or partition, you may encounter some warnings like ‘moving app failed.’ If this pops up on your screen, close and open the app again. The app will already have been installed on the drive or partition. It is more like a false alarm type of warning.
Note that when an app that was originally installed from Windows Store is transferred to a specific location on the drive, Windows 10 may create a ‘WpSystem’ and ‘WindowsApps’ at the drive’s root. The folder and files in this folder will become EFS encrypted so that only your account will have access to that data.
Now it's time to save those apps, files, photos, and videos. You no longer have to delete them to free up space. All you need to do is to move them safely to a partition or hard drive that is easily accessible.
Summary: Move Windows 10 Apps to different drive or partition
- First, locate the app you want to move.
- Select Properties.
- Select the Location tab.
- Click on Move.
- Choose where you would like to move the app.
- Click OK when done.
- Click Apply and then OK to save the changes and start the moving process.
Conclusion
Windows 10 is indeed an improved version that makes like easier for its users. I hope you have a great time using this operating system and enjoy all its great benefits and innovation.
With this practical step by step instruction, you will be able to effectively move whatever app, file, or photo to a new location externally or internally. In case you come up with any challenges on the way we hope with the picture guide you will be able to sort it out easily.
