Generally, the default settings of a computer are good enough; however, some of the performance freaks have their way to do some modifications so that they can get the maximum out of their computers and other devices. By overclocking, you can be assured a better performance than any other device.
Overclocking is the process of boosting the CPU’s (Central Processing Unit) core clock past its factory settings. This way, your processor can run at higher clock speeds than what it was intended to.

Overclocking your processor can seem like a daunting and complicated task that is reserved for the tech-savvy. However, advancements in technology have made overclocking to be a pretty simple process that even beginners can safely do. In this article, we will look at how to overclock a processor for Windows 10.
1. Identify Your CPU:
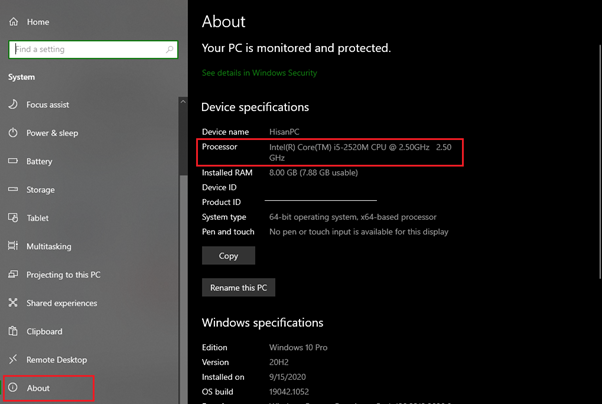
Before you overclock your laptop processor, it is important to first identify the figures of your particular processor. Check the manufacturer’s website to determine the allowed settings and the overclocking capacity. Open the system’s window to find information about the processor in the system section.

2. CPU’s Core Temperature:
One of the most important figures to monitor when overclocking is undoubtedly the core temperature. Since overclocking increases the CPU’s core temperature, it is a good idea to measure it first so as to determine a baseline and compare any changes when doing future tests.
3. Perform a Stress Test:
The other thing is to perform a stress test of the system, especially if you intend to undertake a serious CPU overclock. A stress test helps you to establish whether the CPU has the right stability to handle an overclock. It pushes the CPU to its limits, so you can monitor how it handles the workload.
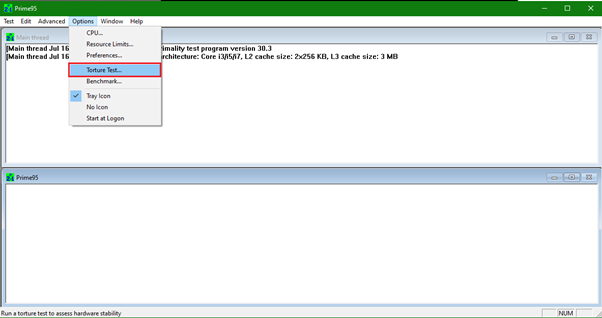
There are several tools for performing a stress test including Prime95 and IBT. The test will place a 100% workload on all CPU loads. To do a stress test using the Prime95, follow these steps below:
- Open Prime95 and click on ‘torture testing’ on the options panel.

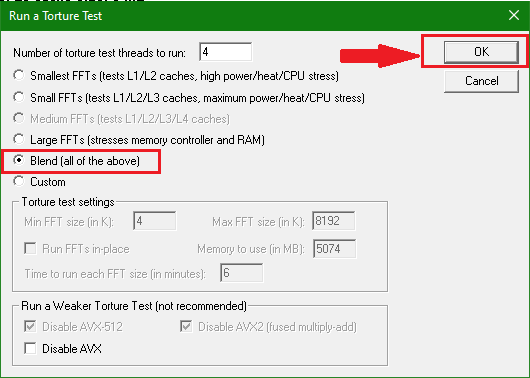
- Select blend, and then click OK. This will allow the stress test to run.

- This will cause the temperature to rise slowly, after which it will level out.
- When this happens, click ‘Test’ at the top left of Prime95.
- Then click ‘Stop.’
Before conducting the stress test, you want to ensure that your computer is clean and well ventilated. This is important because the computer is likely to heat up when doing the test. You can also close other programs, as the test is likely to slow them down. Allow the test to run for one to two hours.
4. Check CPU’s Performance:
Before you get into the process of overclocking, it is also important to monitor your CPU’s performance. This is a vital thing to do since overclocking pushes your processor beyond its factory settings. For this task, you can use the Cinebench tool, which works to reproduce a rendering workload. To do this;
- Extract the archive and launch the Cinebench Windows 64 Bit.
- Then, click the Run button, next to the CPU, to start rendering.
- Once the rendering process is complete, you will see the current score. Be sure to note it down for later comparison.
- Also, monitor the CPU’s temperature as your benchmark.
If you intend to monitor gaming performance, the 3DMARK Basic would an excellent tool.
5. Open BIOS Settings:
Once you are ready to get started with your overclock, the first step is to open the BIOS settings. Also known as the UEFI, the BIOS includes key settings of the computer. To access it, follow the below steps;
- Shut down your computer, and turn it on again.
- As the PC restarts, you will be given a number of BIOS setup keys to choose from. Usually, these keys are F2, F10, or Delete keys.
- Once you identify the BIOS key for your PC, press it repeatedly, and your PC will enter into BIOS.
- The next step is to look for Advanced CPU Cores Settings, OC/Overclocking, Advanced frequency setting, or anything similar.
- A number of options will appear; nonetheless, it is recommended to try ‘Automatic Overclock’, ‘CPU Upgrade’, or ‘OC level’ function.
6. Adjust CPU Multiplier:
For the next step, you need to increase the multiplier in order to raise the clock speed. Multipliers are also referred to as CPU ratios, and they correspond to the speed of the clock. To get the clock speed, you need to multiply the base clock which is usually 100 MHz Therefore, a multiplier of 32 (*100 MHz) will give 32 GHz.
Slowly speed up the computer while monitoring how it goes. Then, save the settings and reboot your PC. Open Prime95 to stress test and benchmark to determine performance. As the stress test runs, follow the steps below to monitor the processors' clock speed;
- Right-click on the Windows button.
- Once open, click on Task Manager and then on the Performance tab.
- Check to see if the CPU tab displays the new speed.
7. Upping the Processor Clock Speed:
If you are looking to increase the clock speed, here is what you need to do:
- Look for the CPU voltage setting, which can also be referred to as Dynamic Vcore, CPU Vcore, and CPU VCCIN.
- Since the CPU voltage is usually set to 1.25, slowly increase the number to about 1.4 or 1.5.
- Doing this will increase the maximum overclock of your system.
- To increase the CPU clock speed, be sure to adjust upwards the front-side bus multiplier to 5 percent increments until you attain 20 percent.
Summary: Overclock my Processor in Windows 10
- Open the Run program.
- Run the command msconfig.
- Go to the Boot tab, and then click Advanced Options.
- In the Advanced Options window, select an option to enable and set Maximum processor state.
- Now, you can see the Advanced Boot Options screen.
- You are required to confirm all options applied in this step, so click Yes.
- Restart your computer.
Conclusion
Were you wondering how to overclock your Window’s 10 processors? We hope that this article comes in handy, and you will be able to confidently and safely overclock your processor.