Are you using Windows 10? If yes, you might be in a situation when you have to prioritize programs in Windows 10. This article will help you to solve this problem quickly and easily.
Windows 10 determines how your systems and apps run by prioritizing. Every program and process is assigned at a given time based on priority. Your system will then make a decision on which background and foreground apps are important then prioritize them according to their importance.

That said, if you want to prioritize other programs, then here are some methods you can follow:
Method 1: Using Task Manager
One of the simplest methods when it comes to giving priority to processes in Windows 10 is through the Task Manager. However, the Task Manager can only assist you in changing the priorities of running processes. Here's how:
- Press CTRL + ALT + DEL at the same time to open the task manager.
- Check the details of different apps as presented by the screen, then select the app you wish to prioritize more.
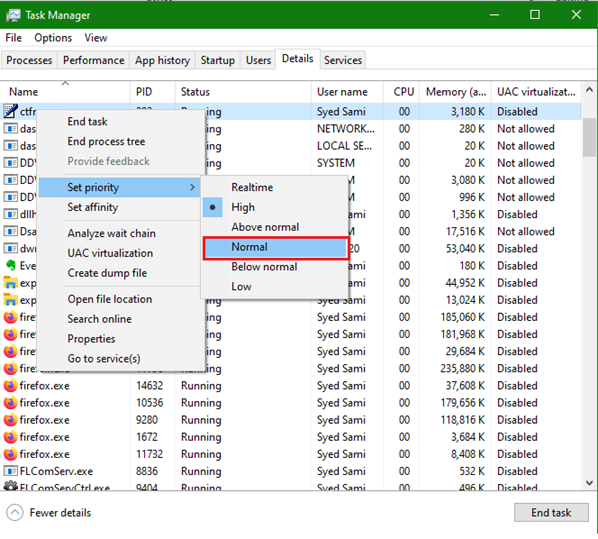
- Right-click on the program you want to prioritize. Hover on the Set priority option, and several options will appear, including Normal, High, Real-time, Above, Low, and Below normal.
- Simply choose from one of the options to change a specific program's priority. You can always repeat this process for different Apps.
Method 2: Using Command Prompt
There are two ways to set priority by using the Command prompt. One is for already running apps, while the other is for the apps you are about to run.
How to set priority for an already running process
- Open the search bar through the Start menu and type "cmd" to open the Command Prompt.
- In the window, type or copy and paste the Command given below and fill in all the details required, including the priority level. Let's assume our priority level is high, and winword.exe is the process name. The Command will be as shown below.

- Once done, simply press Enter. If, for example, you want to change your priority to normal, the Command will be as shown below.

- Simply press Enter after.
How to set priority to start apps
- Open the search bar through the Start menu and type "cmd" to open the Command Prompt.
- In the window, copy and paste this Command: start ""/PriorityLevelName "Full path of the application file."
- Note that for the process name, you have to fill it in the Command. After that, hit the Enter button. For example, let's assume you want to make changes for the priority of Windows Word. We have noted that the process name for the word is winword.exe, and the priority level is assumed to be high. Thus, the Command should look like this:

Summary: Prioritize programs in Windows 10
- Open Start menu and click Settings.
- Click System.
- Click Apps & features.
- Click Advanced options.
- Select the program you want to prioritize in "Choose which apps can access your Realtek Audio device".
- Scroll to the bottom of the window and click Save changes.
Conclusion
Using the above methods, you can prioritize programs and systems on your Windows 10 system. However, you can also use the registry editor to prioritize programs. Depending on how you plan to use your system, there are surely some apps that you use more commonly than others.
However, if you have a couple of programs running at the same time, always ensure that you are working with a specific background and application. High priority is recommended for people who use more apps all at once.
