How to Change the Network Connection Priority in Windows 10? Windows 10 allows you to easily set a different priority for each of your Internet connections. The ability to assign a priority is useful when you are using your home broadband connection because it allows you to make the best use of your limited bandwidth by slowing down other connections. On the other hand, when you switch to a faster connection, you can easily boost your primary network connection. In this article, we will review how to change the network connection priority on your Windows 10 computer.
Windows 10 is very efficient at choosing the optimum network connection to access the web. But you may have to adjust the priority order of the network connections manually from time to time. Such as if you wish to work with the Wi-Fi connection rather than the Ethernet connection when both network connections are present. You can also disable unused network connections. But this is not an adequate answer to the problem as you may need those network connections later. So, a more straightforward fix is to change the interface metrics to select the priority position by which Windows 10 will use the network connections.
Changing the Network Connection Priority in Windows 10 applying Control Panel
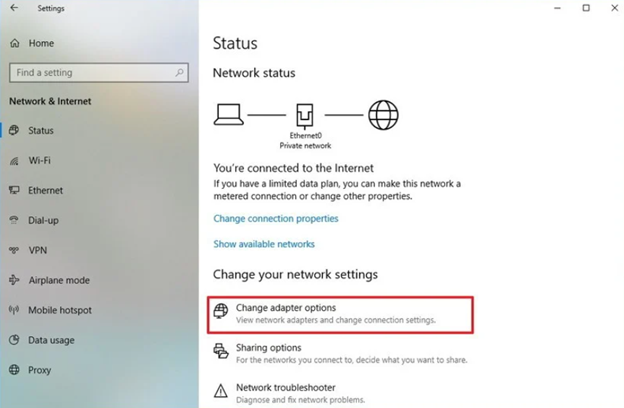
- Access the “Settings” menu on your PC. Select “Network & Internet.” Open the “Status” section and pick the “Change adapter options”.
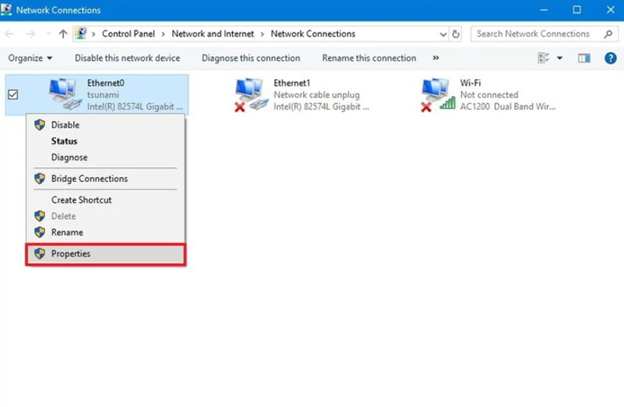
- Pick the network connection you wish to prioritize and open the context menu by right-clicking on it. Then, click on the “Properties” option.
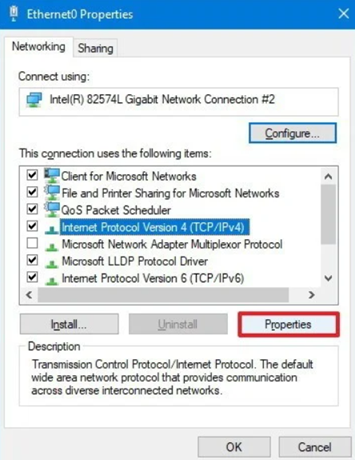
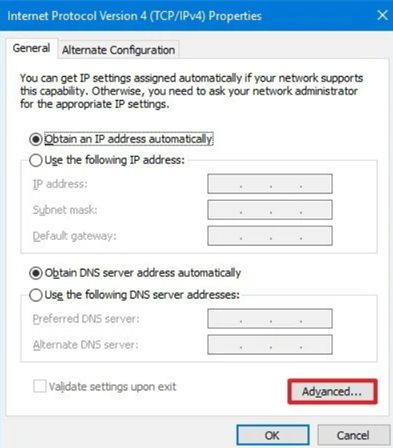
- Choose the “Internet Protocol Version 4 (TCP/IPv4)” option. If you are working with the “IPv6”, then you may need to configure the “Internet Protocol Version 6 (TCP/IPv6) option too. Typically, the default system is IPv4. Open the “Properties” section.
- The “IPv4 Properties” window will show up. Select the “General” section. Look for the “Advanced” option and access it.
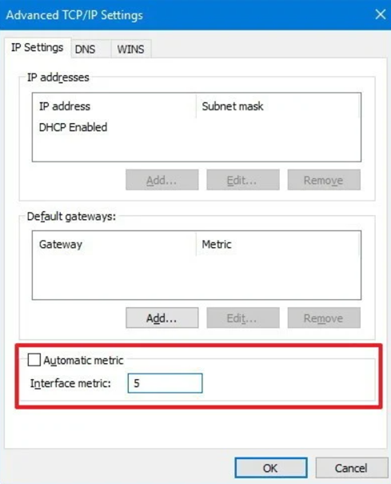
- Check out the box beside the “Automatic metric” option. Then, select the “Interface metric” and put a priority number in the blank field. Setting a lower value means more priority to that network. Choose “OK” to save the adjustment.
- Pick the “OK” option again and go for the “Close” option. After that, Windows 10 will automatically prioritize the network connection according to your selection when connecting to several networks. You can also delete the adjustment by selecting the “Automatic metric” option from the “IPv4” page.
Changing the Network Connection Priority in Windows 10 applying PowerShell
- Access the “Start” menu on your PC. Look for “Windows PowerShell”. Open the top result by right-clicking on it and choosing “Run as administrator.”
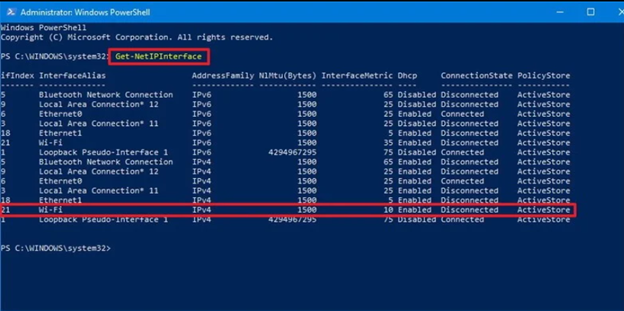
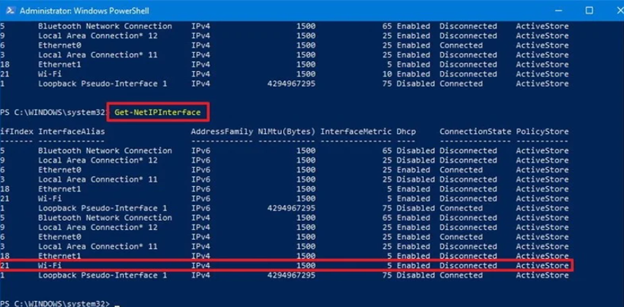
- Put the “Get-NetIPInterface” command and tap the “Enter” key. It will detect the current interface metric and the index number of that interface. Here the interface index is number 21.
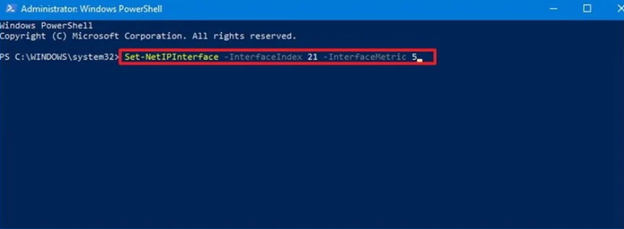
- Then, put this command: “Set-NetIPInterface -InterfaceIndex 21 -InterfaceMetric 10” to modify the priority number of the network connection and hit the “Enter” button.
- The “Interface Index” number here represents the network you wish to prioritize, and the “Interface Metric” number represents the priority number of that network. Here also, the lowest number means the highest priority, same as before.
- Then, put this command “Get-NetIPInterface” and hit the “Enter” option to check the newly assigned metric to the network connection.
- If you wish to set the network connection priority before and let Windows 10 choose the network connection priority, then access the “Windows PowerShell” again.
- Put this command “Set-NetIPInterface -InterfaceIndex 21 -AutomaticMetric enabled” and tap the “Enter” option. Also, see that you are using the correct interface index number to set to automatic metric.
Summary: Change the Network Connection Priority in Windows 10
- Click the Windows Start button and select Settings.
- Select Network and Internet.
- Choose Wi-Fi.
- Click Advanced Options.
- Use the arrows to change the priority of your networks.
