This blog will be useful for those who want to know how to see other computers on network in Windows 10. I will also describe how to share files between 2 PCs. This method is useful when you need to get a file from one PC from another by the help of USB stick, LAN or Internet connection.
Sharing a network to multiple computers, through LAN, is extremely helpful especially when transferring files or accessing a single printer. However, you might encounter a problem of not being able to view the presence of other computers connected.
The different methods below will enable you to see other computers connected without risking the network security.
Method 1: Enable the Network Discovery
- Open the File Explorer in Windows.
- In the left side, locate the tab ‘Network’.
- If Windows alert you about the network discovery being disabled, go to ‘Settings’ and head to ‘Network & Internet’.
- Next, go to ‘Sharing Options’ and enable ‘Turn on network discovery’. However, there is a shortcut located above the File Explorer and you can press it to proceed quickly on the ‘Sharing Options’ menu.
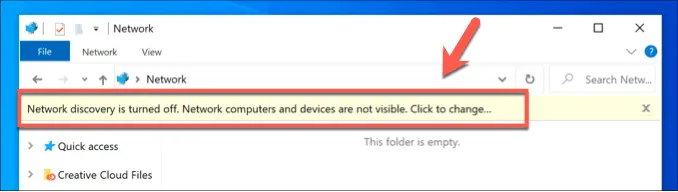
- Once the Network Discovery is enabled, other computers are now visible. They can now be accessible, and you can exchange files freely.
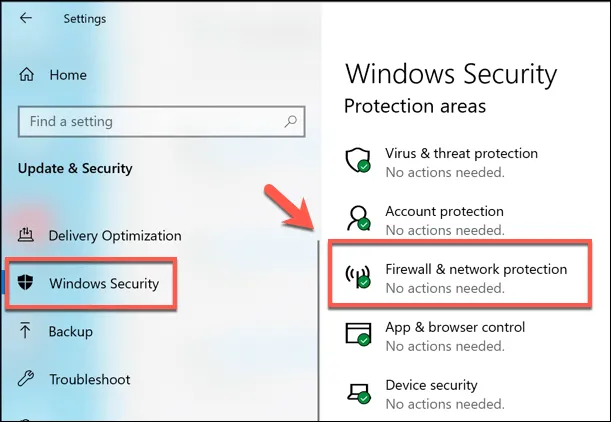
Method 2: Configure the Firewall
- Click on ‘Start’ and select ‘Settings’.
- In the Settings window, select ‘Update & Security’ and choose ‘Windows Security’.
- Next, click on ‘Firewall & network protection’.
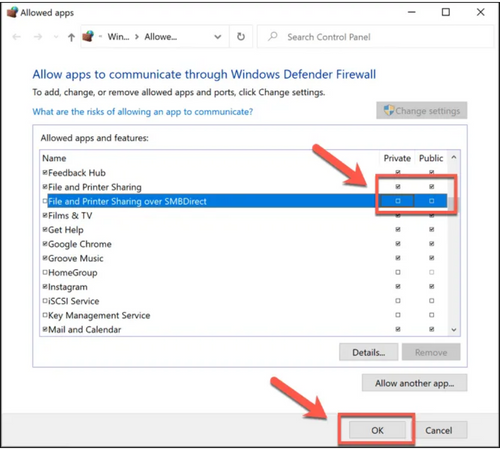
- In the menu, click on the option ‘Allow an app through firewall’. As the app communicates with the firewall, if something prompts, click on ‘Change Settings’.
- On the list displayed, scroll down until the options ‘File and Printer Sharing over SMBDirect’ and ‘Fill and Printer Sharing’ are found.
- Click each of the checkbox for every option under the column ‘Private’.
- Click on ‘OK’ to save the changes.
Method 3: Enable the Browser Service
To do this:
- Press the keys ‘Windows icon’ and letter ‘r’ on the keyboard to open the ‘Run’ dialog box.2. On the text field, type in services.msc and then select ‘OK’.
- On the text field, type in services.msc and then select ‘OK’.
- In the console window of ‘Services management’, find the service ‘Computer Browser’ and look at its status under the column ‘Status’. If it says that it is disabled or stopped, re-enable it by right-clicking the option ‘Properties’.
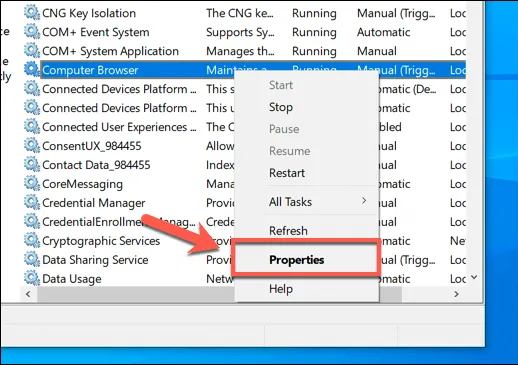
- Click on the button ‘Start’ to enable Computer Browser.
- Afterwards, click ‘Automatic’ under the drop-down menu ‘Startup type’ to start it automatically.
- Click ‘OK’ to save changes.
Method 4: Check the LAN Configuration
- The following steps can be done either on the administrator account or any user account. Click on the ‘Start’ menu and select appropriately whether ‘Windows PowerShell (Admin)’ or ‘Windows PowerShell’.
- In the PowerShell window, type the keywords ping x.x.x.x or ping hostname, and replace the ‘x.x.x.x’ with the local IP address of a computer and ‘hostname’ with the same PC hostname.
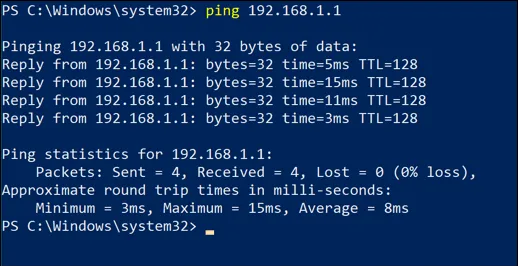
- If there is no response, then the problem probably lies on the physical network. If there is a response as you ping, then the issue lies on the network configuration.
- To test the network configuration, click on ‘Start’ and select ‘Settings’.
- Afterwards, select ‘Update & Security’, and then, select ‘Troubleshoot’.
- Next, choose ‘Network Adapter’ and select ‘Run the Troubleshooter’. If there is a problem detected, Windows will automatically try to fix it.
- If the problem lies on the static IP address being used, then it is advisable to change the set-up. To do this, go to ‘Start’ and select ‘Settings’.
- On the Settings window, select ‘Network & Internet’, then, choose ‘Status’ and finally, choose ‘Change adapter options’.
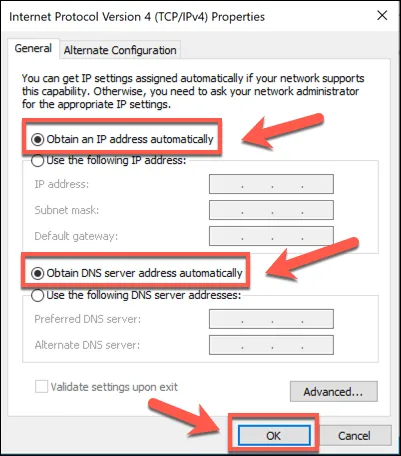
- In the menu ‘Network Connections’, right-click on the particular network device and select ‘Properties’. In that window, select ‘Internet Protocol Version 4 (TCP/IPv4)’ and click on ‘Properties’.
- In the window of IPv4 Properties, ensure that the options ‘Obtain DNS server address automatically’ and ‘Obtain an IP address automatically’ are enabled. Afterwards, click on ‘OK’ to save.
Summary: See other computers on network in Windows 10
- Tap Settings, then Devices (Bluetooth, printers, mouse).
- Turn Network discovery on.
- From the left side menu choose Advanced sharing settings.
- Click the right button on your Wi-Fi to see a pop-up menu.
- Choose Open Network and Sharing Center.
- So you will get access to Change advanced sharing settings.
- Switch network discovery on in Private network settings box. Section: Make sure you always have network discoverability turned off if you are using public Wi-Fi from an airport or Starbucks.
Conclusion
Try to enable the settings if, initially, the computers are connected to a network and there are no hardware issues upon inspection. However, if you can’t seem to solve the issue, try the ping method to make sure there is a physical connection. If there is a connection, then try resolving the software issues using one of the methods mentioned above.
