If you are a new Mac user, you might be wondering how to remove shared devices on Mac. It is not only about removing all the shared devices, but you might want to remove a specific device.
"Odd pc names are showing in the shared section, and I am unable to remove it."
If that's your problem, don't worry, we have got your back.
MacBook allows file sharing between macOS under the same LAN connection. That's why under the shared section, you will always see the devices with which you have paired with. This sharing protocol allows users to see and download files that are being shared.
But sometimes, in the shared section, you might see devices that are unknown to you. And you may not be able to remove those devices easily. That's why you need to know the way of eliminating shared devices on Mac.
Why do these unknown devices show up?
We will indeed discuss the process of erasing the unknown devices, but a big question still remains, "Why do they actually show up in the first place?". So before jumping into the solution part, we should know a little more about our problem.
There are three possible reasons behind this problem.
Configuration glitches
It is one of the most common reasons behind this shared device problem. Due to configuration glitches, your Mac falsely identifies itself as OS X and starts supporting Windows networking.
Picking a router or printer on the network connection
Various network devices have the file-sharing protocol for their own services. These devices may show up in your shared section bar, sometimes.
Getting conflicted with other network protocols
macOS has various connection protocols like AppleTalk, SMB, bonjour etc. Sometimes, these network protocols may cause odd devices to show up on your Mac.
5 Easy steps to remove shared devices
Having unknown devices in your shared section is not very pleasing. It's a threat to your data privacy. So it's better to remove unknown devices from the shared section.
But what’s the process?
To remedy this problem, you need to follow some steps. Let's talk about those.
Step 1
To start with the process, firstly, you have to go simply to the "System preferences option" you will find it by clicking on the apple icon of the top-left corner.
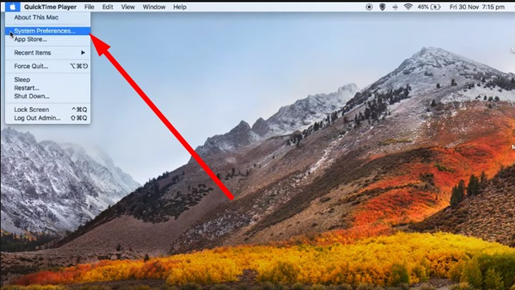
Step 2
Once you click on the system preferences option, you will see some more options in the next tab. From the new options, find out the " Sharing" icon and click on it. It will take you to the sharing section.
![]()
Step 3
After access the "file sharing", you will see a service tab. And under this section, you will see some sharing options. Now uncheck everything you see under this section. Because this is the point where you give access of your files to other users.
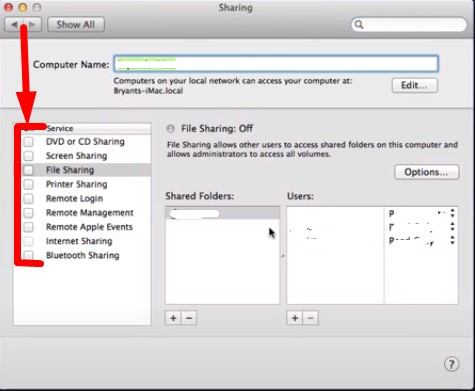
Step 4
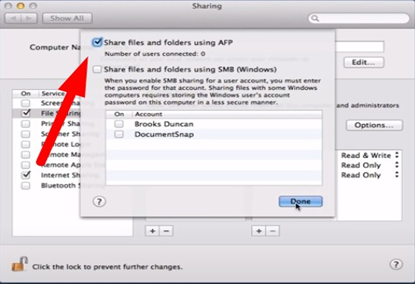
If you have done everything accurately till now, you are almost near getting your job done. In step 4, you will have to access the "File sharing" option. And here you will see a section named "options". You have to click on it.
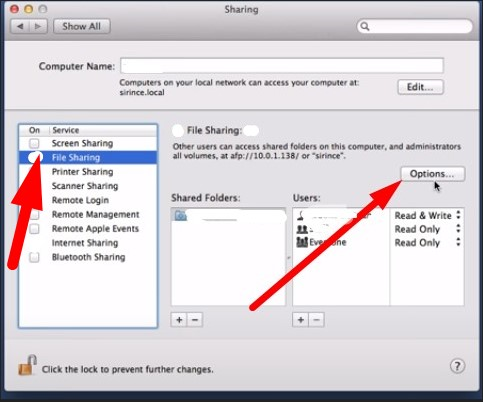
Step 5
After entering into the "options", two new options will appear before you. One is "Share files and folders using AFP" and the other is " Share files and folders using SMB". Now what you have to do here is uncheck the SMB option carefully. And you are all set to finish your job here.
Pro tips
- Turn on file sharing only when you need it.
- Keep the SMB option uncheck always.
- Turn off the wifi connection after finishing your work.
- If the unknown devices remain after all these steps, immediately contact a professional.
Summary: Remove shared devices on Mac
- Open the Apple Menu.
- Open System Preferences.
- Click Sharing.
- Click the lock icon and enter your password or use Touch ID to allow changes.
- Check to see if there are any devices listed under Shared Devices.
- Uncheck anyone who shouldn't have access to your Mac.