You can remove a partition in Windows 10, 8 and 7 using Disk Management tool. It's very simple to do it. All you need is to follow the steps below.
The term “partitioning,” when associated with a computer’s hard drive, refers to the process of creating single or multiple regions for a specific storage purpose. This means that it is a section of a storage drive that is considered a separate logical volume. System files are generally stored in the “System Partition” while user data files are kept in the “Data Partition”.
In some Windows systems, “Recovery Partition” may be present which stores the files utilized by the Windows Recovery Environment. Moreover, the said partitions or volumes come in different types: the primary, extended, and logical partitions. While these divisions are generally helpful, they may sometimes interfere with the full disk capacity.
However, there can be some people who find partitions on their Windows 10, 8, or 7 computers to be restrictive, most especially when it comes to the total space availability. Gladly, there are three ways to eliminate these partitions, minus the hassles which will be discussed in this article.
Method #1: Utilize Disk Management
While this method only allows you to remove partitions one by one, it’s the perfect option if you aren’t inclined to use third-party applications, making it much safer.
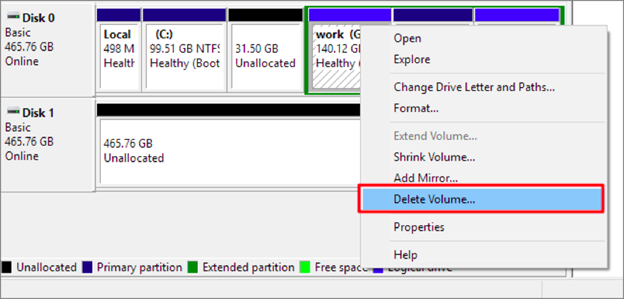
- To get started, use the right-click of your mouse to open “My Computer.”
- Select “Manage.” Right-click once again on the second hard drive or the SSD partition.
- Proceed by hitting the “Delete Volume.”
Do the steps repeatedly until you have already removed all the partitions on your Windows 10, 8, or 7 disk drive. Once the volumes are cleared, you may instantly notice the unallocated space, and you may already begin creating new ones.
Before using this Windows tool, make sure that you're one of the PC administrators. If not, you won’t be able to delete a partition unless it’s empty. You are also barred from removing volumes on removable media using Diskpart and Disk Management.
Method #2: Use the Disk Cleanup Command Line
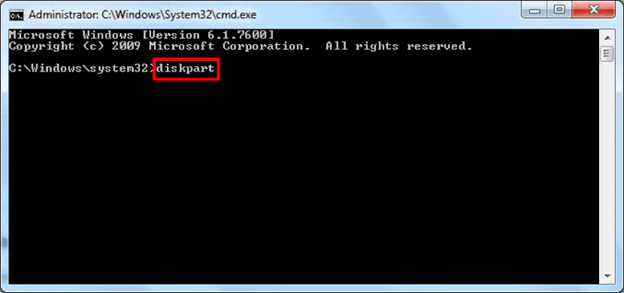
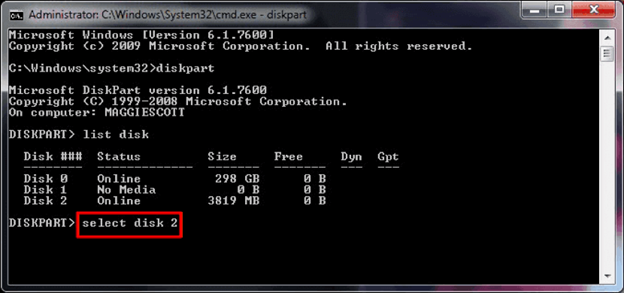
- The first step is to right-click on the “Start Button.” Pick the “Command Prompt” and carefully type the word “diskpart.” Hit “Enter.”
As shown below, add the words “list disk” next to “DISKPART> list disk.” Again, press the “Enter” button.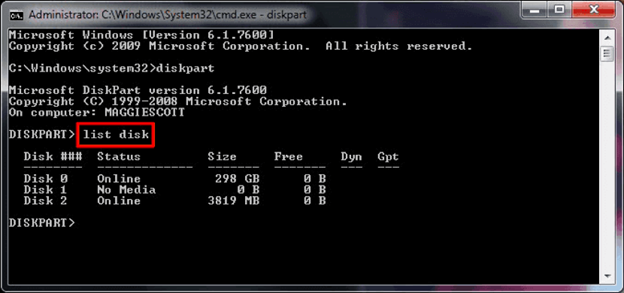
- You will then need to encode “select disk 2” then hit “Enter.” Remember to change “2” with the disk number of your second or next SSD/HDD.
- Type “clean” and push the “Enter” button.
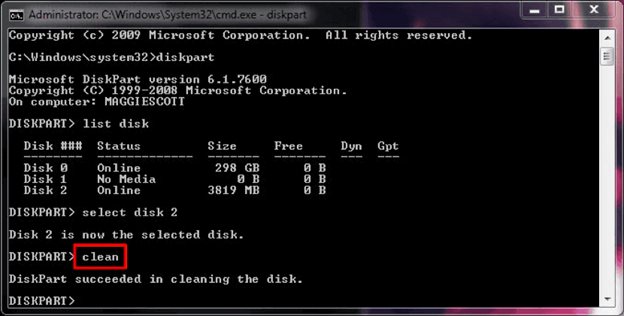
- Finish the whole process by typing the word “exit.”
Method #3: Install Free Hard Drive Partitioning Software
Lastly, you may also give a hard drive partitioning software a try. This type of computer application can help delete all the unnecessary partitions in one go.
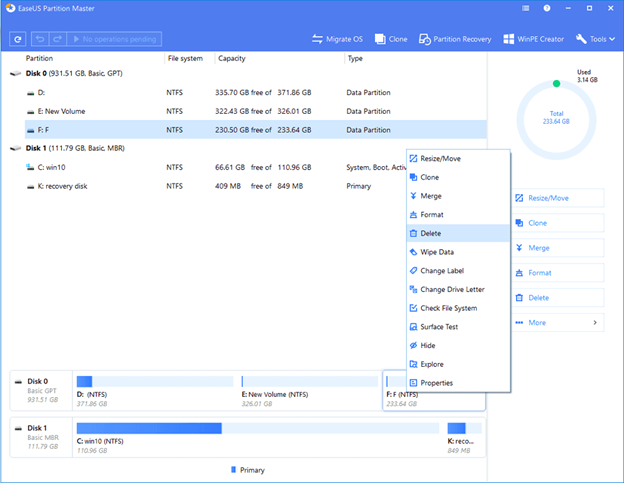
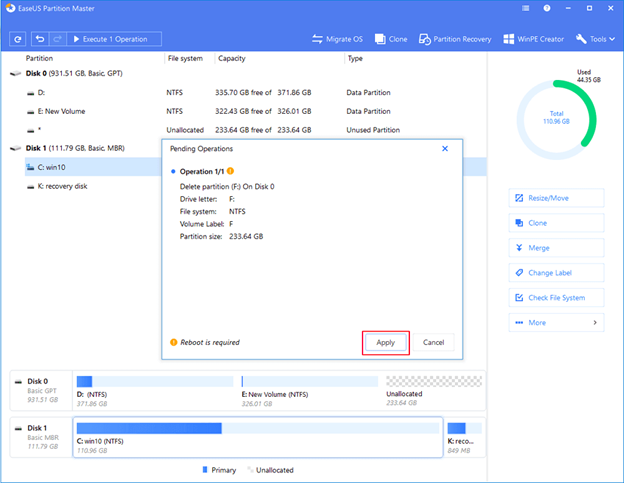
EaseUS, for instance, is one of the most popular free partition software that you can use. It’s also relatively easy to use that even folks without a solid computer background can operate.
- When using the EaseUS Master, right-click on the hard drive partition that you want to remove.
- Choose “Delete.”
- A prompt will ask you to confirm the deletion. Click, “OK.”
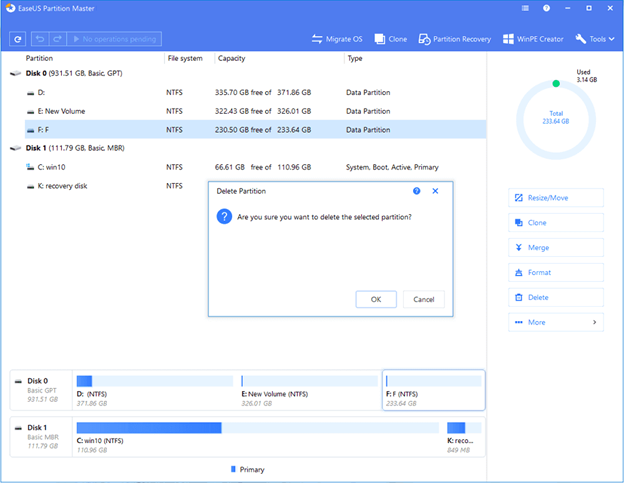
- Look for the “Execute Operation” button, which can be found at the top corner of the page. To keep all the changes you’ve made, click “Apply.”
Final Words
If you are having a hard time removing certain volumes, the partition may probably be an EFI System partition or a “Recovery” partition. Note that these types of partitions cannot be deleted because they are protected; thus, the Windows Disk Management utility may not work. It involves a more complex solution that may require other applications, apart from that mentioned above.
Now that you have already learned how to delete partitions on your Windows 10, 8, or 7 computers, you may now choose which of these methods will work best for you and enjoy your clean, clutter-free hard disk drive.
Summary: Remove a partition in Windows 10, 8 and 7
- Open Disk Manager.
- Right-click the partition on the hard drive you want to remove.
- Click Delete Volume.
- Click Yes to confirm that you want to delete the partition.
- If prompted, click Yes to confirm that you want to convert the selected basic disk to a dynamic disk.
- Right-click the unallocated space on your hard drive and select New Simple Volume. The New Simple Volume Wizard will open.
- Follow through the New Simple Volume Wizard until you see a screen with a message that says "You must now assign a drive letter or path."
- Select Do not assign a drive letter or drive path and click Next.
- Note the free space available under Unallocated Space in the Disks list in Disk Management.
- Right-click theSystem Reserved partition, select Delete Volume and then click Yes for any prompts to confirm that you want to remove the volume.
