How To Remove All Icons From Windows Desktop Including Recycle Bin, Computer, Network Etc.?
514 Views
Have you been trying to remove the desktop icons in Windows 10? Did you find a way, but it seems to be a painful process to you? Did you know that the desktop icons such as Recycle Bin can slow down your computer significantly? In this article, I am going to share with you how to remove all icons from Windows 10 desktop including Recycle Bin, Computer, Network and more.
![]()
Are you tired of dealing with the unnecessary icons scattered on your screen?
Do you feel the need to clear your crowded desktop without uninstalling the icons? If organizing your desktop without deleting anything is an urgent matter, then here are simple steps that will cost you minimal time.
NOTE: Removing icons from a windows desktop can be achieved in several ways. Here are the different methods followed by their own step-by-step guide.
Removing all icons with Windows View options
To remove all icons from your Windows desktop, right-click on an empty space on your desktop, and it should bring up this context menu. This applies to all Windows versions and is the easiest method to remove all the working icons in the background:
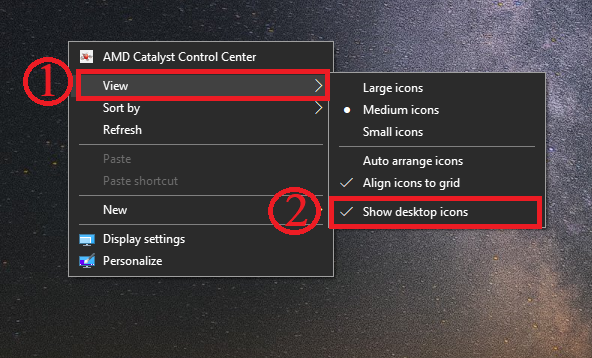
- Move the mouse cursor to View.
- Select Show desktop icons.
With that done, all of the desktop icons are now hidden! The Show desktop icons will be unchecked, and it will not show any icons on your desktop. To have them appear again, you just need to do the same process. Just make sure that the checkmark appears right beside the Show desktop icons option.
Removing Icons with Windows Desktop Icon Settings feature
This is also another way for Windows users to remove selected icons from the desktop. This guide will also include Windows Vista, 7, and 8 users. Don’t worry; we got you covered!
For Windows 8 and 10 Users
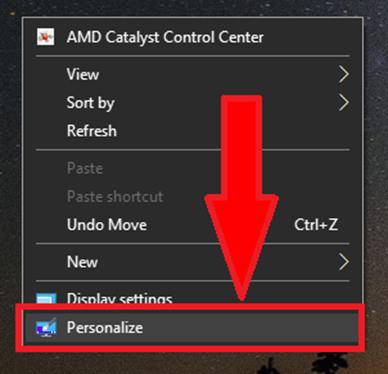
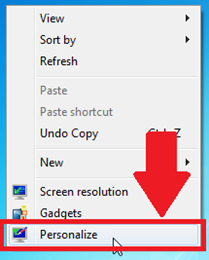
You still need to right-click on a space within the desktop. After right-clicking, it will bring up this context menu. Then, you need to select the Personalize option from that menu:
It will bring up the Settings window which is shown in this picture for your reference:
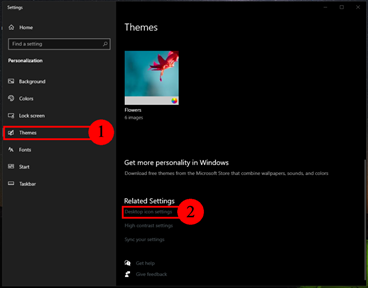
- Select Themes.
- Navigate within the Themes window.
- Scroll down until you find the Related Settings sub-category and then select the Desktop icon settings option.
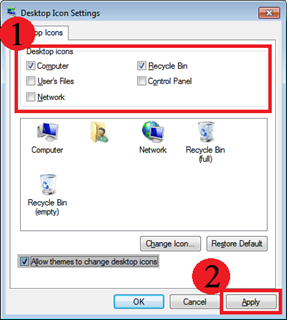
After clicking on the Desktop icon settings option, it will open up a dialogue box which is also shown in this picture for your reference:
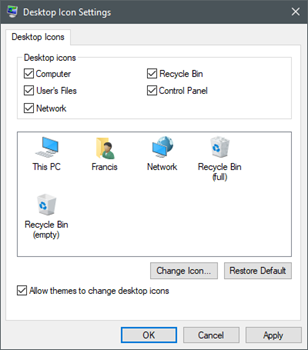
The Desktop Icons will remain checked by default if you haven’t made any changes to this setting. Now, you can choose to uncheck all the icons you want to be removed from your desktop.
![]()
- Select the icons you want to be hidden.
- Click Apply.
- Click Ok if you are satisfied with the changes you have made.
Well done! The selected icons are now made unavailable to your desktop. They will not be shown unless you go through the Desktop Icon Settings menu again and restore the visibility of the icons.
For Windows Vista and 7 Users
The same process goes for Windows Vista and 7. You have to right-click on any empty space within the desktop to bring up the context menu, then move the mouse pointer over to the Personalize option.
After selecting Personalize, it will open up a window, and on the left side of that window, you can see the Change desktop icons option. You must click on that.
![]()
After selecting the Change desktop icons from the left menu bar, it will open up the settings dialogue box, and from there you can uncheck the icons you want to be hidden from the desktop.
- Change the Desktop Icon settings checkboxes to your desired preference.
- Do not forget to hit Apply as soon as you are satisfied with the changes in order to save it.
Well done! Now, those icons will remain removed until you choose to restore them back to the desktop with full visibility. That covers the directions on how to remove the icons in the Windows Vista and 7 desktops.
Summary: Remove all icons from Windows desktop
- Right-click on an empty space of the desktop and go to View.
- Uncheck the "Show desktop icons" option. This will also hide any other desktop icons that were already visible.
- To restore all of your icons to their default positions, right-click on an empty space of the desktop and go to View > Auto arrange icons.
- If a particular icon is still not where it should be, then you can rearrange it by right-clicking on it and then clicking Arrange icon by and selecting the appropriate option.
- Click apply, and then OK. Your desktop should now be cleared.
