Windows Update Assistant is nasty software that can infect your PC in order to force you to update to Windows 10. It pretends to be a legitimate program by updating security system, but do not trust it. The interface looks like a official Windows 10 alert, and creates unneeded stress and anxiety. To remove Windows Update Assistant, I have prepared various solutions below.
Have you ever wondered how it’s like not receiving Windows Update notifications? Are you part of those meticulously few individuals who dream of removing or disabling their Windows Update Assistant permanently because it slows their productivity and presents update that makes their system buggy and current setup incompatible to the updates?
If you are spot on to these, then better yet follow these simple steps and have your Windows Update Assistant disabled permanently. The steps below should walk you through the process like a computer expert.
Steps to follow
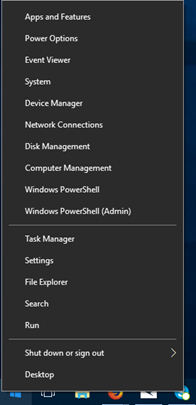
- To uninstall the Windows Update Assistant, make sure your computer set is turned on and has finished loading startup files. To start the process, right-click on the “Start” button and select “Run”.
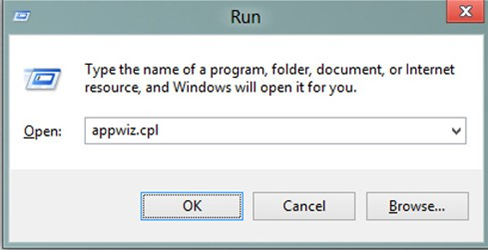
- After selecting the Run option, you need to enter “appwiz.cpl” in the text box provided on the “Run” page. Click the “OK” option after making everything was typed correctly. The image below should give you an idea of what to see on your screen if you were able to follow the walkthrough correctly up to this part.
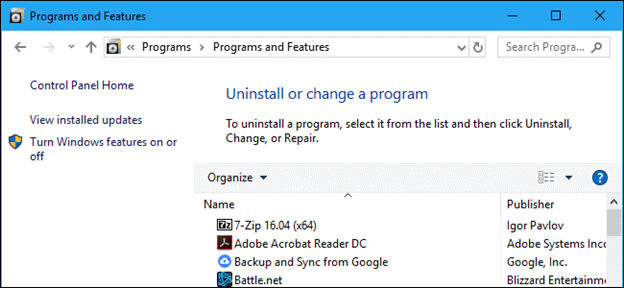
- This window should immediately pop up after clicking on the “OK” button. Select the Windows 10 Update Assistant in the software list or the Windows Update Assistant for non-Windows 10 systems. All you need to do is to scroll down as indicated in the arrow and look for the designated file names.
- Once clicked, the chosen file should automatically become highlighted. This is a confirmation that you have already clicked on it. The picture below should provide you a visual presentation of how it would look like on your computer screen. Moving forward, you need to do a right-click on the chosen file and choose the “Uninstall” option. Note, choosing this will automatically allow the system to remove or erase any pertinent information of the file associated with it, so think carefully.
- After clicking on uninstall, the system should automatically send you another pop-up asking you to confirm such action. If you are really determined to remove or deactivate your Windows Update Assistant, then click Yes to further confirm.
- After successfully uninstalling your Windows Update Manager, the next step is to remove and delete the “Windows Update Manager” file folder in your system to fully get rid of these files inside your computer system. Doing this would stop your computer from retrieving the same files. Note, if you were unable to remove all the files associated with the Windows Update Manager, there is a possibility that the system might revert back to the previous adjustments made.
- Click the File Explorer taskbar button as indicated by the yellow arrow on the illustration below.
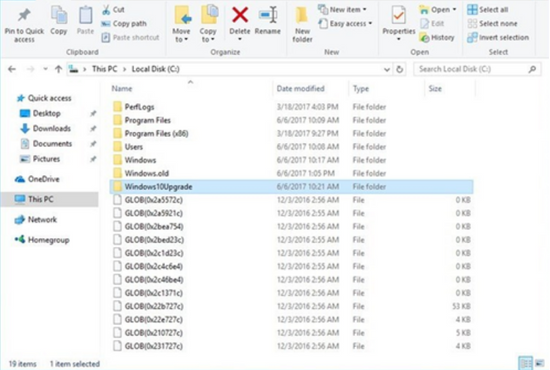
- The image below should be the screen that you would be seeing once you open your “file explorer” icon. Inside, navigate and go to “Local Disk C” or “File C”. Once inside, use the scroll bar to scroll up or down to look for the “Window Update Assistant” folder and select it. Once selected, it should appear in a highlighted form.
- Press the Delete button after selecting which file folder to delete. Once confirmed and deleted, the folder should automatically disappear from the list.
- Restart your desktop or laptop to complete the process.
After completing the process, you should be able to work your way without the Windows Update Assistant. Be it known that you can uninstall this the same way as most other software. Once done and completed, you should be able to see the changes after a restart is done.
All you need to do further to stop the system from activating it from time to time is to turn off the update assistant’s scheduled tasks in the task scheduler. Cheers! You have just completed a walkthrough like how computer experts do it their way. You did great!
Summary: Remove Windows Update Assistant
- First, press the Windows key and the letter R on your keyboard simultaneously.
- This will bring up a new window called “Run box”. Type in services.msc, then click OK.
- The Services window will open up. Scroll down the list of services until you find Windows Update.
- Right click it, then click Properties.
- In the General tab, change Startup type to Disabled, then click Stop and hit Apply and OK at the bottom of the panel.
- Next, we need to remove a few folders from your system. Open up File Explorer (by default known as “Windows Explorer”) by hitting the Windows key and the letter E at once on your keyboard.
- Navigate to C:\Windows\System32\Tasks\Microsoft\Windows\UpdateOrchestrator then select that folder and delete it completely.
- Repeat this process for C:\Windows\System32\Tasks\Microsoft\Windows\WaaSMedic Then you should also delete C:\Program