How do I render a jpeg sequence in Maya? This was something that I had to find out. It turns out, it’s not as simple as you would expect. A lot of Googling yielded little or no results. So I set out to solve the issue once and for all. Hopefully, this will help anyone else who needs to figure this out.
Images are great, but nothing tells quite a compelling story other than an animation sequence. With animation, you can clearly convey what you want, and it gives viewers a unique and easy way of grasping that meaning. This is especially true with 3D animation, which offers a more realistic view of your sequence.
One software that’s great for 3D animation is Autodesk Maya, or simply, Maya. It offers comprehensive features that allow animators to render realistic-looking sequences with amazing special effects. You can even generate a series of Jpeg images to form a Jpeg sequence.
However, the learning curve can be steep, so you need proper guides to use this animation tool effectively. With that said, this article will provide you a step-by-step guide to rendering Jpeg animation sequences in Maya.
What Is Maya?
Maya, or Autodesk Maya, is a powerful computer animation software that animators can use to create stunning animation sequences. Rendering on Maya will result in photorealistic images and animation sequences, turning them from 2D to 3D.
Autodesk Maya is often used for generating 3D sequences that will be used for various media, such as television, film, and even video games.
Rendering Jpeg Sequences with Maya
If you’re looking to render animation sequences in Maya, you can do so even without an Arnold license.
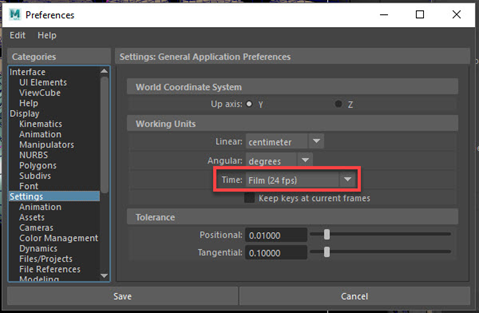
To render image sequences, you first need to set up your animation’s proper frame rate in the Preferences or Settings menu. The default value is 24 fps, which will work on most devices.
After this, go to the “Render Settings” then select the “Common” tab. Under this tab, you’ll find the “Frame/Animation ext” list. From there, you need to choose an option with the # sign. This will activate the Start and End frame attributes, allowing you to set your range.
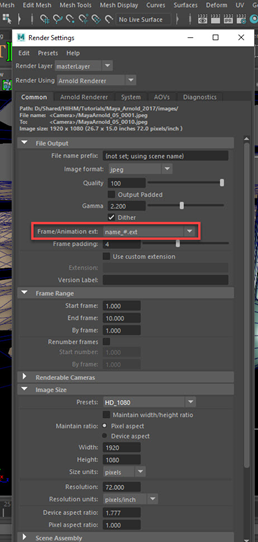
Under this menu, you can also specify your output file name and select the desired image format, such as jpeg, png, and tiff. If you choose jpeg, you should leave the Gamma value at the default value of 2.2. You can adjust the image size and frame range according to your preferences or needs.
After this, go to the top left part of the program and switch to the Rendering menu. Under this, you’ll find the “Render Sequence” option.
Clicking on this will open the Render Sequence options window, and you’ll see that the title bar indicates the frames to be rendered.
To render all images in the sequence, enable the Render All Layers under the Render Options menu. Not doing so will only render the active layer, not the entire series. After rendering the images, you can save them to Render View.
For this, you need to enable the “Add to Render View” option or the “Enable Add All Layers” to add all the layers.
To start the rendering sequence, click the “Render Sequence” option. This will render all images in the sequence and save them both to the Render View option and the disk.
Final Thoughts
Animation sequences can help you tell stories in a more visually appealing and unique way. However, you will need animation software to help you do so.
Maya is an excellent software for creating amazing animations, especially if you want professional-grade rendered sequences. Rendering images using this software can create incredibly realistic 3D animation sequences.
While it typically requires an Arnold license to render sequences without a watermark, the steps mentioned above can help you do so without one. Hopefully, these steps have helped you learn more about rendering jpeg sequences in Maya.
Summary: Render a Jpeg Sequence in Maya
- Open Maya
- Open your project
- Select File > Render Settings.
- Click the Common tab.
- Click the Image Format List.
- Set the Frame/Animation Ext to name.#.ext, where name is the base of your image file names and ext is the file extension for your image format (for example, .iff for Alias).
- In the Frame Padding field, specify how many digits are used in numbering your files (for example, 4 means 0001, 0002). Maya adds leading zeros to make all frames the same length.
- Click Close.
- Select File > Render > Batch Render or type Render -r file in the command line and press Enter. The renderer starts rendering frames to files, using the image file name and location you specified when you created your scene. If you entered a value of 4 for Frame Padding, the frame number in each file name includes four digits and is preceded by a decimal point (for example, tst0001.iff). When rendering is complete, enter quit;in the command line to exit batch mode on Windows or Linux systems, or exit;on a Mac OS
