Do you hate it when you take high-quality, high-resolution photos only to find that they turn out blown up on your friend's computer? Do you wonder why there are no clear answers on the internet? In this tutorial I'm going to teach you how to resize pictures in Windows 10. Why, how and what tools do we need for this purpose? How can I manage my photo collection using Cloud Storage Services? Will all my photos be damaged or not shine anymore after resizing?
Many image viewing applications come with built-in features to resize images. In this article, we will talk about some of the best built-in, third party, and web-based programs for resizing images on Windows 10.
Whether you need to preserve the quality of large-sized images that you want to upload on social media, or you need to fit a not so little picture into an email, knowing how to resize images is really easy to learn with the right tools.
The quality of resized images depends on the quality of the original one. Pictures are usually better when you reduce them because they are usually very detailed. Besides, it is easier to resize a screenshot taken on your laptop or phone as well as images that contain text.
Built-in Apps to Resize Your Photos
To resize your images, you simply have to use these tools
1. Paint
The Paint application has been on the Windows operating system since 1985. It has been around for a while now. You may have even used it before as it is part of every Windows system at this point. It can be used to open the common types of image files such as PNG, JPG, GIF, etc. It also gives a direct and easy approach to resizing images.
To use, simply follow these steps
- If you don't know where the paint app is on your computer, type the words “paint” in the search bar.
- In the Paint app, click on "File" then click "Open" to open the image you want to resize.
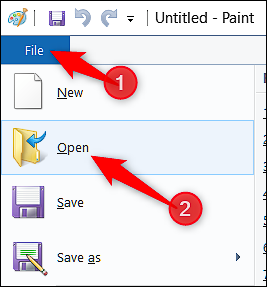
- Find the image you want to resize, select it, and click on the "Open" bar.
- Left Click “Resize” on the home screen of the Paint app.

This app gives the choice of either resizing by pixel or by percentage. The default setting is to resize by percentage, and while this okay for quick or rough projects, it is advisable to change the setting to use pixels for better and more specific results.
There is a slot to type the horizontal value you want and another slot for the vertical value. When you input the horizontal or vertical value, Paint inputs the other value. This is to keep the original dimensions of the image.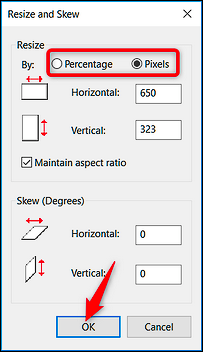
- Choose the percentage you want, as well as the dimensions, then left-click on “OK”.
Paint is a good built-in choice for resizing images if you don’t want to download any external applications.
2. Pic Pick
It is very similar to Paint but has a lot more features and options. Its editing and annotation tools are much better, and it even has a solid screen capture. The best part is that even with all these features, it is completely free for personal use and costs just about $25 for commercial use license.
Here’s how to use it
- The first thing to do is to click on the “Open” bar and select the image you want to resize. Another option is to drag the picture from file explorer.
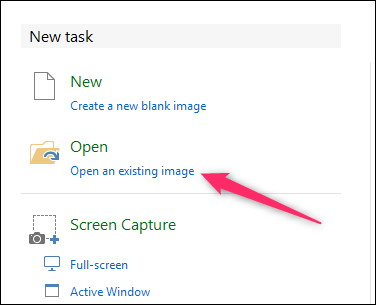
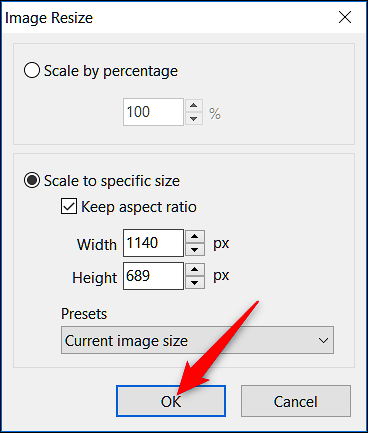
- Left-click on the “Resize” button on the toolbar, then click “Image Resize” on the resulting menu.

Like Paint, Pic Pick also resizes by percentage or pixel. It uses percentages by default, but it is advisable to switch to pixels for more specific dimensions.
This app is also very similar to Paint in that when you fill in the horizontal or vertical slot, it automatically fills in the other for you to preserve the picture’s original dimension. You can disable this action by unticking the “keep aspect ratio” box.
- Choose your desired percentage or dimensions, then click the “OK” button.
These apps are very good and effective for personal use. They are also cost-effective and allow you to resize your images with ease. Hope you learn something from this article.
Summary: Resize photos in Windows 10
- Open the Photos app.
- Click on the menu box in the top left corner, and choose Settings.
- Click Resize down here.
- Choose your desired size, and click Done.
- Now you can go back, click on any photo you want to resize, and click Edit and Create at the top of the window.
- Then choose Resize, and there's your resized photo.