Resolving “microphone sensitivity” is a pretty common issue that occurs with many users. It's one of those problems that seems to come up with new upgrading laptops, PC's and even smartphones. What is the best way to fix the problem?
A properly configured microphone is a must for every video content creator and streamer these days. There are times that any uploaded content or streamed session produces an unacceptable buzzing sound or background noise. This is the last thing you want to happen, especially if you are aiming to offer high-quality content. Fortunately, you can prevent this undesirable outcome by setting up your mic correctly.
For aspiring creators who happen to own a Windows 10 computer, keep in mind the following pointers for a more audible output:
- Whenever you have a sufficient budget, aim to purchase a superior quality microphone. If you prefer to buy a headset, find a product that has a noise-canceling feature.
- Choose a mic that has the 3.5mm jack plug since it provides a better sound than one with the USB connector.
- Although your mic should be within a foot away while you speak, the ideal distance may differ from one person to another.
- Apply an Air Filter and Pop Filter to your current mic set-up so that you can lessen any background noise.
- Check both your audio and mic drivers for any available updates.
Since you know the pointers, you may skim through the tips below to fix the sensitivity of your mic in Windows 10.
Minimizing Mic Background and Buzzing Noise
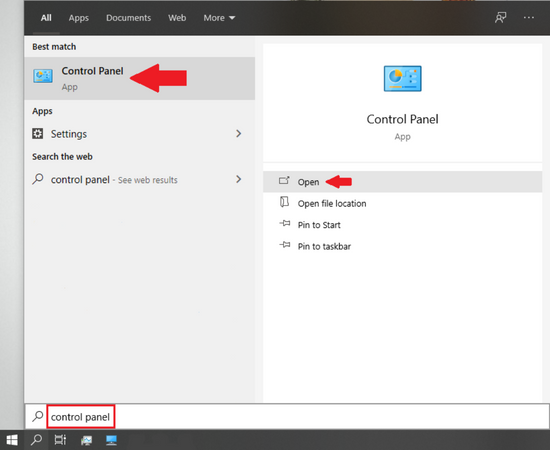
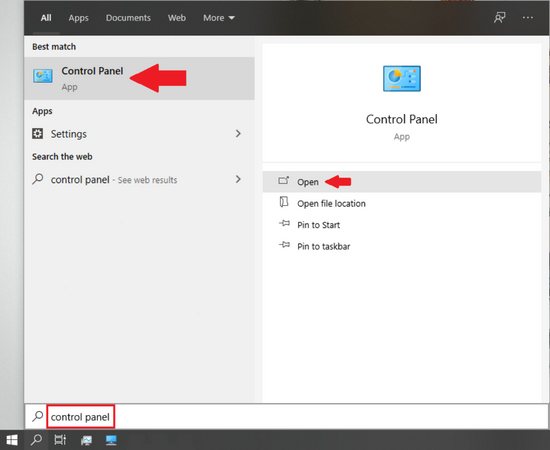
- Click on the search box or magnifying glass icon on your Windows 10 taskbar.

- Type control panel into the search box and wait for the Control Panel app to pop up. Once Control Panel shows up in the search results, click on it.
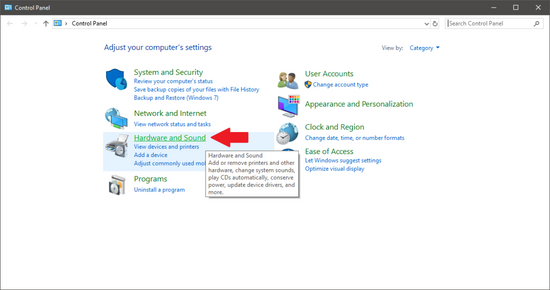
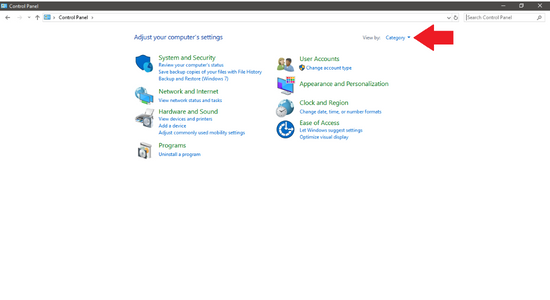
- While in the Control Panel window, look for Hardware and Sound and click on it.
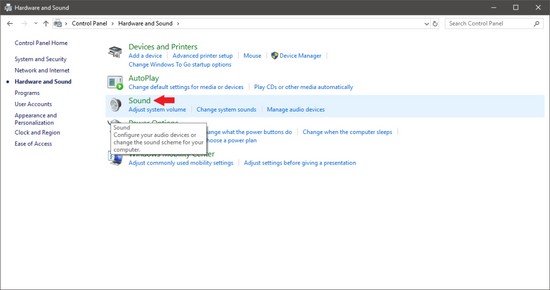
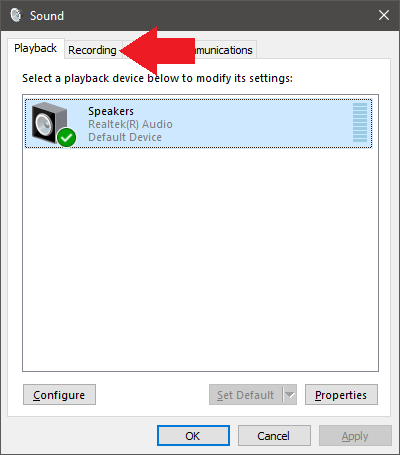
- On the next page, look for Sound and click on it.
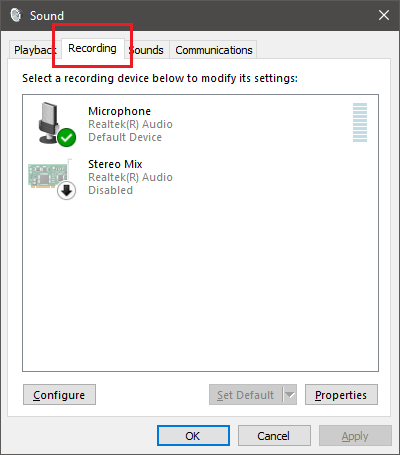
- From the Sound dialog window, look for the Recording tab and click on it. This tab shows you all recording devices that the Windows 10 operating system has recognized.
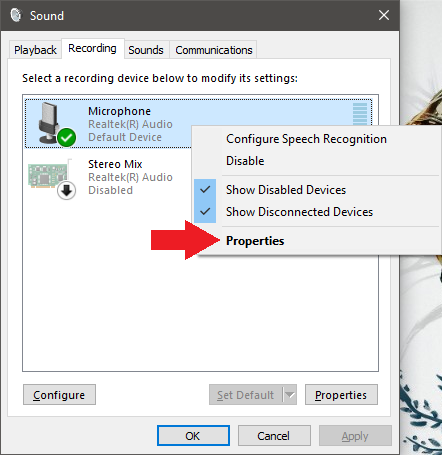
- Within the Recording tab, right-click on the microphone with the issue and click Properties.
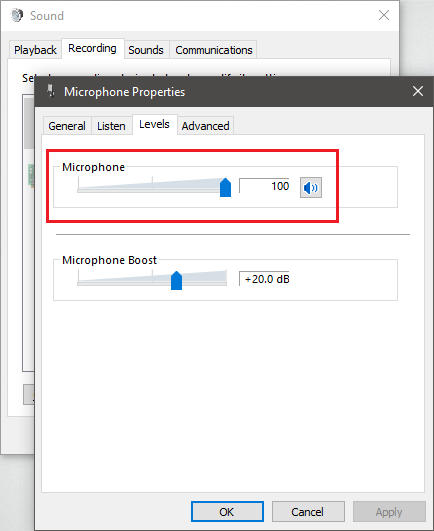
- In the Microphone Properties dialog sub-window, click on the Levels tab and adjust the Microphone level to 100. If the audio output is still low, leave it at 100 and adjust your vocal distance from your mic until you are contented with the configuration.
Note: If applicable, there should be a Microphone Boost level below the microphone level that must be set to +10.0 dB or more.
- Still within Microphone Properties, click on the Enhancements tab located between the Levels and Advanced tabs if you are using a noise-canceling mic or headset. Tick the check box beside Immediate Mode and do the same for the boxes beside Noise Suppression and Acoustic Echo Cancellation.
Note: The Enhancements tab is optional and will only show up once your computer has detected the noise-canceling mic or headset.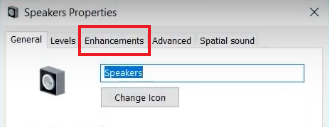
- Click OK to apply the changes.
Method 2: Using the Playing Audio Troubleshooter
Another way to sort out your microphone sensitivity issue is to run the Playing Audio troubleshooter through the Windows 10 Control Panel. To access this specific troubleshooter:
- Open Control Panel in the same manner that you did in the previous method.
- Change the "View by:" value from Category to Large icons.
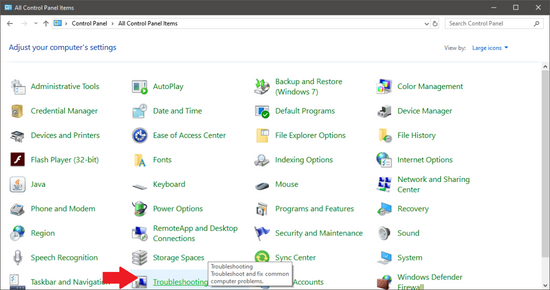
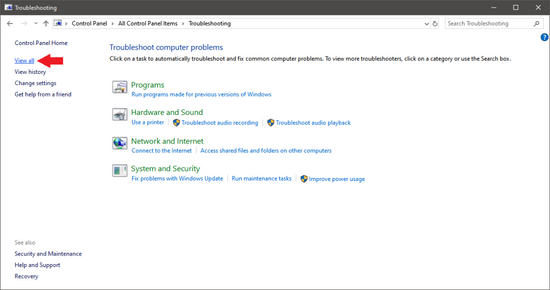
- On the next page, look for the Troubleshooting option and click on it.
- On the left side of the next page, click on the View All option.
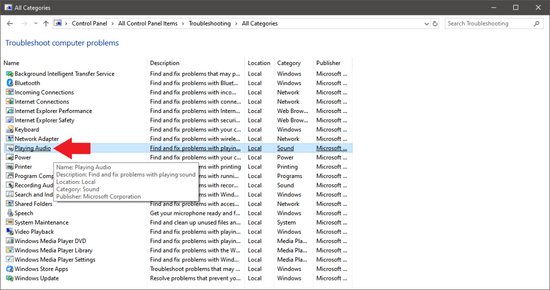
- Wait for Windows to show you the list of available troubleshooting categories. Then, find Playing Audio and click on it.
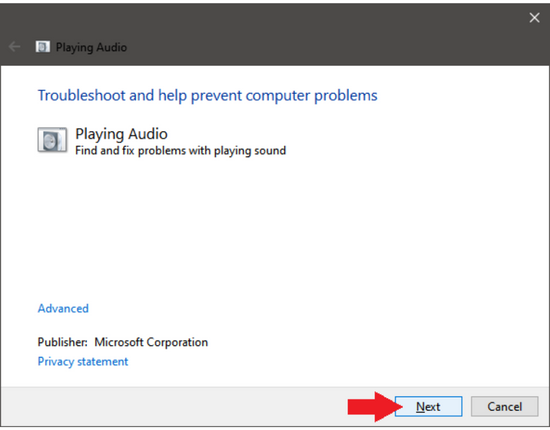
- On the Playing Audio dialog window, click Next and follow the onscreen instructions thoroughly.
Summary: Resolve microphone sensitivity
- Click the Start button, and select Control Panel.
- In the Control Panel, click Hardware and Sound.
- Click Speech Recognition.
- At the top of the window, click the "Recording Audio" link.
- Click Next in the Recording Audio dialog box to get started.
- When you are asked to talk into your microphone, speak a few sentences about yourself or read a few lines from a book or magazine.
- To adjust your microphone sensitivity with Windows XP, follow these steps:Click the Start button, and select Control Panel.
- Click Sounds and Audio Devices.
- Click the Audio tab.
- From the drop-down menu next to Microphone, select Properties.
Conclusion
If you Windows 10 microphone has sensitivity issues, try either of the two methods above to resolve it. Also, keep in mind the tips provided to help you choose a top-notch microphone that give quality output.
