You may want to share the printer on your local network. When you want to share the printer on Windows 10, 8 and 7, it's not a difficult job for those who do this before, but for the novice users, the procedure may be a bit complicated for them. That's why today I'm here to tell you what you should do when you don't know how to share printer in Windows 10/8/7. Besides, we'll take advantage of which network protocol that windows supports to share printers.
Multiple devices and computers, which are connected to the same network, can possibly access one or more printers through the process called printer sharing. In some cases, any of the gadgets use may be allowed to modify the printer settings.
Now, you may be wondering if this mode of sharing is possible even if your printer is already outdated. Fortunately, this isn’t an issue, as long as it is properly installed in one of the computers.
Start sharing your printer, whether you currently have Windows 10, 8, or 7, by following these simple steps:
Step #1
To get the ball rolling, set up your printer either by connecting it directly to the network, using the HomeGroup, or linking it even when you have not yet created an account for the latter.
Note, however, that the HomeGroup feature is already removed from Windows 10, but you can still use it if your computer runs Windows 8 or 7.
The first way to share your printer depends on what kind of printer you have. Luckily, most printing devices have built-in networking or may be connected using Wi-Fi, Ethernet, and other options.
On the other hand, HomeGroup is a helpful tool that Windows 7 and 8 users can enjoy. Start by connecting your printer to one of the computers on the network.
Fire up the HomeGroup on the “Control Panel.”
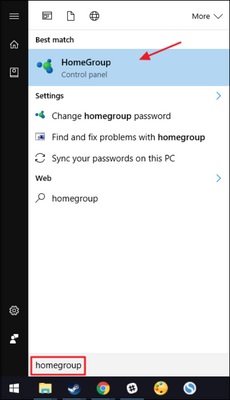
If the HomeGroup setting shows that you are already sharing printers, you are good to go. In case you are not, hit the “Change what you’re sharing with the homegroup” link.
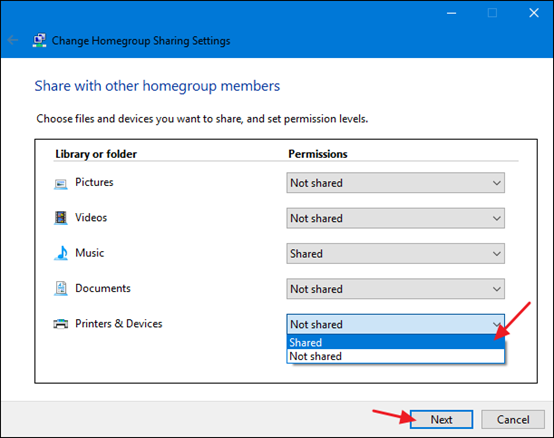
Look for the drop-down menu on the “Printers & Devices.” Make sure to pick the “Shared” option. You may then move on to the next step.
When a HomeGroup has already been created, but somehow, the computer where your printer is connected is not a member, click “Join now.”
You may change the sharing options of the “Printers & Devices” into Shared. Click “Next.”
You will then be asked to enter the password for the Homegroup. For computers running Windows 8 and 10, you will be automatically authorized if you are signing in using the same Microsoft account as your PC.
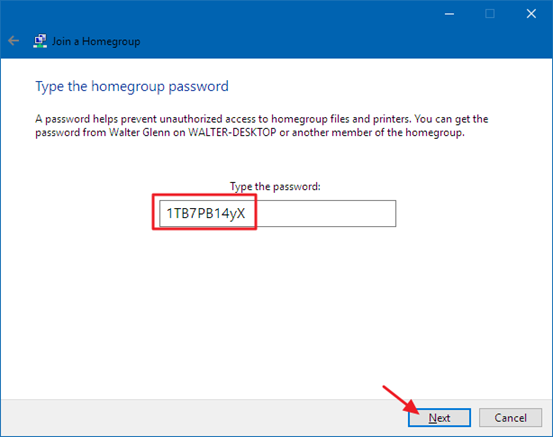
If you are yet to create a HomeGroup for your PC, click the “Create a homegroup” link. Just follow the instructions appearing in the prompts and then you are ready to share your printer.
Step #2
Once you have successfully connected your printer to the network, you may now begin connecting other PCs on the network.
Using HomeGroup, all you need to do is check whether all the PCs are included in it. If so, your computer will show the devices and printers and you can now instantly print on any of them.
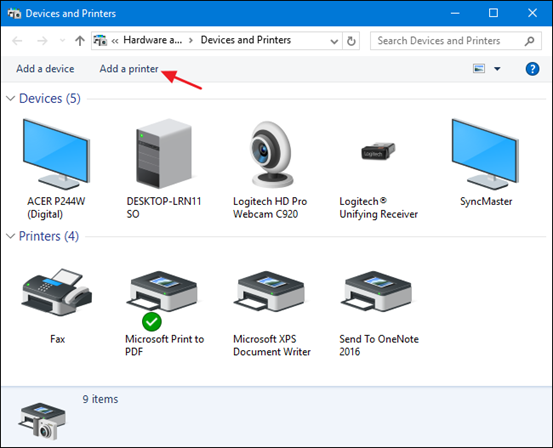
You are in for some legwork if your computer does not have the HomeGroup feature. Nonetheless, the process is still pretty straightforward. Go to the Start menu and type “Devices and printers.”
A box will appear showing all the devices on your computer. Click the “Add a printer.” From there, just follow all the instructions.
Apart from these steps, you may also use software like PrintShare to allow your devices to print documents and photos on other user’s printers.
Summary: Share printer in Windows 10, 8 and 7
- Open the Control Panel.
- Open the Devices and Printers window.
- Right-click the printer you want to share and select Printer Properties.
- Select the Sharing tab.
- Check Share this printer and add a name for the share, if you like.
- Click Apply to save your changes and return to Devices and Printers.
Conclusion
Printer sharing is a feature that can be helpful for PC users, especially if you need to connect multiple devices to your printer. With this feature, you can easily access your printer from multiple devices.
Hopefully, the aforementioned steps have helped you understand how to share your printer when running Windows 7, 8, and 10.