Windows 10 has been around for good while and it's still one of the best operating systems that Microsoft has ever made. One of the newest features in the new Creators Update is Windows Ink. After installing the update, some users think that Windows Ink is not worth their time and should be disabled. Is this something you're also interested in? If so, read on as I'll show you how to shut down this feature without any hassle.
The Windows Ink program was introduced by Windows 10 during its last update. It is often referred to as Windows Ink Workspace.
What Does Windows Ink Workspace do?
The Windows Ink Workspace is a very recent upgrade. It is displayed on the desktop homepage as an icon, shaped like a pen. Windows Ink makes it easier for computer users to use the pen input feature. This program uses the digital pen of a user to write helpful reminder notes to display on the screen “sticky notes”, to doodle, and screenshot on Screen sketch or Sketchpad and load as a picture.
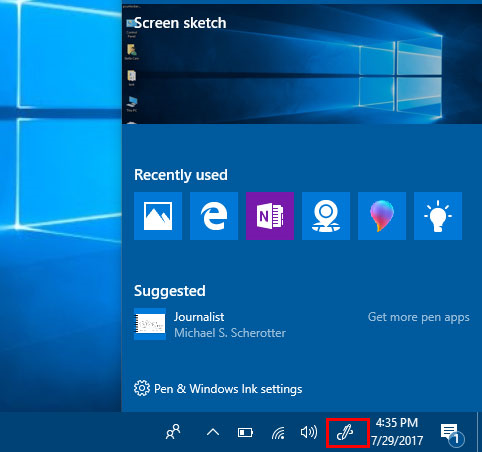
However, not all computers use digital pens. Therefore, if your computer doesn’t have this feature or if you would like to disable Windows Ink and remove it from the taskbar, follow this step-by-step guide. Here are 2 easy methods to disable Windows Ink from computers with Windows 10:
Method 1: Turn Off Windows Ink Workspace With Group Policy Method
- Open your windows search bar by pressing the Windows icon on the bottom left corner. Another method to do this is by clicking on the key for windows on your keyboard.
- Type gpedit.msc in the search box.
- Click the icon labeled Edit group policy.
- Right click Yes.
- The local group policy editor will open up with a number of options. Navigate the options and click Computer Configuration.
- Click on Administrative Templates.
- Click on Windows Components then click on Windows Ink Workplace.
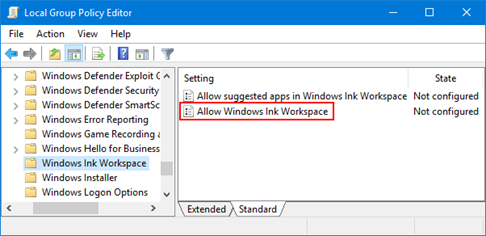
- On the right side, a few options will pop up. Choose to allow Windows Ink Workspace. This will open up more options about its properties. If you see that there are two entries for Windows Ink Workspace, then configure entry 2. This will ensure that Windows Ink is disabled.
- If Windows Ink is Enabled, then it is still functional. Click the Disabled option which is found under Options’ dropdown menu.
- Click Apply then click OK.
- Restart your computer or shut it down. Start it again and ensure that the changes have taken effect.
Method 2: Turn Off Windows Ink Workspace With Registry Tweak Option
This method is for those who are confident in software application management. If you are not confident in changing your computer’s settings, you can either get help from a tech-savvy friend or use Method 1. Any changes in the Registry Editor that is improper may cause your computer to malfunction and lead to irreversible damages.
Before you begin, it is extremely advised that you create a backup for your computer in the event that something accidentally goes wrong. Follow these steps closely:
- Open Registry Editor
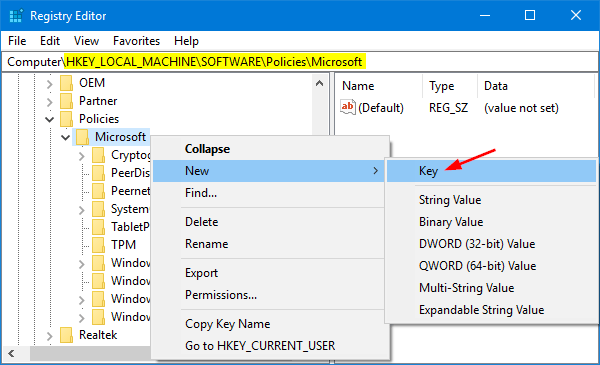
- Type in the following key or follow this runway to get to Microsoft key: HKEY_LOCAL_MACHINESOFTWAREPoliciesMicrosoft
- Right-click the Microsoft key which you can find on the left side.
- Select New then click Key.
- Rename the key to be WindowsInkWorkspace.
- Select WindowsInkWorkspace. Right click the right plane in the empty space.
- Select New then select DWORD (32-BIT) Value.
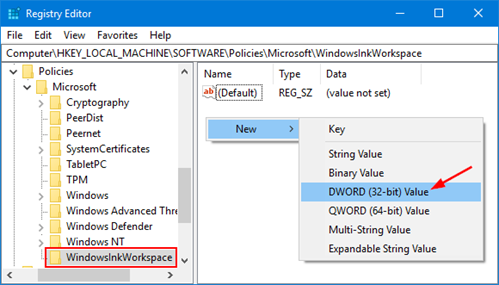
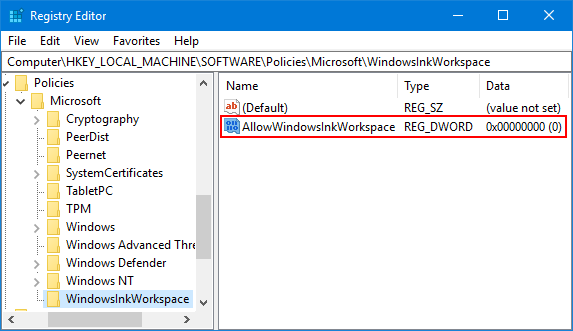
- Rename DWORD value to AllowWindowsInkWorkspace. Do not change its value data. If you are having difficulty locating WindowsInkWorkspace, create a new folder. Do this by right-clicking Microsoft key > New>Key and rename it as WindowsInkWorkspace. Click OK.
- Shut down your computer or choose to restart it.
- Check to see if the Windows Ink feature is disabled.
If you want to reverse the process and enable Windows Ink feature again, repeat the steps above, but switch the DWORD AllowWindowsInkWorkspace to a value of 1, instead of 0. After these processes, restart your computer.
Summary: How to turn off Windows Ink?
- Follow these instructions to turn off Windows Ink, in case you don't want it.
- Click Start.
- Open the control panel, and click on Hardware and Sound.
- Click on Tablet PC Settings.
- Uncheck all options under "Use pen to" section, if you want the pen to never do any of the functions mentioned below.
- By default, “Press and hold” option is checked. If you want to use this feature without turning on Windows ink for other features, then uncheck all the other options but leave “Press and hold” option checked. After this customers will be able to use press and hold functionality but not any of the other functions mentioned in “Use pen to” section. Since the customer did not mention this issue specifically in his post, I have listed instructions for both cases (i.e. when "press and hold" is unchecked or when its checked).
- If "press and hold" is unchecked (by default), then follow these steps
- Click on Options button under "Press and hold".
- In the Press and Hold Settings window that appears on screen.
Conclusion
As long as you follow the steps properly, disabling Windows Ink on your computer can be pretty easy.