Mac users have a wide range of choices to print documents. If you have an older printer, you can use the built in print menu to print documents. However, as Mac users are switching to modern printers that come with more features, it is no longer an option to use older printers. So, what if you want to turn on two-sided printing on your Mac or install a driver for unsupported printers?
If you do not want to waste your printing pages as it saves money, you can use the two-sided printing feature option in your Mac system interface. Here are the things you need to know to print your documents sequentially on both sides of a single page.
Before you get started
Your printer must support the two-sided printing feature. Otherwise, you will not be able to use your printer for two-sided printing.
Changing the settings of the printing unit
Before you apply two-sided printing on your Mac system interface, you need to check if the option for two-sided printing has been enabled or not. Otherwise, if you try to print your document with the two-sided option, the system will not allow you to turn on the two-sided printing. It will remain grey and you will not be able to select the drop-down options. To enable dual printing unit:
- Go to the “System preferences” option from your Mac and select the “Printers & Scanners” icon. You can change the settings of your printer from here.
- If you have multiple printers attached to your device then select the printer in which you want to apply the settings. Choose your preferred printer from the left side of the printer options page.
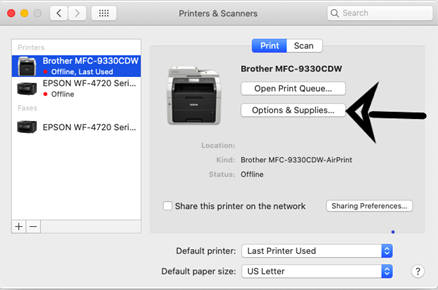
- Now select the “Options & Supplies” option. Select the “Options” tab from the horizontal tab options.
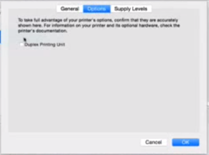
- Tick the “Duplicate Printing Unit” box to enable the two-sided printing drop-down options.
Enabling the two-sided printing options
To turn on the two-sided printing options, you must first change the settings of your printing unit. If you have already done so, then follow the following steps to print your documents by enabling two-sided printing:
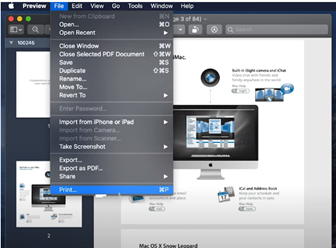
- Select the document which you want to print from your local storage directory. You can also select your document if that is in an external drive (USB or any other readable storage drive) which you have attached with your Mac device. Double-click on the document to open your file.
- After opening the document, click on the “File” option on the top side of the application tab and select the “Print” option. You can also use the shortcut “Command + P” button to directly open the settings of print.
- Go to the drop-down option where the “Preview” option is and click on it to see the list of options. Click on the “Layout” option and you will see that the two-sided printing option will show up. Click on the “Two-sided” drop-down option there are two options to enable two-sided printing. They are the “Long edge bending” and the “Short edge bending”.
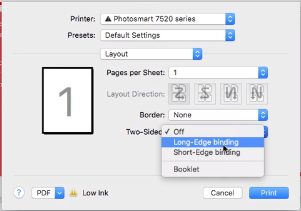
- It depends on where you bind your stacked documents after printing. If you prefer binding your documents on the longer side of your page, then you need to select the “Long edge bending” option. If you want to bind your all document pages to the shorter side, then select the “Short edge bending” option. You have to choose from these two options because the printer sets up the sequence and sets the format of the pages according to your choices.
- When you have finished making your changes, click on the “Print” option. You will see that the printer has printed your documents on both sides according to your instructions.
Summary: How to turn on two-sided printing on Mac?
- Swipe in from the right edge of the screen, and then tap Settings. (If you're using a mouse, point to the lower-right corner of the screen, move the mouse pointer up, and then click Settings.)
- Tap or click Devices.
- Tap or click Printers > Add a printer or scanner.
- Tap or click The printer that I want isn't listed > Add a local printer or network with manual settings > Next.
- Tap or click Have Disk.
- Tap or click Browse.
- Locate and then tap the appropriate Printer Model INF file for your printer by doing one of the following: If you are prompted for an administrator password or confirmation, type the password or provide confirmation. NOTE For this example, use HP LaserJet 1020 INF as an example INF file name.
- Tap or click Open
- When you are prompted to use the driver that is currently installed (recommended), tap or click Use the driver that is currently installed (recommended).
- Under Device type, tap or click Show all devices, and then tap or click Next. Under Manufacturer in the Install the printer driver dialog box.
