Have you ever asked yourself why is Google Chrome so slow? You're not the only one. There are numerous discussions related to this topic on the internet. Some people claim the browser is a memory hog. Others say the way it handles large number of tabs is what slows it down. In this article, I'm going to answer that question once and for all.

Perhaps one of the most popular browsing tools today is Google Chrome. Without a doubt, it is one of the most reliable, stable, and user-friendly browsers out there. Kudos to Google for launching a great browsing tool.
However, despite the numerous positive aspects of Chrome, it is still not perfect and many users have reported several issues. One of which is that Chrome sometimes runs slowly. In this article, we will tackle what makes Google Chrome run slowly and quick fixes.
What makes Google Chrome so slow?
Whether you are using chrome for gaming, watching videos, or doing work, browser lag is something very irritating. Luckily, the reasons for this are fairly simple and its fixes are easy as well.
1). Cache and browsing data
One common reason why Chrome is slowing down is because of too much accumulated cache and browsing data. We highly recommend cleaning your cache now and then. Besides, accumulated internet data greatly influences your browser’s speed.
Similarly, your browsing history also adds to browser lag. To maintain a stable browser speed, you need to periodically clean your cache and browsing data.
To do so, simply click the setting button on Google Chrome. It is located on the upper right part of chrome just below the close button. The settings button icon looks like 3 dots aligned vertically.
Click on the History selection and when the mini window appears, click on History again. Doing so will open a new tab in chrome. In the History tab, locate the Clear browsing data button on the left panel and click it.
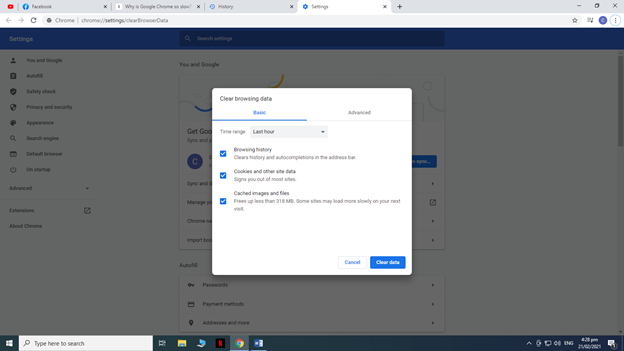
It will redirect you to a different tab with the Clear browsing data window open. You can choose between Basic and Advanced tabs. For this method, we will only be focusing on the Basic tab.
First, click on the drop-down button for the time range. For best results, you should select All time. This will delete all selected options since the beginning of chrome on your pc. Next put a checkmark on the options Browsing history, Cookies, and other site data, and Cached images and files.
Click Clear data and wait until the process ends. Restart Google Chrome and check if your browser speed has significantly increased.

2). Too many extensions
In Chrome, you can add extensions to help optimize your browsing experience. However, too many extensions can eat up browser performance causing it to lag. Extensions have specific purposes and some of them may have been only used once and you don’t need them anymore.
To optimize your browser’s speed, remove unneeded extensions. There may also be extensions that you might need in the future but you seldom use them. If you don’t want to remove them, you can simply disable them. This will also improve your browser’s performance.
To find out what extensions you have installed, click on the Settings button of chrome again and then go down and click on Settings.
This will open and redirect you to the settings tab. On the right side, you will see a panel with different options. Click on Extensions.
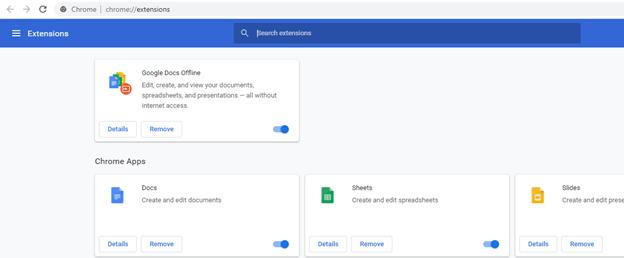
Once again, you will be redirected to a different tab. In the Extensions tab, you will see all the extensions that are currently installed on chrome. Click the corresponding Remove button on each extension to remove it. To disable the extension, just click on the corresponding toggle on each extension.

3). Update Chrome
Lastly, your browser speed may drop if it is not up-to-date. Fortunately, Google Chrome automatically updates itself when new updates are available. To check whether your browser is up to date, go to settings, help, and then click About Chrome.
Summary: Why is Google Chrome so Slow?
- Chrome is a browser that's known for being fast and responsive.
- So why is it so slow?
- The long answer is that Chrome has many different parts to it, including several rendering engines.
- Google Chrome was originally written in C++ and has a lot of legacy code from when it started. There are some significant things to keep in mind about these two bits of information.
- When rendering pages, the page itself sends instructions to the browser about how to render them (sometimes called CSS).
- Different browsers interpret them differently, which can make pages render differently across browsers.
- Because of C++'s speed and flexibility, a lot of web browsers have been written in this language. This means that many rendering engines exist and there is no clear consensus on what the best one is. Chrome uses its own rendering engine, Blink.
- The other thing to keep in mind is that many applications use C++ because most operating systems have libraries written in C or C++. It means that they can be used by many other programs without having to be rewritten for each OS.
- Android uses Java as its primary language, but many libraries are written in C.
Conclusion
These are the most common causes as to why Chrome lags. We hope that these fixes work for you and will improve your browsing experience. Good luck with the fixes!