Are you a hardcore gamer? If so, you’re probably interested in knowing how to access the NVIDIA Control Panel on Windows 10. It should come as no surprise that Nvidia has made it easy for gamers and power users to customize their experience to squeeze out every last bit of performance from their graphics card.
If you have an NVIDIA graphics card, you will notice that you have an NVIDIA Control Panel that pops up in your taskbar. However, Microsoft requires the NVIDIA Control panel to not be included in the driver package included with Windows. NVIDIA Control Panel is instead distributed officially through the Microsoft Store. It is installed automatically after installing an NVIDIA driver.
The NVIDIA Control Panel is a program that lets you easily adjust the hardware settings of your media processor (MCP) and graphics card (GPU)
Here are the minimum system requirements for the NVIDIA Control Panel App:
- X64 Bit CPU
- NVIDIA GPU with DCH1 driver installed
- Windows update service
- Active internet connection
- Microsoft Windows 10 Fall Creators Update or newer (version 1803 build 17134 or later)
Don’t worry if the NVIDIA control panel doesn’t automatically install during an NVIDIA driver installation. You can still manually install the program by visiting the Microsoft store and searching the term “NVIDIA Control Panel”. Alternatively, you can visit this link to immediately get there. Before this program was available, users had to dive into the BIOs of their computers. There are multiple ways you can access the NVIDIA Control Panel in Windows 10.
How to access the NVIDIA Control Panel in Windows 10?
- The fastest way to check or access the NVIDIA Control Panel is to right-click on your desktop. A pop-up window will appear. Refer to the image below for visuals.
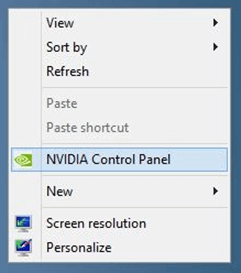 If the NVIDIA Control Panel is properly installed, the option above will be available. Press Left-Click on it and it will open the program.
 - Using the Run command
If the NVIDIA control panel option doesn’t come up using the right-click menu technique, there are other ways you can still access it. One of these is the run command.
Press the “Windows + R” keys on your keyboard at the same time. This will open the “Run” window.
Next, type “control” in the box and press enter and ok to open your PC’s control panel. Refer to the image below for visuals.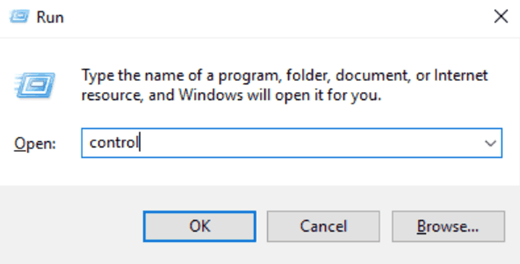
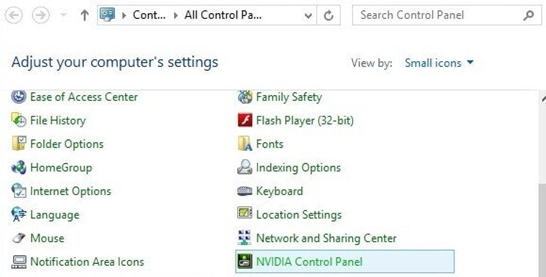
- Once inside the PC control panel, find the NVIDIA Control Panel option. Refer to the image below for how that looks.
- Now you can access the NVIDIA Control Panel through your PC’s control panel.
- If you want to add the NVIDIA Control Panel to the drop-down menu, you can. Select the desktop dropdown menu in the menu bar.
- Next, you need to check the box that says “Add Desktop Context Menu”
Once the box is checked, the NVIDIA Control Panel icon will appear on the right-click pop-menu on your Desktop.
NVIDIA Control Panel isn’t opening at all? Here’s how you can fix it
One of the most common reasons is that you’ve recently updated your system to Windows 10 or a newer version of it. This can cause some issues with the NVIDIA control panel due to it being out of date.
If that’s the case, you’re going to need to upgrade your NVIDIA driver software before the NVIDIA control panel can open properly. The most convenient way to update your NVIDIA drivers is by downloading and installing GeForce Experience.
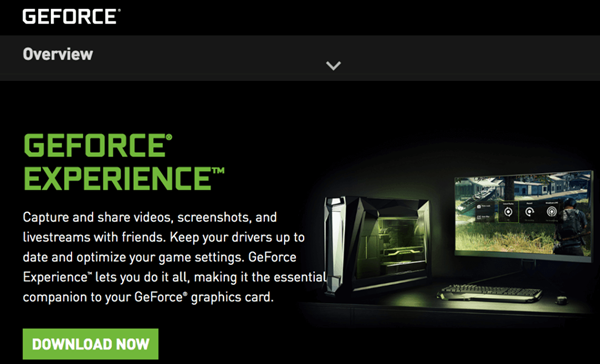
GeForce Experience is a program used to handle all your NVIDIA drivers and other rig needs. It can even optimize some games for you. Installing the program is relatively simple, you can follow the link provided above. Using GeForce Experience, you can update all of your NVIDIA drivers easily and effectively. This should fix any issues when trying to open the NVIDIA Control Panel.
Summary: Access the NVIDIA Control Panel in Windows 10
- Select the Windows icon.
- Click Settings.
- Select System > Display.
- Scroll down and select Advanced display settings.
- Select Display adapter properties for Display 1.
- The NVIDIA Control Panel can be accessed in Windows 10 via the Advanced display settings menu.
Conclusion
We hope that you’ve learned how to access the powerful program that is NVIDIA Control Panel. Now you can tweak hundreds of things, both hardware and software related.
